Table of Contents >> Show >> Hide
- Why a One-Sheet Plywood Leaning Shelf Works So Well
- Project Overview: What You’re Building
- Materials and Tools
- Cut List: One Sheet, Clean Layout
- How to Cut Plywood Without Losing Your Mind
- Build Steps
- 1) Shape the Side Panels (The Leaning Look)
- 2) Sand and Prep
- 3) (Optional) Add Edge Banding for a “Not Homemade” Finish
- 4) Mark Shelf Locations
- 5) Two Assembly Options: Choose Your Adventure
- 6) Install Cleats (Recommended Either Way)
- 7) Attach Shelves
- 8) Add a Top Stretcher (Stops the “Splaying” Problem)
- Finishing: Make It Look Like You Meant To Do That
- Safety: Anchor It (Seriously)
- Common Mistakes (So You Don’t Join the Club)
- Customization Ideas (Make It Yours)
- Conclusion
- Extra: Real-World Experience (500-ish Words of Lessons, Wins, and “Well, That Happened”)
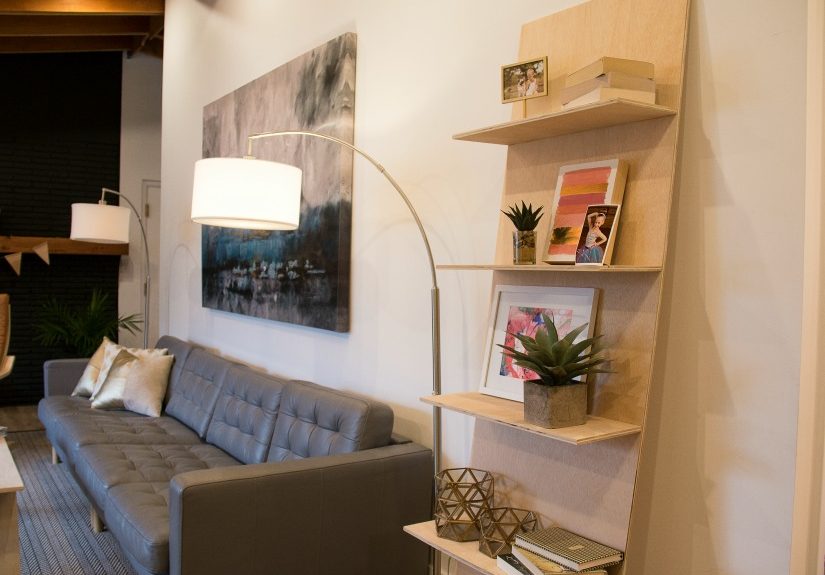
A leaning shelf is the woodworking equivalent of showing up to a party in a crisp white tee: simple, stylish, and it somehow makes everything around it look more put together. The best part? You can build a solid, good-looking leaning ladder shelf using one sheet of plywoodno pile of 2x4s, no “wait, why did I buy twelve different boards?” regret.
In this guide, you’ll learn how to design, cut, and assemble a one-sheet plywood leaning shelf that looks clean, stands sturdy, and won’t wobble like a baby giraffe. We’ll keep it beginner-friendly, but still legit enough that your handy friend will quietly respect you (even if they won’t say it out loud).
Why a One-Sheet Plywood Leaning Shelf Works So Well
A DIY leaning shelf is popular for a reason: it uses vertical space, it fits in tight rooms, and it makes your plants/books/decor look like they have a personal stylist. Using one sheet of plywood makes it even better because:
- Budget-friendly: fewer materials, fewer trips to the store, fewer “how did this get so expensive?” moments.
- Consistent look: one plywood face/veneer = a more uniform finish.
- Efficient build: a smart cut plan means less measuring chaos and fewer scraps you’ll “definitely use later.”
Project Overview: What You’re Building
This tutorial builds a leaning ladder shelf style unit with two plywood side panels and five shelves. It leans against a wall at a comfortable angle, with shelf depths that get deeper toward the bottom (because gravity is rude and heavier items deserve a stable spot).
Recommended Finished Size
- Height: about 84 inches (7 feet)
- Overall width: about 25–26 inches (depends on shelf width choice)
- Number of shelves: 5 (easy to adjust)
- Shelf depth range: 5 inches (top) to 12 inches (bottom)
Materials and Tools
Materials
- (1) 4×8 sheet of 3/4-inch plywood (cabinet-grade birch/maple looks great; sanded pine is fine)
- 1-1/4 inch wood screws (or pocket hole screws if you use a jig)
- Wood glue
- Iron-on edge banding (optional, but makes plywood edges look finished)
- Sandpaper (120, 180, 220 grit)
- Finish: paint, stain + clear coat, or wipe-on poly
- Wall anchor strap (highly recommendedmore on this later)
- Felt pads or rubber feet (optional, but kinder to floors)
Tools
- Circular saw (or table saw if you’re fancy)
- Straightedge guide (store-bought track or a straight board clamped down)
- Drill/driver + bits
- Clamps (helpful, not mandatory, but your future self will thank you)
- Measuring tape + pencil
- Speed square
- Sander (or sanding block if you enjoy turning time into dust)
- Household iron (for edge banding)
Cut List: One Sheet, Clean Layout
This cut list is designed to come entirely from one standard 48″ x 96″ plywood sheet. It assumes 3/4″ plywood and a shelf width of 24 inches. If you want a narrower shelf (for a tight space), you can reduce the shelf width and gain extra scrap for add-ons like lips or side trim.
Step 1: Rip the Sheet Into Two 24″ x 96″ Panels
Using a circular saw with a straightedge guide, rip the plywood lengthwise into two equal halves: 24″ x 96″ and 24″ x 96″. This makes the whole project way easier to manage.
Panel A (Sides)
- (2) Side panels: 12″ x 84″
You’ll cut these from Panel A by ripping it into two 12″ strips, then crosscutting to 84″. You’ll have a leftover piece about 24″ x 12″ (perfect for test cuts, shelf spacing jigs, or mistakes you swear were “on purpose”).
Panel B (Shelves + Cleats)
- (1) Bottom shelf: 24″ x 12″
- (1) Shelf 2: 24″ x 10″
- (1) Shelf 3: 24″ x 8″
- (1) Shelf 4: 24″ x 6″
- (1) Top shelf: 24″ x 5″
- (1) Top stretcher (back tie): 24″ x 4″
- (10) Shelf cleats (optional but recommended): 1-1/2″ wide, lengths matching shelf depths (2 per shelf)
Why cleats? Cleats turn your shelf from “pretty good” into “I could store actual books on this without fear.” They also make shelf installation less stressful because the shelf can rest on something while you fasten it.
How to Cut Plywood Without Losing Your Mind
Cutting plywood cleanly is 70% blade choice, 20% setup, and 10% resisting the urge to rush. Here’s how to get crisp cuts with a circular saw:
- Support the sheet on rigid foam insulation so the offcut doesn’t tear out at the end.
- Use a plywood/finish blade (more teeth = cleaner cut).
- Painter’s tape on cut lines helps reduce splintering.
- Measure your saw’s offset (blade-to-shoe distance) so your straightedge guide is actually guiding.
- Cut with the good face down if your saw cuts upward (most circular saws do).
Build Steps
1) Shape the Side Panels (The Leaning Look)
If you leave the side panels as simple rectangles, the shelf will still work. But tapering the front edge gives it that classic leaning bookshelf silhouette.
- Lay a side panel flat with the 84″ length vertical.
- On the top front corner, measure in and mark 6 inches.
- Connect that mark to the bottom front corner (12″ depth at the bottom).
- Cut along the line to create a clean taper.
- Repeat for the second side panel (stacking and cutting together helps them match).
Save the tapered offcuts. They’re surprisingly useful for temporary braces, test stains, and making you feel emotionally better about “waste.”
2) Sand and Prep
Sand now, not laterbecause sanding after assembly is like trying to shave while wearing a motorcycle helmet.
- Start with 120 grit to remove splinters and mill marks.
- Move to 180 grit for a smooth touch.
- Finish with 220 grit if staining (especially on shelf faces).
3) (Optional) Add Edge Banding for a “Not Homemade” Finish
Plywood edges are like the backstage of a theater: functional, but not meant to be on display. Iron-on edge banding covers exposed ply layers and makes the shelf look finished.
- Cut edge banding slightly long for each edge.
- Use a household iron (medium-high, no steam) and press slowly.
- Let it cool, then trim flush (a dedicated trimmer is easiest; a sharp utility knife works too).
- Lightly sand the edge banding for a seamless blend.
4) Mark Shelf Locations
Here’s a spacing layout that looks balanced and works for books and decor. Measure from the bottom of the side panel up along the back edge and mark the top surface of each shelf:
- Bottom shelf top at: 8″
- Shelf 2 top at: 24″
- Shelf 3 top at: 40″
- Shelf 4 top at: 57″
- Top shelf top at: 74″
Want a more “library” feel? Tighten spacing. Want it more “plant spa”? Increase spacing and give leafy things room to breathe.
5) Two Assembly Options: Choose Your Adventure
Option A (Fast + Forgiving): Slight Backward Tilt Shelves
This is the easiest way to build a plywood leaning shelf. You assemble shelves square to the side panels. When the unit leans, shelves tilt slightly backwardgreat for books and frames because things naturally stay put.
Option B (Plant-Friendly): Level Shelves
If you plan to store plants, mugs, or anything that hates angles, build with level shelves:
- Lean both side panels against a wall at your intended angle (bottom about 10–14″ from the wall is common).
- Clamp a shelf at the marked height.
- Use a level to make the shelf perfectly horizontal.
- Install cleats underneath while everything is clamped and level.
- Fasten the shelf to the side panels.
This takes longer, but it’s also the difference between “cute plant shelf” and “why is my potting soil sliding into the void?”
6) Install Cleats (Recommended Either Way)
Cut cleats from plywood scraps: about 1-1/2″ wide, with lengths matching each shelf depth. You’ll need two per shelf (one on each side panel), so 10 total.
- Place a cleat just below the shelf line mark on the inside face of the side panel.
- Apply glue, then pre-drill and screw it in place (2–3 screws per cleat).
- Repeat for each shelf location and for the other side panel.
7) Attach Shelves
- Set the shelf onto the cleats.
- Check alignment at the front edges (flush looks best).
- Pre-drill to avoid splitting and drive screws down through the shelf into the cleats.
- Add a couple screws through the shelf ends into the side panels if you want extra rigidity.
Pro tip: Start from the bottom shelf and work upward. Lower shelves stiffen the frame and make the rest easier.
8) Add a Top Stretcher (Stops the “Splaying” Problem)
A leaning shelf can slowly spread at the top if it’s not tied together. The fix is simple: add a top stretcher across the back.
- Cut a 24″ x 4″ piece of plywood.
- Attach it near the top back between the side panels (glue + screws).
- Keep it square so the shelf doesn’t twist.
Finishing: Make It Look Like You Meant To Do That
Paint
Paint hides plywood personality (including any tiny sins). Use primer first, then two coats. A satin finish is a crowd-pleaser.
Stain + Clear Coat
If you’re using birch/maple plywood, staining can look great. Apply wood conditioner first for a more even tone, then stain, then a clear protective coat.
Clear Coat Only
For a modern “natural wood” look, sand well and apply wipe-on polyurethane. It’s beginner-friendly and forgiving.
Safety: Anchor It (Seriously)
Because it leans, this shelf is stable, but not immune to physicsespecially if kids, pets, or enthusiastic adults exist in your home. Use a furniture anti-tip strap:
- Find a wall stud.
- Attach the strap near the top stretcher.
- Keep heavy items on the bottom shelf.
This takes 10 minutes and prevents 10 years of guilt. Worth it.
Common Mistakes (So You Don’t Join the Club)
- Skipping pre-drilling: plywood can split, especially near edges.
- Cutting before checking square: measure twice, cut once, cry never.
- Uneven floors: add felt pads or shims so it doesn’t rock.
- Forgetting edge finishing: raw edges scream “garage project.”
- Not anchoring: the shelf may be calm today, but life is unpredictable.
Customization Ideas (Make It Yours)
- Add a small front lip on each shelf (great for plants and frames).
- Drill a cable notch for charging stations on a middle shelf.
- Use contrasting finishes: painted sides + stained shelves looks sharp.
- Round over edges with a router for a softer, furniture-like feel.
- Go minimalist: fewer shelves, more open space, very modern.
Conclusion
Building a one-sheet plywood leaning shelf is one of those projects that hits the sweet spot: practical, good-looking, and achievable with basic tools. If you cut carefully, add cleats, and anchor it properly, you’ll have a sturdy DIY ladder shelf that looks right at home in a living room, bedroom, office, or “I swear I’m organizing this year” corner.
Extra: Real-World Experience (500-ish Words of Lessons, Wins, and “Well, That Happened”)
Here’s what actually happens when you build a leaning plywood shelf in real life (as opposed to the magical universe where every board is perfectly straight and your drill battery lasts forever).
First: the plywood sheet is always heavier than you remember. Even if you remember it being heavy. If you’re breaking down the sheet with a circular saw, do yourself a favor and set it on a foam insulation board. The first time I tried to cut plywood on sawhorses, the offcut sagged at the last inch of the cut, pinched the blade, and scared me into a new personality. Foam support turns the whole cut into a calm, controlled experiencelike switching from roller skates to normal shoes.
Second: shelf spacing is emotional, not mathematical. On paper, evenly spaced shelves look “balanced.” In practice, you’ll realize you own at least one tall thing (a vase, a speaker, a plant that has dreams) that refuses to fit on an evenly spaced shelf. That’s why I like marking shelf locations with painter’s tape first, then physically stacking a few of the items you plan to store. It’s a quick reality check before you commit to screw holes that will haunt you forever.
Third: edge banding is a small effort with a huge payoff. The first time you apply it, it feels like arts-and-crafts hour. Then you step back and realize the project suddenly looks like furniture instead of “something I made from a sheet good behind the shed.” The trick is patience: slow iron passes, let it cool, then trim cleanly. And if you mess up one small section? Congratulations, you’ve just discovered why trim existssand it lightly and move on like a professional.
Fourth: the “lean” is adjustable, and that’s both good and sneaky. A shelf that leans more aggressively looks dramatic and takes up less floor space, but it can also make shallow top shelves feel almost decorative-only. A gentler lean is more functional but can look a bit less “designer.” The best compromise I’ve found is setting the bottom about a foot from the wall on a 7-foot-tall unit. It looks intentional, feels stable, and doesn’t demand that you rearrange the room to accommodate it.
Finally: anchoring is not optional if you plan to live like a normal human. Even a sturdy leaning shelf can shift if someone bumps it while vacuuming, a pet launches off it like a stunt double, or a kid decides the bottom shelf is a step. A simple wall strap turns it into a “this is staying put” piece of furniture. And once it’s anchored, you’ll feel comfortable putting heavier books on the lower shelf without the tiny voice in your head whispering, “Is this how it ends?”
The best part? After you build one, you start seeing one-sheet projects everywhere. You’ll look at a blank wall and think, “I could put a leaning shelf there.” That’s how it starts. Today it’s a shelf. Tomorrow you’re building matching nightstands and referring to plywood by species like it’s a fine wine.