Table of Contents >> Show >> Hide
- Before You Start (So You Don’t Yell at Your Phone)
- How to Add Multiple Pictures to a Snapchat Story (13 Steps)
- Open Snapchat and land on the Camera screen
- Open Memories
- Switch to Camera Roll (or the Home tab)
- Enter selection mode (multi-select)
- Tap each photo you want to add to your Story
- Sanity-check your selection
- Tap Send / the arrow button
- Choose My Story (and any other Story destinations)
- Preview and edit each photo like a responsible storyteller
- Keep it vertical-friendly (9:16 is your best friend)
- Watch for “Camera Roll” labels, borders, or timestamps
- Post it
- Confirm your Story looks rightand fix it fast if it doesn’t
- Shortcut Methods (Because You Have a Life)
- Pro Tips to Make Multiple Photos Feel Like One Great Story
- Troubleshooting: When Snapchat Refuses to Cooperate
- Extra Feature Worth Knowing: Quick Cut (Turn Photos into a Beat-Synced Video)
- Conclusion
- Real-World Experience: What Actually Works (and What I’d Never Do Again)
Snapchat Stories are basically the modern-day campfire: you gather your people, you tell a tale, and everyone pretends they’re not emotionally invested… while watching the whole thing twice. The only problem? Posting multiple pictures can feel like juggling flaming torches while riding a unicyclefun, but one wrong move and your friends get 17 separate “oops” snaps.
The good news: adding multiple photos to a Snapchat Story is totally doable, and once you know where Snapchat hides the buttons (like a mischievous raccoon), it’s fast. This guide walks you through the cleanest method using Memories + Camera Roll, plus a couple of pro shortcuts for iPhone and a “rapid-fire” option for capturing new shots with Multi Snap.
Before You Start (So You Don’t Yell at Your Phone)
1) Update Snapchat and check permissions
First, make sure your Snapchat app is up to date. Then confirm Snapchat can access your photos. If you don’t grant photo access, Snapchat can’t magically pull images out of your camera roll (it’s an app, not a wizard).
2) Know which Story you’re posting to
Most people mean My Story (your standard Story). But Snapchat also lets you post to other places like a Private Story, Shared Story (collab), or even your Public Profile if you use creator features. The steps below work best for My Story, but you’ll see options for others when it’s time to choose where to post.
How to Add Multiple Pictures to a Snapchat Story (13 Steps)
These steps are optimized for posting a batch of photos from your phone’s camera roll into one continuous Story flow. (Translation: fewer taps, fewer regrets.)
-
Open Snapchat and land on the Camera screen
Launch Snapchat. If you’re not on the camera view, swipe until you are. The camera screen is “home base” for most Story actions.
-
Open Memories
Swipe up from the camera screen to open Memories. On many versions of the app, you can also tap the small Memories icon near the shutter. Either way, you’re aiming for the grid of saved snaps and camera roll media.
-
Switch to Camera Roll (or the Home tab)
In Memories, find the tab labeled Camera Roll (some layouts also show “Home,” which surfaces a mix of items). Tap Camera Roll so you’re viewing photos and videos from your phonenot just snaps you previously saved in Snapchat.
-
Enter selection mode (multi-select)
Look for a Select option or a checkmark icon. Tapping it puts Memories into “shopping cart mode,” meaning you can pick more than one photo at a timewithout doing the “post one… go back… post one… spiral into chaos” routine.
-
Tap each photo you want to add to your Story
Select multiple images by tapping them one by one. You’ll see checkmarks (or a counter) indicating what’s selected. Choose the pictures that tell a story, not just “here’s my lunch from six angles.” (Unless the lunch is truly iconic.)
-
Sanity-check your selection
Before you post, pause for one second and confirm you selected the right items. This is how you avoid accidentally uploading a screenshot of your bank balance or the blurry photo you took while running.
-
Tap Send / the arrow button
Once your photos are selected, hit the action buttonusually a paper plane or arrow. This moves you toward the “Send To” screen where you choose where your photos will go.
-
Choose My Story (and any other Story destinations)
On the Send To screen, select My Story. Depending on your account and settings, you may also see other Story destinations. Snapchat can let you add the same snap to multiple Story locations from this screen (handy when you want it in My Story and elsewhere).
-
Preview and edit each photo like a responsible storyteller
After choosing where to post, Snapchat may let you review or edit. Add captions, stickers, doodles, music, or filtersjust don’t bury the whole photo under 47 tiny emojis (unless your brand is “chaotic sparkle goblin,” in which case: proceed).
-
Keep it vertical-friendly (9:16 is your best friend)
Snapchat is built for vertical media. If you post wide photos, they may appear cropped or letterboxed. If a photo looks awkward, crop it before posting, or use Snapchat’s edit tools to reframe it so the important part stays in view.
-
Watch for “Camera Roll” labels, borders, or timestamps
Snapchat sometimes visually marks camera roll uploads so viewers know it wasn’t captured in-app. If you’re trying to keep everything looking consistent, consider importing key images into Memories first, or use the app’s built-in tools to make them feel more “Snap-native.”
-
Post it
Tap Send (or Post) and let Snapchat upload your photos. Keep the app open and stay on a stable connection if you’re posting a larger batch. If you bounce to another app mid-upload, Snapchat may decide you didn’t really mean it (dramatic much?).
-
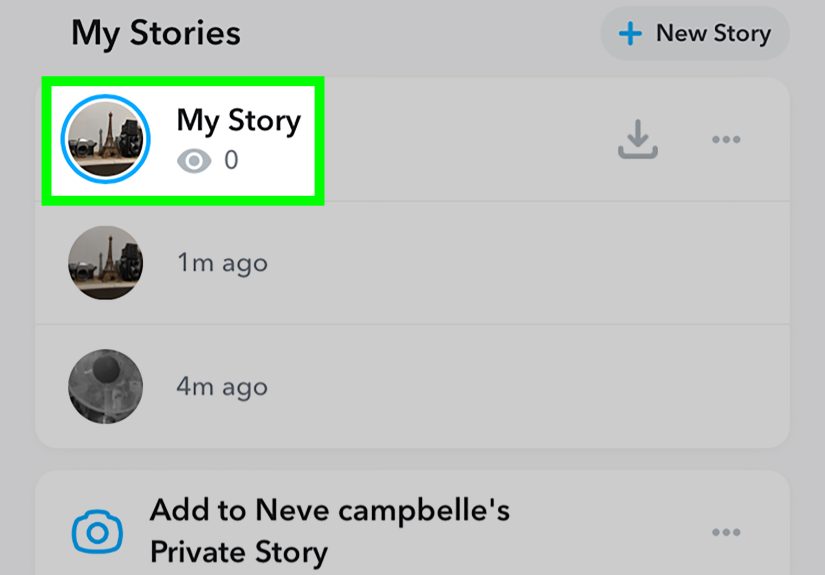
Confirm your Story looks rightand fix it fast if it doesn’t
Go to your Profile or Stories screen and watch your Story in order. If something is out of place, blurry, or accidentally includes that photo of your thumb, remove the offending snap and repost the corrected version.
Shortcut Methods (Because You Have a Life)
iPhone shortcut: Share from Photos straight to “My Story”
On iOS, you can sometimes send a photo directly to Snapchat via the iPhone Share button and choose My Story as a share optionuseful when you’re already organizing photos in Apple Photos and don’t want to hop through extra menus.
Rapid-fire option: Use Multi Snap to capture a batch in seconds
If the “multiple pictures” you want are ones you’re taking right now, Multi Snap is the fastest way. It’s designed for capturing several photos/videos quickly, then reviewing and editing each one before posting. Great for concerts, birthdays, sports, or any moment where blinking means missing the shot.
“Compilation” option: Create a Story directly from Memories
Snapchat also lets you create a Story from selected Memories. This is ideal when you want to bundle a set (like a trip day, an event, or a “glow-up timeline”) into a neat, named Story package before sharing.
Pro Tips to Make Multiple Photos Feel Like One Great Story
Think in beats, not in dumps
A solid Story usually has a beginning (context), middle (the good stuff), and end (wrap-up). If you post 12 photos, try grouping them: arrival → highlights → funny moment → sign-off. Your friends will follow the narrative instead of just tapping through a digital junk drawer.
Don’t fight the orderplan for it
When selecting multiple items from Memories/Camera Roll, Snapchat may arrange them based on timestamps. The simplest hack is to select photos that are already in the order you want your audience to experience. If you need a specific sequence, post manually in that order (yes, more workbut also more control).
Make text readable in one second
Stories move fast. If your caption needs a paragraph, it should probably be a blog post (like this one). Keep Story text short, high-contrast, and placed where it won’t be covered by UI.
Use one “style rule” for consistency
Pick one recurring elementsame font style, same emoji vibe, same color theme, or the same kind of sticker. It makes a multi-photo Story feel intentional instead of accidental.
Troubleshooting: When Snapchat Refuses to Cooperate
“I can’t select multiple photos.”
- Make sure you’re in Memories and have tapped the checkmark/Select mode.
- Update Snapchat if the UI looks different from what you’re expecting.
- Try long-pressing an item in Memories; some versions jump into multi-select from a press-and-hold.
“My Camera Roll doesn’t show up.”
- Check iPhone/Android permissions: Snapchat needs photo access.
- In Snapchat settings, look at Memories-related options if Camera Roll access is restricted.
- If needed, import selected items into Memories first, then share from there.
“Why is there a border/label on my uploaded photo?”
Snapchat has historically distinguished camera roll uploads from in-app captures. If the look bugs you, experiment with importing to Memories and editing in Snapchat, or lean into it: add a “Throwback” caption and own the vibe.
“My batch upload is blurry.”
- Post while on strong Wi-Fi or solid cellular data.
- Avoid posting 30 high-res items at once if your connection is shakybreak it into two smaller uploads.
- Crop/resize giant photos before uploading if they’re extremely high resolution.
Extra Feature Worth Knowing: Quick Cut (Turn Photos into a Beat-Synced Video)
If your “multiple pictures” are really meant to feel like a montage, Snapchat has introduced tools that can stitch photos and clips into a short, shareable edit right inside the app (often with music and beat timing). It’s not the same as posting separate photos, but it’s a slick alternative when you want “one Story moment” instead of 20 taps.
Conclusion
Posting multiple pictures to a Snapchat Story isn’t complicated once you know where the multi-select lives. Use Memories to grab images from your Camera Roll, select them in one go, choose My Story, then edit just enough to make it feel like a story (not a storage upload). And when you’re capturing new moments fast, Multi Snap is your best friend. Now go forth and post responsiblyyour friends’ thumbs will thank you.
Real-World Experience: What Actually Works (and What I’d Never Do Again)
Here’s the honest truth: the first time you try to add multiple pictures to a Snapchat Story, you’ll feel extremely confident… right up until Snapchat shows you the Send To screen and your brain briefly forgets how fingers work. I’ve watched people post a single photo, go back, post the next, go back againlike they’re building a Story one emotional breakdown at a time. The multi-select method fixes that, but there are a few “real life” details that matter way more than the basic steps.
The biggest upgrade I’ve learned is to choose photos that already flow. Snapchat Stories are fastyour viewers are basically speed-reading your life. If you mix “friend group photo,” “random screenshot,” “ceiling,” “food,” “zoomed-in ear,” then “sunset,” your Story feels like your camera roll fell down the stairs. Instead, I batch-select like I’m editing a tiny magazine spread: opener photo (sets the scene), two to five highlights, then one closer (a funny moment or a final shot). This is especially clutch for events like weddings, trips, or birthdays where you took 80 photos but only 10 of them are truly Story-worthy.
Second: vertical is not optional if you care about presentation. I used to upload wide landscape photos and wonder why everyone looked like they were trapped in a tiny rectangle. Now I either crop ahead of time or I use Snapchat’s edit tools to reposition the image so the important stuff is front and center. If you’re sharing a group shot, zoom it so faces aren’t microscopic. If you’re sharing food, let the food be the main character. (No disrespect to your hand holding the taco, but still.)
Third: when posting multiple photos, captions should be consistent. I once added a different font and vibe on each snapone was minimalist, one was neon chaos, one was “I discovered stickers for the first time,” and the result looked like five different people hijacked my account. Now I pick one simple style: same font family, similar size, and I only use emojis like seasoning, not the whole spice rack. The Story instantly feels more polished, even if the photos were taken in the wild with questionable lighting.
Fourth: you will eventually hit the “why is Snapchat labeling this?” moment. Camera roll uploads may look different than in-app captures. The best approach is to treat that as a creative cue: call it a throwback, add a “from the vault” caption, or intentionally post a quick “context snap” first (taken in Snapchat) so the rest feels framed as a curated set. People don’t mind old photosthey mind confusion. Give them the plot.
Finally, here’s the mistake I’m begging you not to repeat: don’t post 25 photos just because you can. The average friend will tap through a long Story like it’s an unskippable adfast, emotionally distant, and slightly resentful. If you have a lot to share, consider splitting content: a short “best-of” Story now, and the deeper cuts lateror turn it into a quick montage-style edit. Your Story will perform better, feel more intentional, and you’ll still get to share the memories without turning your audience into cardio thumb athletes.