Table of Contents >> Show >> Hide
- First, Decide: Full Sanding or Just a “Screen and Recoat”?
- Tools That Make (or Break) the Job
- Prep Work: The Part Everyone Skips (Then Regrets)
- The Grit Roadmap: How to Sand Without “Mystery Scratches”
- Drum/Belt Sander Technique: Get Smooth, Not Grooved
- Edging Without Swirls: The Make-or-Break Zone
- Dust Control and Safety: Your Lungs Are Not Shop-Vacs
- Fill, Patch, and Fix: When to Use Wood Filler
- To Stain or Not to Stain
- Choosing a Finish: Oil vs Water-Based Polyurethane
- Troubleshooting: Fix Problems Before Finish Locks Them In
- Pro Tips That Make Your Floor Look Professionally Done
- Real-World “Experience Notes” People Learn the Hard Way (About )
- Conclusion
Hardwood floor sanding is one of those DIY projects that looks suspiciously simple on the internet: rent a machine, wave it around like a magic wand, and boombrand-new floors. In real life, sanding is more like giving your floor a haircut with a lawnmower. Do it right and it’s gorgeous. Do it wrong and you’ll spend the next week staring at “that one spot” like it personally insulted your family.
This guide breaks down how to get flawless floor sanding resultssmooth, even, and ready for stain or a clear finishwithout turning your house into a snow globe of dust. If you’re a teen (or just new to power tools), do this with a trusted adult. Floor sanders are powerful, heavy, and absolutely not impressed by confidence alone.
First, Decide: Full Sanding or Just a “Screen and Recoat”?
Not every floor needs to be sanded down to bare wood. The key is figuring out what kind of damage you’re dealing with:
- Screening (buffing) + recoat is best when the finish is dull or lightly scratched, but the wood itself isn’t gouged. This scuffs the old finish so a new topcoat bonds well.
- Full sanding is for deeper scratches, stains that soaked into the wood, uneven boards, heavy wear, or a color change (like going from honey oak to “espresso drama”).
If you see gray wood (water damage), deep pet stains, or worn-through finish in high-traffic lanes, you’re usually in full-sanding territory.
Tools That Make (or Break) the Job
For a true refinish, you typically need a small team of machinesthink of it as a sanding “band” where each member has a job and one of them is definitely too loud:
- Drum sander or belt sander: handles the main field of the floor. Fast, aggressive, and capable of leaving marks if you pause at the wrong time.
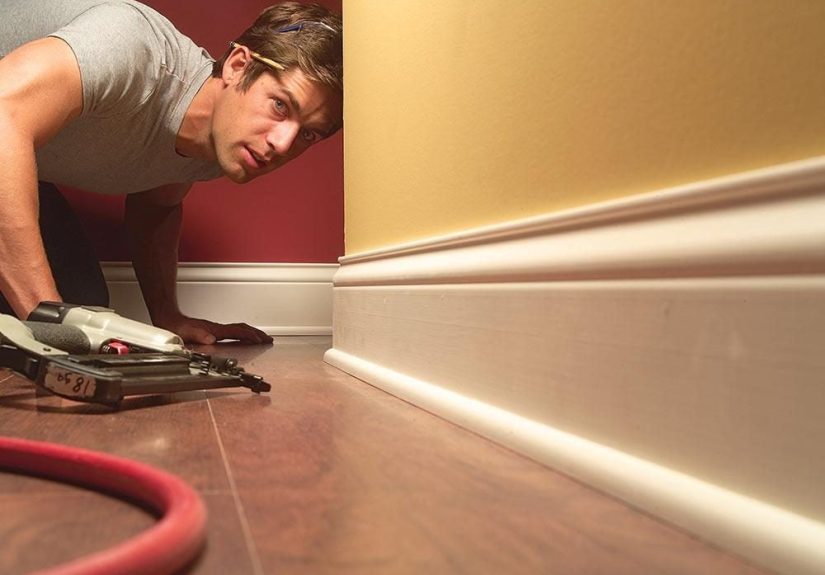
- Floor edger: gets tight to walls and baseboards. Also the #1 creator of swirl marks when used carelessly.
- Buffer/floor polisher with sanding screens: blends edger areas into the field and smooths between steps.
- Detail tools: carbide scraper for corners, hand sanding blocks, and sometimes a small random-orbit sander for closets and awkward zones.
- Dust control: shop vacuum with a good filter (HEPA is best), tack cloths or microfiber, and plastic sheeting to isolate rooms.
Pro move: Rent from a flooring specialty shop when possible. They’re more likely to have well-maintained machinesand staff who can show you how not to launch the drum sander like a startled kangaroo.
Prep Work: The Part Everyone Skips (Then Regrets)
Flawless sanding is 30% sanding and 70% not doing something that ruins sanding.
Room prep checklist
- Remove all furniture, rugs, and doors that swing into the room.
- Pull base shoe molding if you want a cleaner edge. If you can’t remove it, be prepared for careful edging.
- Seal doorways with plastic, cover vents, and turn off forced-air HVAC while sanding to avoid dust redistribution.
- Set nails and staples below the surface with a nail setabrasives hate metal, and metal always wins.
- Replace damaged boards or secure squeaks before sanding. Sanding doesn’t fix movement; it just smooths it.
Old-house caution: If your home is older, be extra careful about dust and previous coatings. When in doubt, consult a professional for testing guidance, and prioritize containment and respiratory protection.
The Grit Roadmap: How to Sand Without “Mystery Scratches”
The secret to a smooth floor isn’t one magical gritit’s the sequence. Each grit removes the scratches from the grit before it. Skip too far ahead and you’ll leave deep scratches that the final pass can’t erase, no matter how hard you squint.
A common progression for stripping old finish and smoothing hardwood is:
- Coarse cut (level + remove finish): 36 or 40 grit
- Medium cut (remove coarse scratches): 50 or 60 grit
- Fine cut (refine): 80 grit
- Final smoothing: 100 (sometimes 120 depending on wood species and finish system)
Rule of thumb: Don’t “jump” more than one grit step at a time. Your floor will remember. And it will remind you under bright sunlight.
Drum/Belt Sander Technique: Get Smooth, Not Grooved
The drum or belt sander is the main event. It can also be the main disaster if you stop with the sanding surface engaged.
How to avoid stop marks
- Start moving first, then lower the drum. Reverse that when stopping: lift drum while still moving.
- Keep a steady pace. Too slow = deep cuts; too fast = uneven sanding and leftover finish.
- Overlap passes slightly (think “mowing the lawn,” not “painting stripes”).
- Watch the cord like it’s a mischievous snake. Keep it over your shoulder and out of the machine’s path.
Leveling tip: If the floor is cupped or wavy, you may need a more aggressive initial pass (and possibly a diagonal approach depending on flooring type). The goal is to flatten without over-thinning. When in doubt, start less aggressive and evaluate.
Edging Without Swirls: The Make-or-Break Zone
The edger is essential, but it’s also responsible for many “Why does the edge look different?” moments. Swirl marks usually come from using too coarse a grit too long, tilting the machine, or failing to blend with the field sanding.
Edger best practices
- Use the same grit progression along the perimeter that you used in the field.
- Keep the edger flat. Tilting creates gouges and crescent-shaped marks.
- Feather your edge zone so it blends into where the big sander reached.
- After edging, blend with a buffer and sanding screen (often 80–100) to erase the “edger signature.”
Swirl rescue: Fix swirls by sanding with the grain using the appropriate grit by hand or with a controllable sander, then blend outward so you don’t create a shiny “patch” that shows through the finish.
Dust Control and Safety: Your Lungs Are Not Shop-Vacs
Wood dust isn’t just annoyingit can be a health hazard. Treat dust control like part of the finish quality, because dust affects both your breathing and your topcoat.
- Wear a well-fitting respirator (not just a floppy paper mask).
- Use vacuum systems and empty bags safely. Fine dust is sneaky and airborne.
- Ventilate when possible, but don’t blow dust into the rest of the house.
- Keep the workspace free of ignition sources when using solvent-based products later.
If you’re chasing “dustless sanding,” aim for “dust-minimized sanding.” Even pro setups capture most dustnot all. The goal is to control it, not pretend it doesn’t exist.
Fill, Patch, and Fix: When to Use Wood Filler
After your first coarse pass, the floor will reveal its secrets: gaps, nail holes, dents, and questionable life choices from previous owners.
Common repair approaches
- Loose boards: re-secure before final sanding so edges don’t move and crack finish later.
- Small holes and minor gaps: use a compatible wood filler (often trowel filler for many small gaps).
- Large gaps or missing wood: consider slivers/strips of wood or board replacement rather than thick filler blobs.
Fill at the right time: many refinishers do repairs after the first cut, then sand again so filler ends up flush and smooth.
To Stain or Not to Stain
Stain is optional. Natural clear-coated wood looks classic and often hides dust better than very dark stains. Stain is great when you want a specific lookbut it adds steps and increases the need for uniform sanding.
Stain success rules
- Test first in a hidden area or on a spare board. Wood species vary; so do surprises.
- Keep sanding consistent across the whole flooruneven sanding can cause blotchy absorption.
- Stir, don’t shake. Shaking can introduce bubbles that show up as little finish hiccups later.
- Wipe stain evenly and follow recommended wipe times for your product.
Example: If you sand the center to 100 grit but stop edging at 60 grit, stain will often look darker and rougher at the perimeter. That’s not “rustic charm.” That’s a sanding mismatch wearing a fake mustache.
Choosing a Finish: Oil vs Water-Based Polyurethane
Your topcoat determines durability, sheen, and how quickly you can reclaim your room.
- Oil-based polyurethane: tends to amber/warm over time, has a stronger odor, and often takes longer between coatsbut it’s known for toughness and a classic look.
- Water-based polyurethane: dries faster, stays clearer (less amber), and usually has lower odorgreat when you want a lighter, more “raw wood” tone.
Either can work beautifully. The key is clean conditions, correct recoat timing, and enough coats for traffic (often 3, sometimes more depending on the system).
Between coats: screen, clean, repeat
Lightly “screen” (buff) between coats when recommended by the finish manufacturer. Then vacuum thoroughly and wipe with a clean microfiber cloth. This improves adhesion and helps avoid peeling.
Troubleshooting: Fix Problems Before Finish Locks Them In
Most sanding problems are easier to fix before you apply stain or polyurethane. Here’s what to watch for:
Common issues
- Drum lines/stop marks: caused by pausing with drum down. Fix by re-sanding that zone with the right grit and feathering out.
- Edger swirls: caused by aggressive edging and poor blending. Fix with with-grain sanding and buffer blending.
- Chatter marks: often from machine issues, worn abrasives, or uneven pace. Check equipment and technique.
- Blotchy stain: usually inconsistent sanding or species issues. Re-sanding (yes, again) is often the real fix.
- Dust nibs in finish: improve cleaning, control airflow, and consider tack-wiping before coating.
Pro Tips That Make Your Floor Look Professionally Done
- Use bright, low-angle light (a work light near the floor) to spot scratches and swirls before finishing.
- Change abrasives often. Dull paper doesn’t sand; it polishes unevenly and overheats.
- Sand the exit path last. Plan your route so you’re not trapped in a corner like a sitcom character holding wet polyurethane.
- Keep the room stable. Moderate temperature and humidity help finishes cure predictably.
- Choose the right sheen. Satin and matte can hide minor imperfections better than high gloss.
Real-World “Experience Notes” People Learn the Hard Way (About )
In real homes, flawless floor sanding isn’t just a checklistit’s a series of “aha” moments that usually arrive covered in sawdust. One of the biggest is how quickly the floor tells on you. The moment you think, “This is probably fine,” the sunlight later will reveal a faint edger halo near the baseboards, like the floor is highlighting your mistakes with a highlighter pen.
Another common experience: the first time you start a drum sander, your brain expects it to glide politely. Instead, it has the enthusiasm of a shopping cart with a wobbly wheel. People often describe the first few passes as “learning to steer,” and that’s accurate. Once you find a steady pace, you’ll notice something satisfying: the old finish disappears in clean ribbons, and the wood grain wakes up. It’s the DIY equivalent of peeling the protective film off a new phoneexcept louder and with more personal growth.
The perimeter is where confidence goes to be humbled. The edger feels manageable because it’s smaller, but it’s also easier to tilt without realizing it. Many first-timers figure out that pressure is not the solution. If the edger isn’t cutting well, it usually needs fresh sandpapernot your full body weight. A gentle, controlled pass with the right grit beats an aggressive pass that creates swirls you’ll chase for hours.
People also discover that sanding is a cleanliness project disguised as a tool project. You vacuum, then vacuum again, then somehow vacuum dust off a surface you swear you already vacuumed. And just when you’re feeling smug, you find a dust bunny hiding under the radiator like it pays rent. This is why pros obsess over dust control: dust isn’t just messyit’s a finish defect waiting to happen. Tiny dust particles can settle in wet polyurethane and create a texture that looks like your floor developed goosebumps.
Staining brings its own emotional arc. The first swipe looks dramatic, and the temptation is to speed up because it’s finally “pretty.” But the best-looking stains come from patience: maintaining a wet edge, wiping consistently, and not skipping your test patch. A classic real-world scenario is someone testing stain on a tiny corner, loving it, then realizing the full floor looks darker than expected because large areas reflect light differently. That’s not failureit’s a reminder that floors are basically huge mirrors for your decisions.
Finally, the finish stage teaches the art of waiting. Many people can handle sanding noise, lifting machines, and endless vacuumingbut waiting for coats to dry is where willpower is tested. The room sits there, glossy and perfect, and suddenly you need something that’s inside it. The smartest “experience tip” is simple: plan your life around the cure window. Move essentials out, block the area, and accept that socks become your temporary footwear of choice. When the last coat cures and you walk in on a smooth, even sheen, the payoff is realand it makes every dusty, noisy step feel worth it.
Conclusion
Flawless floor sanding comes down to three things: prep, a disciplined grit sequence, and blending (especially around edges). Add smart dust control and the right finish choice, and you’ll get a floor that looks professionally refinishedwithout hiring a crew or living in a construction zone forever. Take your time, fix flaws before finishing, and remember: the floor doesn’t care how tired you are. It only cares what grit you used.