Table of Contents >> Show >> Hide
- Know Your Enemy: Why Drywall Cuts Go Sideways
- Drywall Cutting Tools: What You Need (and What You’ll Wish You Had)
- Prep Like You Mean It: Setup for Cleaner Cuts and Less Mess
- Straight Cuts: The Score-and-Snap Method (Your New Best Friend)
- Step 1: Measure smart (because walls don’t always agree with each other)
- Step 2: Mark clearly and cut on the “waste” side
- Step 3: Score the face paperdon’t try to “sword fight” the whole board
- Step 4: Snap the board along the score
- Step 5: Cut the back paper to separate the pieces
- Step 6: Rasp for a factory-looking edge
- Rip Cuts, Skinny Strips, and the Tape-Measure Trick
- Cutting Outlet and Switch Openings Without Inventing New Swear Words
- Windows, Doors, and Big Openings: When “Hang First, Cut Later” Makes Sense
- Circles and Curves: Recessed Lights, Pipes, and “Why Is This Round?”
- Common Cutting Mistakes (and How to Fix Them Without Crying)
- Dust Control and Safety: Protect Your Lungs (They’re Kinda Important)
- Pro Habits for Perfect Drywall Cuts Every Time
- FAQ
- Conclusion
- Field Notes: of Real-World Drywall-Cutting Wisdom
- 1) The sharp blade rule is not a suggestion
- 2) “Perfectly tight” is often the wrong goal
- 3) Outlet cutouts fail because of confidence, not math
- 4) Big openings are easier when you let framing guide you
- 5) Power tools aren’t “better,” they’re “different”
- 6) The rasp is the quiet hero
- 7) A little planning beats a lot of patching
Cutting drywall looks like one of those jobs that should be easy. It’s basically a giant, flat rectangle, right?
How hard can it be to cut a rectangle… into another rectangle?
And yet, drywall has a special talent: the moment you get cocky, it punishes you with torn paper, crumbly edges,
and outlet holes that are somehow both “too big” and “not in the right place.” The good news is that perfectly
cut drywall isn’t magicit’s a repeatable process. The even better news is that once your cuts are clean,
finishing becomes easier, seams look tighter, and your mudding workload drops from “epic saga” to “short story.”
Know Your Enemy: Why Drywall Cuts Go Sideways
Drywall is a sandwich: paper face, gypsum core, paper back. The paper gives it strength and helps you control
cuts; the gypsum is strong-ish… until it isn’t. The “perfect cut” is less about brute force and more about
controlling the paper so the core breaks exactly where you want.
Most cutting disasters come from one of these:
- Measuring a space that isn’t square (because framing loves chaos).
- Cutting too deep too soon (tears paper, dulls blades, makes edges fuzzy).
- Using the wrong tool (power tools can be fast, but they’re not always cleanor polite to your lungs).
- Rushing cutouts (outlets, windows, vents… the “gotchas” of drywall life).
Drywall Cutting Tools: What You Need (and What You’ll Wish You Had)
The “90% of the job” kit
- Utility knife + fresh blades (sharp beats strong every time).
- Drywall T-square or long straightedge for laser-straight score lines.
- Tape measure + pencil (or a knife tick mark for quick work).
- Drywall rasp to clean and fine-tune edges without over-sanding your sanity.
For cutouts and “interior cuts”
- Jab saw / drywall saw for outlets, switches, HVAC vents, and small openings.
- Oscillating multi-tool for controlled plunge cuts (great, but blades can wear fast).
- Drywall router / spiral saw for speed on big openings (with a dust-cloud tax).
For circles (lights, pipes, and other round surprises)
- Hole saw for clean, repeatable circles (especially for pipes).
- Circle cutter to score a perfect ring before finishing the cut.
Pro tip: your “best tool” depends on the cut. A utility knife is king for straight cuts because it creates minimal
dust and clean edges. A saw (hand or power) shines for openings and curves. The trick is knowing when to switch.
Prep Like You Mean It: Setup for Cleaner Cuts and Less Mess
A perfect cut starts before the blade touches the board.
- Support the sheet on sawhorses or a flat surface so it doesn’t flex mid-cut.
- Clear your cutting zone so you’re not stepping over tools like it’s a home-improvement obstacle course.
- Protect the room if you’ll be sawing: plastic sheeting, drop cloths, and a vacuum plan.
- Wear PPE: eye protection, and a respirator or high-quality mask if dust is in play.
Drywall dust is sneakyfine particles hang in the air and end up everywhere (including places you didn’t know existed,
like the inside of your soul). If you can score-and-snap instead of sawing, you’ll dramatically reduce dust.
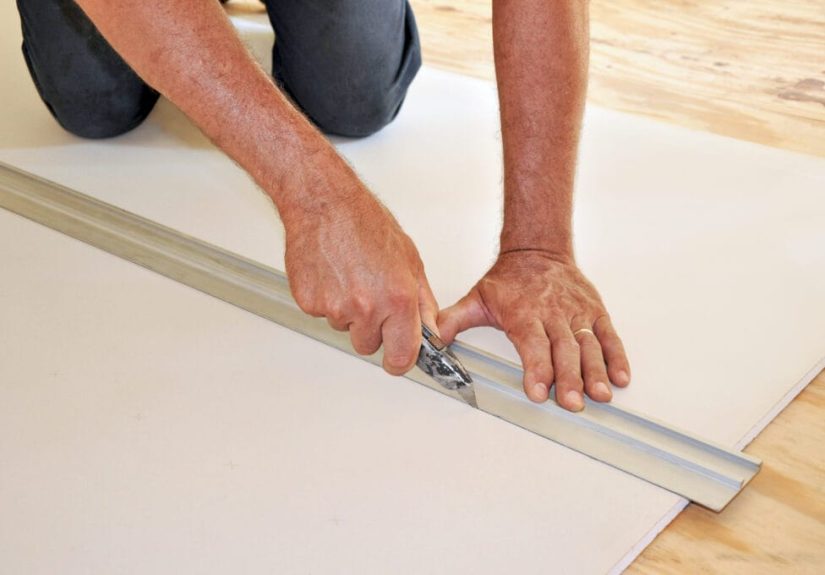
Straight Cuts: The Score-and-Snap Method (Your New Best Friend)
Most drywall cuts are simple straight linesand the cleanest way to make them is score-and-snap. Think of it like
tearing a perforated coupon… if that coupon weighed 50+ pounds and tried to fight back.
Step 1: Measure smart (because walls don’t always agree with each other)
Measure both ends of the opening (top and bottom, or left and right). If the measurements differ, use the smaller one
and fit the panel to realitynot to your hopes and dreams. For tricky spots, plan to leave a small gap (around 1/8 inch)
to make installation easier. Small gaps are easy to fill later; a too-tight panel is not.
Step 2: Mark clearly and cut on the “waste” side
Mark your line with a pencil (or a clean knife tick for speed). Always cut on the waste side of the line so the finished
piece doesn’t end up undersized.
Step 3: Score the face paperdon’t try to “sword fight” the whole board
Place your T-square/straightedge and make a steady score through the face paper and just into the gypsum. Light-to-medium
pressure is the move. If you’re muscling it, you’re doing extra work and dulling your blade faster.
Step 4: Snap the board along the score
Lift and bend the sheet so it snaps along the scored line. The key is snapping away from the scored side for a cleaner break.
Let the score do the workdrywall is not cardboard, and it does not appreciate being “folded with enthusiasm.”
Step 5: Cut the back paper to separate the pieces
Fold the board open like a hinge and slice the back paper along the crease. Congratulations: you’ve just made a clean,
straight cut without turning your room into a snow globe.
Step 6: Rasp for a factory-looking edge
Use a drywall rasp to smooth ragged gypsum and shave tiny adjustments. This is how you go from “close enough”
to “whoever hung this deserves a trophy.”
Extra pro move: whenever possible, cut to length first, then cut to width. Keeping factory edges intact
makes it easier to use a square and get straighter cuts.
Rip Cuts, Skinny Strips, and the Tape-Measure Trick
Need a long, narrow strip? You can do the standard T-square method, but there’s also a slick trick some pros use:
the tape measure becomes your guide. You anchor the hook where the cut starts, pinch the blade to the hook, and let the tape
act like a straight fence as you score.
Two warnings:
- Keep your free hand out of the blade path. Drywall is cheaper than ER copays.
- Use light pressure. The goal is a clean score, not a dramatic reenactment of a pirate movie.
Cutting Outlet and Switch Openings Without Inventing New Swear Words
Outlet cutouts feel high-stakes because they are. One wrong measurement and your drywall becomes an expensive art project.
Here are the most reliable ways to nail it.
Method A: Measure and draw the box outline
- Measure from the nearest edge(s) to the box location (horizontal and vertical).
- Transfer those measurements to the drywall and draw the outline.
- Double-check. Then check again. Drywall does not offer refunds.
- Cut with a jab saw (slow and steady) or an oscillating tool for a cleaner plunge cut.
Method B: Transfer the box location with a level (fast, accurate, low drama)
One clever approach is using a level to transfer the box position to the sheet without doing a bunch of math.
You mark the top and bottom of the box on the level, then transfer those marks to the drywall at the correct location.
This reduces “tape-measure gymnastics,” especially when the sheet is heavy and awkward.
Method C: Chalk or lipstick transfer (yes, really)
Coat the edges of the electrical box with chalk or old lipstick. Press the drywall sheet into place (without fastening),
then pull it offyour outline transfers to the back of the board like a DIY stamp.
Safety note (non-negotiable)
Turn off power at the breaker before working around electrical boxes. Make sure wires are safely pushed back in the box before cutting.
Your goal is a neat cutoutnot an impromptu light show.
Windows, Doors, and Big Openings: When “Hang First, Cut Later” Makes Sense
For large openings (like windows and doors), many pros hang the sheet over the opening first, then cut it out.
Why? It eliminates a bunch of measuring errors and lets the framing be your guide.
A clean method for big openings
- Hang the sheet over the opening.
- Use a drywall saw to cut the sides along the framing.
- Score the top line (often from the back), snap the waste forward, and cut the paper to free it.
Router/spiral saw option (fastest, dustiest)
A drywall router with a guide bit can trace the inside edge of framing quickly. Move carefully and keep controlthis tool
removes material fast, and it’s not shy about creating dust.
Circles and Curves: Recessed Lights, Pipes, and “Why Is This Round?”
Hole saws for clean circles
For recessed lights (commonly 4-inch or 6-inch holes) and pipe penetrations, a hole saw makes accurate circles with minimal fuss.
Use a template if your fixture provides one, mark carefully, then drill the hole.
Circle cutter + drywall saw combo (surprisingly precise)
A circle cutter can score a perfect ring, and then you can finish the cut with a drywall saw. This can be a nice compromise when
you want accuracy but don’t want to power-saw the entire neighborhood.
Curved cuts
For gentle curves, a jab saw works fine. For smoother curves, an oscillating multi-tool can helpjust go slow and let the tool do
the work. If you’re building truly curved walls, specialty gypsum boards exist specifically for tighter radii, but for most homeowners,
“curved cut” usually means “that pipe is not where I hoped it would be.”
Common Cutting Mistakes (and How to Fix Them Without Crying)
Mistake: The piece is slightly too big
Don’t force it. Shave the edge with a rasp, test fit, repeat. You want snugnot wedged in like you’re installing a vault door.
Mistake: The cutout is too small
Enlarge it gradually. Trim the edge with a utility knife or rasp, and sneak up on the final fit. Drywall rewards patience.
Mistake: The electrical box opening is too big
It happens. One repair-friendly approach is beveling the opening edge and filling the gap with fast-setting joint compound.
The cover plate can hide minor sins, and the compound handles the rest.
Mistake: Torn face paper
Cut away loose paper fibers cleanly, avoid ripping farther, and plan to seal/skim that area during finishing.
Torn paper can “bubble” under compound if it’s not stabilized.
Dust Control and Safety: Protect Your Lungs (They’re Kinda Important)
The cleanest drywall cuts come from a knife, not a saw. Scoring the face paper and snapping the board dramatically reduces dust.
When you do need to saw or sand, dust control matters.
Practical dust-control tips
- Choose score-and-snap whenever possible.
- Vacuum as you go (a HEPA vac is ideal if you have one).
- Isolate the workspace with plastic sheeting for renovations.
- Ventilate (open windows, use a fan to move air outnot deeper into your house).
- Wear proper PPEespecially eye protection and a respirator/mask when dust is airborne.
Handling safety (because sheets are heavy and awkward)
Drywall sheets are heavy and can flex or snap if mishandled. Store panels flat, lift with help when needed, and don’t try to “solo”
a giant sheet in a tight hallway unless you enjoy wrestling inanimate objects.
If you’re working professionally (or managing a crew), respiratory protection rules and training requirements can apply.
Translation: dust safety isn’t just “nice to have”it can be a compliance issue, too.
Pro Habits for Perfect Drywall Cuts Every Time
- Plan your layout to use as many full sheets as possible (fewer seams, less mudding).
- Measure both ends of openings and trust the smaller number when things aren’t square.
- Leave a tiny gap (around 1/8 inch) so sheets fit without forcing.
- Cut on the waste side of your line and “sneak up” on perfect.
- Change blades oftendull blades tear paper and wreck edges.
- Rasp, don’t panic-sanda rasp removes material cleanly and controllably.
- For openings, use templates (or transfer methods) whenever possible.
FAQ
What’s the best way to cut drywall with minimal dust?
Use the score-and-snap method with a sharp utility knife and a straightedge. Sawing creates more airborne dust.
Do I cut drywall from the front or the back?
For straight cuts, score the face paper (front), snap, then cut the back paper. For saw cuts, many pros cut from the face side
to protect the finished paper.
What’s the best tool for outlet cutouts?
A jab saw works well and is inexpensive. For speed, a drywall router can be very fastbut it takes practice and makes more dust.
Templates and transfer tricks help prevent miscuts regardless of tool choice.
How do I cut drywall already on the wall (repairs)?
For repairs, cut a neat rectangle or square around the damaged area using a drywall saw or oscillating multi-tool, then fit a patch.
Clean edges make the patch stronger and finishing easier.
Conclusion
Cutting drywall perfectly is a skill, but it’s not a mystery. Most of it comes down to three things: accurate marking, the right tool
for the cut, and controlled techniqueespecially score-and-snap for straight lines. Master those, and you’ll spend less time fixing
mistakes and more time enjoying the strangely satisfying moment when a panel fits like it was born there.
And if you do mess up? Welcome to the club. The difference between “beginner” and “pro” is mostly how calmly you fix itand how quickly
you swap to a fresh blade.
Field Notes: of Real-World Drywall-Cutting Wisdom
Here’s what seasoned DIYers and contractors tend to learn the hard wayso you don’t have to.
1) The sharp blade rule is not a suggestion
Drywall doesn’t dull a blade politely. One minute you’re scoring cleanly; the next you’re tearing paper like you’re opening a bag of chips
with oven mitts. If your score line looks fuzzy or the knife starts “skipping,” change the blade. The cost of a new blade is microscopic
compared to the time you’ll waste repairing torn paper and ragged edges.
2) “Perfectly tight” is often the wrong goal
New installers sometimes chase a friction-fit piece of drywall like it’s woodworking. But drywall finishing is forgivingmud and tape are literally
designed to hide small gaps. A tiny gap (think 1/8 inch) makes hanging easier and reduces broken corners. The real enemy isn’t a small gap;
it’s a sheet that won’t sit flat because you forced it into a space that isn’t square.
3) Outlet cutouts fail because of confidence, not math
The most common “oops” is measuring once, marking fast, and cutting fasterbecause you’re sure you nailed it. The most common fix is… measuring again.
Pros often use transfer tricks (level marks, chalk/lipstick) because they reduce the number of measurements and the number of chances your tape measure
can betray you. Also, cover plates forgive small imperfections, but they won’t cover “modern art.”
4) Big openings are easier when you let framing guide you
Windows and doors feel scary until you realize the framing is basically a built-in stencil. Hanging over the opening and cutting it out can be faster and
more accurateespecially when jambs aren’t installed yet. Just remember: saw the sides cleanly, score where it makes sense, and snap waste away in a controlled
way. It’s strangely satisfying when the waste piece drops out like a trapdoor.
5) Power tools aren’t “better,” they’re “different”
A drywall router can be a speed demon, but it also creates dust like it’s being paid by the particle. If you’re remodeling an occupied home, score-and-snap
and hand tools can be kinder to your furniture, your HVAC system, and your relationships. If you do use power tools, isolate the space and vacuum often. Your
future self (and everyone who lives with you) will be grateful.
6) The rasp is the quiet hero
A rasp doesn’t get the glory of a fancy tool, but it’s the difference between “it almost fits” and “it fits.” It’s also the best way to rescue a cut that’s
slightly oversized without destroying the paper face. If drywall had a mascot, it would be a rasp wearing a cape.
7) A little planning beats a lot of patching
Before you cut your first sheet, look at the wall layout and decide where seams will land. Fewer seams mean less mudding, less sanding, and less dust.
Drywall finishing is where time goes to vanish. Cutting and planning well up front is the easiest way to keep your schedule from turning into a miniseries.