Table of Contents >> Show >> Hide
- What You’re Building (And Why It Looks So Good)
- Parts and Tools You’ll Want on the Table
- Choosing Acrylic: Clear vs. Light-Guide
- Designing the Rainbow for Maximum Glow
- LEDs and Power: Don’t Let a Rainbow Become a Heater
- Microcontroller Options: Two Great Paths
- Where the Weather Data Comes From
- Turning Forecasts into Color: A Mapping That Feels Right
- Build Steps (High-Level, No Guesswork)
- Troubleshooting: The Usual Suspects
- Upgrades That Make It Extra
- Conclusion: A Forecast You’ll Actually Look At
- Real-World Maker Experiences: What It’s Like to Build and Live With One
- SEO Tags
A weather forecast is useful. A weather forecast that doubles as a glowing rainbow sculpture is dangerously useful
the kind of useful that makes you check the forecast just to watch the colors change. That’s the magic behind an
edge-lit rainbow weather display: you’re not just reading conditions, you’re seeing them spill across acrylic like light through a prism.
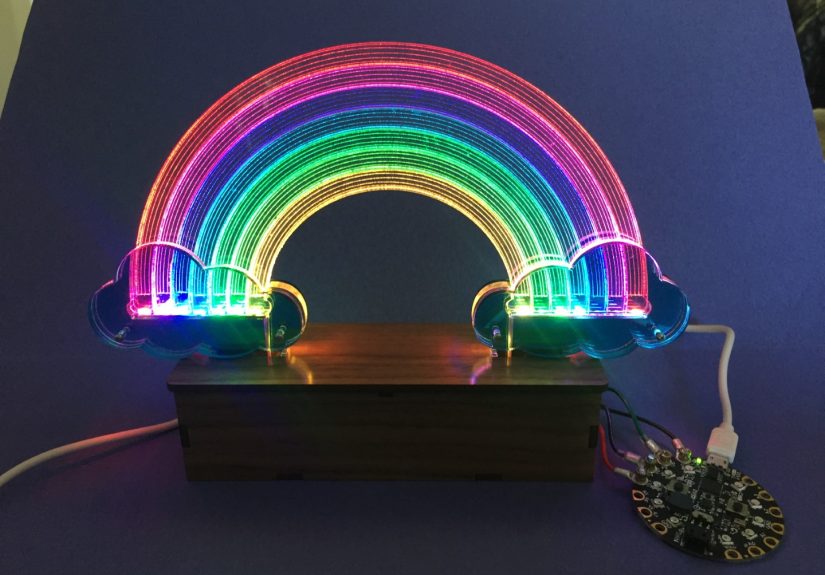
In this build, the “screen” is a laser-etched acrylic rainbow that lights up from the edges. RGB LEDs do the heavy lifting,
and a microcontroller translates live weather data into color gradients and animations. Sunny becomes warm, saturated bands.
Rain turns the rainbow cooler and moodier. Storms? The rainbow gets dramatic, because it’s allowed to have feelings.
What You’re Building (And Why It Looks So Good)
Edge lighting works because acrylic is basically a light highway: shine LEDs into the edge, and light travels through the sheet
until it hits something that scatters itlike an engraving, sanded area, or textured pattern. That scatter is where you “see” the glow.
The result is a crisp, floating image that looks way fancier than the parts list suggests.
The rainbow shape is perfect for edge lighting because it naturally invites gradients and color mixing. With addressable LEDs,
you can push smooth transitions across bands, animate “moving weather,” or even split the display into zones (current conditions on one side,
tomorrow’s forecast on the other). It’s functional décorthe best kind of décor, because it has an excuse.
Parts and Tools You’ll Want on the Table
Core Materials
- Acrylic sheet (clear or light-guide acrylic), 1/8″ (3mm) is common; thicker can work but needs stronger edge lighting.
- Addressable RGB LEDs (NeoPixel/WS2812-compatible strip or ring). Choose density based on how evenly you want the edges lit.
- Microcontroller:
- Quick-and-fun mode: a beginner-friendly board that runs CircuitPython for fast iteration.
- Connected mode: an ESP8266 or ESP32 for Wi-Fi weather pulls.
- Power: 5V supply sized for your LED count (more on sizing below).
- Wiring basics: hookup wire, heat shrink, soldering gear, JST connectors (optional but very handy for swapping controllers).
- Base/housing: wood, 3D print, or a simple channel that holds LEDs tight to the acrylic edge.
Tools for the Acrylic
- Best option: laser cutter/engraver for clean linework and consistent light scatter.
- No laser? Still doable: rotary tool engraving, vinyl-mask + sandblasting, or careful hand-sanding patterns on the back.
- Finishing: fine sandpaper (for diffusion tricks), microfiber cloth, and patience (acrylic shows fingerprints like it’s paid to).
Choosing Acrylic: Clear vs. Light-Guide
You can absolutely build this with regular clear acrylic, especially if you’re engraving bold lines and lighting strongly from the edges.
But if you want that “even glow across the whole rainbow” lookwhere it feels like the acrylic is lit from withinconsider
light-guide acrylic (sometimes sold as edge-lit, LGP, or illuminated acrylic). It’s formulated to spread light more uniformly.
Practical takeaway: if your first prototype looks bright near the LEDs but fades quickly across the rainbow, the fix is usually one of three things:
(1) better acrylic (light-guide), (2) more deliberate diffusion/engraving strategy, or (3) improved LED-to-edge coupling (tighter contact and better alignment).
Designing the Rainbow for Maximum Glow
Engrave Where It Counts
Engraving (or roughening) creates the “light leak” that becomes your visible design. Many makers engrave on the
back side so the front stays glossy and clean while the back does the scattering. If you’re hand-finishing,
lightly sanding the back surface in targeted areas can act like a diffuser and help reduce hot spots.
Make the Base Do Its Job
Edge lighting is brutally honest about mechanical fit. If the acrylic edge is barely touching the LEDs, you’ll get bright dots and sad gaps.
If the acrylic is firmly seated against the LED strip (or a reflective channel that pushes light into the edge), illumination becomes smoother.
Think “snug hoodie,” not “loose scarf.”
Consider Graduated Patterns
An advanced trick is to vary engraving density/depth: lighter engraving near the LED edge (where light is strongest),
heavier engraving farther away. This balances brightness and makes the whole rainbow read evenly instead of “flashlight-at-the-bottom.”
LEDs and Power: Don’t Let a Rainbow Become a Heater
How Many LEDs Do You Need?
If your LEDs are only lighting the acrylic edges (not directly visible), you can often use a short strip tucked into a base:
enough LEDs to couple light into the acrylic and create uniform edge brightness. Higher-density strips can help smooth out the light injection,
but they also increase current draw.
Power Sizing (The Calm, Responsible Part)
Addressable RGB LEDs can draw significant current at full white brightness. You don’t have to run them at 100% (your eyeballs will file a complaint),
but you should size your power supply with headroom. A common approach is to plan for worst-case draw, then cap brightness in software for comfort and safety.
Wiring Best Practices That Save LEDs from an Early Retirement
- Connect ground first (and disconnect it last). This reduces the chance of weird, spicy voltage behavior.
- Add a large capacitor (often 500–1000 µF or similar) across +5V and GND near the LED power input to buffer current spikes.
- Place a series resistor (often a few hundred ohms) on the LED data line near the first pixel to reduce data-line ringing/spikes.
- Keep power wires short and adequately thick, especially if you’re feeding a strip in a base (voltage drop is a sneaky villain).
Translation: a rainbow is not the time to “wing it” with power. Do the tiny safety steps once, and you’ll spend your time enjoying animations
instead of debugging flicker gremlins at midnight.
Microcontroller Options: Two Great Paths
Path A: Fast Iteration with CircuitPython
If you want to experiment quickly with color mixing and animations, CircuitPython is delightful. You can iterate on effects in minutes:
tweak gradients, add sparkle, adjust brightness curves, and test “storm mode” without recompiling in the traditional sense.
Many makers start here: build the physical display, drive LEDs locally, and perfect the rainbow behavior. Then, once the visuals are nailed,
move to a Wi-Fi board for live weather dataor use a Wi-Fi capable CircuitPython board from the start.
Path B: Wi-Fi Weather Fetch with ESP8266/ESP32
For a true weather display, you need data. Wi-Fi microcontrollers make it simple to poll an API on an interval (every 10–30 minutes is usually plenty),
parse conditions, and update colors. The key is being a good internet citizen: cache results, respect rate limits, and don’t hammer endpoints
like you’re trying to “DDoS the drizzle.”
Where the Weather Data Comes From
Option 1: National Weather Service API (Great for U.S. Locations)
The National Weather Service provides a public API that can return forecasts, alerts, and observations. If your display will live in the U.S.,
this is a strong option: it’s official data, and you can build forecast-based effects (sunny, rain, snow, etc.) and even flash an alert pattern
when watches/warnings are active.
Typical flow (conceptually):
location → forecast endpoint → “periods” text/icons → condition mapping.
You can also pull alerts for your area and give the rainbow a “heads up” behavior when severe weather is in play.
Option 2: Commercial Weather APIs (Works Globally)
If you need global coverage or want a single streamlined response with current + hourly + daily forecasts,
a commercial API can be convenient. The tradeoff is usually an API key and usage limits, so keep your polling interval sensible.
Turning Forecasts into Color: A Mapping That Feels Right
The most fun part of this project is choosing how the weather “feels” as light. Here are practical mappings that read well at a glance:
Condition-to-Effect Ideas
- Clear / Sunny: saturated warm rainbow with gentle breathing animation (slow brightness pulse).
- Partly Cloudy: rainbow with soft white “cloud puffs” drifting across segments.
- Overcast: desaturated rainbow (lower saturation), subtle gray-white shimmer to imply haze.
- Rain / Drizzle: cooler palette shift (blues/teals emphasized) plus tiny downward sparkles like raindrops.
- Thunderstorms: darker base colors with occasional bright white/purple flashes (short, raredon’t strobe your living room).
- Snow: icy pastel rainbow with slow twinkles and extra white highlights.
- Fog / Mist: muted colors with a “soft blur” effectlow contrast, gentle motion.
A Concrete Example: Forecast “Mood Score”
Instead of hard-switching effects, you can compute a simple “mood score” from the forecast:
precipitation chance pushes the palette cooler, temperature nudges brightness or saturation, wind adds motion speed,
and severe alerts override everything with a clear warning pattern. The rainbow becomes expressive but still readable.
Build Steps (High-Level, No Guesswork)
1) Prototype the Light Injection
Before you engrave anything fancy, test a plain acrylic strip in your base with LEDs. You’re checking for:
tight edge contact, evenness, and whether the light spreads far enough. Fix the mechanical fit nowyour future self will send you a thank-you card.
2) Create and Engrave the Rainbow
Design a rainbow outline that will read well when only the engraved parts light up. Thick lines and bold shapes work best.
Engrave the back to keep the front polished. If you’re experimenting with diffusion, test a small corner with sanding or a dot pattern.
3) Build the Base
Your base should:
(a) hold the LED strip aligned with the acrylic edge,
(b) block stray light so the acrylic glow is the star,
and (c) provide room for wiring and the controller. Reflective lining inside the channel can improve coupling and reduce dark spots.
4) Wire Power and Data Cleanly
Add the recommended capacitor near the LED power entry and a resistor on the data line. Keep wires short.
If you’re using a detachable controller, a connector makes swapping boards painless (great for going from “animation-only” to “Wi-Fi weather” later).
5) Program the Rainbow First
Start with a “demo mode” that cycles through conditions. This lets you tune brightness, saturation, and animation speed
without waiting for the forecast to cooperate. Once the visuals are satisfying, connect the weather data and map conditions to modes.
6) Add Weather Fetch + Caching
Pull weather on a reasonable interval (e.g., 10–30 minutes), parse the primary condition, then update the display state.
Cache the last successful response so your rainbow doesn’t panic if Wi-Fi drops for a moment.
Troubleshooting: The Usual Suspects
Problem: Bright hot spots near the base
- Improve acrylic-to-LED contact (tighten fit).
- Use a light-guide acrylic sheet for more even spread.
- Try graduated engraving: lighter near the LEDs, heavier farther away.
- Lower LED brightness and increase diffusion slightly (carefullytoo much diffusion can wash out detail).
Problem: Flicker, random colors, or glitchy animations
- Confirm common ground between microcontroller and LED strip.
- Add/confirm the series data resistor and the bulk capacitor.
- Shorten data wire length and avoid running data next to noisy power lines.
- If using a 3.3V microcontroller with 5V LEDs, consider signal conditioning if the first pixel is unreliable.
Problem: It’s too bright (aka “my rainbow is yelling”)
- Cap brightness in software. A lower brightness often looks better through acrylic anyway.
- Use gamma correction (perceptual brightness) so gradients look smooth instead of banded.
Upgrades That Make It Extra
- Multi-day forecast: split the rainbow into segments for today/tomorrow/next day.
- Alert mode: if a watch/warning is active, overlay a distinct pattern that’s noticeable but not obnoxious.
- Indoor sensors: add temperature/humidity and blend indoor comfort with outdoor conditions.
- Seasonal palettes: same weather data, different “vibes” (winter pastels, summer saturation).
- Quiet hours: auto-dim at night so your rainbow doesn’t become a surprise sunrise at 2 a.m.
Conclusion: A Forecast You’ll Actually Look At
The best maker projects don’t just workthey invite you to interact. An edge-lit rainbow weather display turns invisible data into something
warm, tactile, and surprisingly calming. It’s also a sneaky way to learn a lot in one build: acrylic optics, LED power planning,
microcontroller programming, and API logic. Plus, it makes your room look like it has excellent taste.
Real-World Maker Experiences: What It’s Like to Build and Live With One
Makers who build edge-lit acrylic projects often discover the same funny truth: the “electronics part” is predictable, and the “acrylic part”
is where your personality gets tested. The first time you light a freshly engraved rainbow, you’ll probably get that instant dopamine hit
and then notice one corner is brighter, one band fades early, and the whole bottom edge looks like it’s hoarding photons.
That’s normal. Edge lighting rewards tiny mechanical improvements more than dramatic code changes.
The most common “aha” moment is realizing how much contact matters. A fraction of a millimeter gap between LED and acrylic can
turn smooth illumination into dotted hot spots. Builders frequently end up revising the base: adding a tighter channel, switching to a slightly
thicker diffuser strip, lining the inside with reflective material, or simply repositioning the LED strip so it pushes light into the edge more evenly.
It’s not glamorous, but it’s the difference between “cool prototype” and “this looks like I bought it from a fancy design store.”
Another experience you’ll likely have: overestimating how bright you need the LEDs. When you’re testing a bare strip on your desk,
brightness feels like success. When the acrylic is in place, the same brightness can feel like the rainbow is trying to land airplanes.
Many builders cap brightness aggressively (sometimes far below max) and then use saturation and animation to keep it expressive.
The irony is that lower brightness often looks richer through acrylic because it reduces harsh hotspots and makes gradients smoother.
On the software side, the “experience” is usually a journey from literal to poetic. At first, you might map conditions in the simplest way:
rain equals blue, sun equals yellow. Then you realize weather is more nuanced than a kindergarten sticker chart. You start blending:
precipitation chance cools the palette, temperature warms it, wind speed nudges animation tempo. Soon you’re debating whether fog should be
desaturated rainbow or a pearly white shimmer with barely-there colorlike the rainbow is whispering because it’s polite.
Living with the display is its own small delight. You’ll glance at it while making coffee and instantly know if you’re grabbing a jacket,
an umbrella, or your best “I can handle wind” face. It also becomes a conversation magnet. Guests will ask, “What is that?”
and you’ll say, casually, “Oh, it’s a rainbow that reports the weather,” as if that’s a sentence people say every day.
And if you add an alert mode, you’ll experience the strange satisfaction of a piece of art being quietly helpfullike décor with a civic duty.
The final maker rite of passage is iteration. Most people don’t build exactly one version. They build “Version 1 (works),”
“Version 2 (prettier),” and “Version 3 (why am I ordering specialty acrylic at midnight?).” The good news is that each iteration is faster,
because the core ideas stay the same: light travels, engraving reveals, LEDs animate, and the forecast becomes color. Once you’ve got the hang of it,
you can make themed versionsseasonal rainbows, minimalist arcs, even multi-panel displays. Your home may eventually look like a tasteful portal
to a slightly more cheerful universe. And honestly? That’s a pretty good outcome for checking the weather.