Table of Contents >> Show >> Hide
- What Are Sliding Picture Ledge Shelves?
- Planning Your $20 Sliding Picture Ledge Project
- Materials and Tools You’ll Need
- Step-by-Step: How to Build Sliding Picture Ledge Shelves
- How to Install Sliding Picture Ledge Shelves Safely
- Styling Ideas for Your New Sliding Ledge Gallery
- Common Issues and Pro Tips
- Real-Life Experiences: What You Learn Building $20 Sliding Ledges
- Conclusion: A Designer Gallery Wall on a DIY Budget
Want a gallery wall that looks like a designer styled it but costs less than
your last coffee run? Easy. With a couple of basic boards, a handful of
screws, and about an hour of your time, you can build easy $20 DIY
sliding picture ledge shelves that turn any blank wall into a
rotating art display. Think of them as picture ledges on “shuffle mode”:
your frames can slide, overlap, and rearrange without ever punching new
holes in the wall.
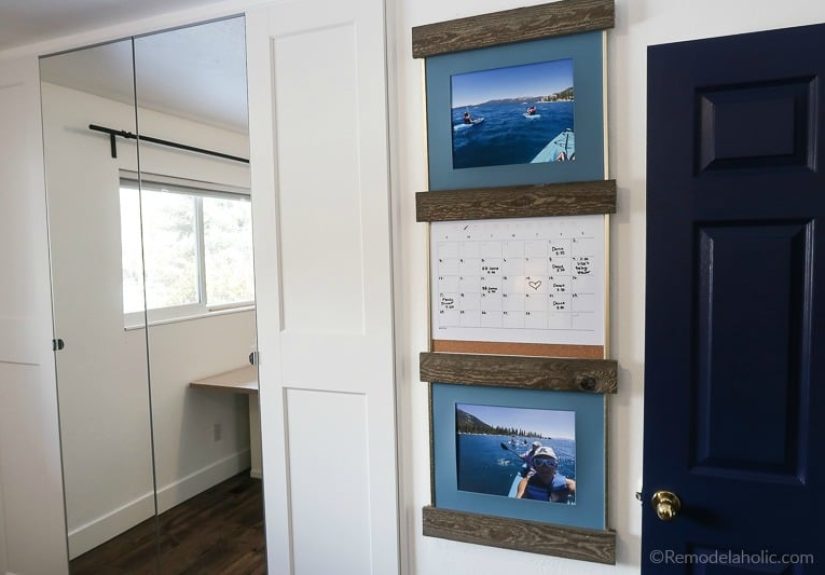
Inspired by the popular Remodelaholic sliding picture ledge project, these
shelves are beginner friendly, renter friendly (because you minimize wall
holes), and budget friendly. We’ll walk through exactly how to plan, build,
and install them, plus share real-life tips and experiences so you can skip
the “oops” moments and go straight to “wow, I made that.”
What Are Sliding Picture Ledge Shelves?
A traditional picture ledge is a shallow shelf with a small front lip that
keeps frames from slipping off. You mount it on the wall, lean art and
photos against the back, and you’re done. It’s simple, clean, and way more
flexible than hanging each frame individually.
Sliding picture ledge shelves take that concept one step
further. Instead of one fixed ledge, you build several narrow ledges that
can nest or overlap visually. Once they’re mounted on the wall, you can
slide your frames along the shelf to create new arrangements without moving
hardware. It’s ideal if:
- You love to rotate family photos, kids’ art, or seasonal prints.
- You’re indecisive about layout (no judgment, same).
- You want a gallery wall that can grow and change over time.
The Remodelaholic version uses a smart combination of small boards that
create a sturdy, U-shaped ledge with a front lip to keep frames secure –
all for around $20 in lumber when you keep the design simple and the
shelves modest in length.
Planning Your $20 Sliding Picture Ledge Project
Choose the Perfect Wall
Sliding picture ledges work best on long, open stretches of wall where you
want a strong visual moment. Great spots include:
- The wall behind a sofa or sectional.
- A narrow hallway that needs personality.
- The space over a console, dresser, or entry bench.
- Above a desk or workspace where you display inspiration pieces.
For most homes, two to four ledges stacked vertically give you plenty of
display space without overwhelming the wall. Leave roughly 10–14 inches
between ledges for standard frames, and more space (18–24 inches) if you
plan to mix in tall art or vases.
Dial In the Size and Quantity
One of the reasons this project stays around the $20 mark is smart use of
standard lumber lengths. Remodelaholic’s original build uses two 8-foot
boards (a 2×2 and a 1×4) to create a set of shorter shelves. By cutting
those boards into sections (for example, four 20-inch ledges), you get a
whole gallery’s worth of shelving from just a couple of pieces of wood.
Before you buy, measure your wall. Decide:
-
Length per shelf: 20–36 inches is easy to handle and
stays sturdy without sagging. -
Number of shelves: 3–4 ledges stacked is usually
visually balanced for a medium wall. -
Board thickness: 1×3 or 1×4 boards work well for the
base and back; a thinner strip (like 1×2) makes a nice front lip.
Estimated Budget Breakdown
Here’s how you can keep the total cost around $20–$25:
- Two 8-ft boards (1×4 and 1×2 or similar): about $12–$16 total.
- Wood screws and brad nails: $3–$5 (usually less if you already own some).
- Wood glue (optional but helpful): a few dollars, and you’ll have plenty left for other projects.
- Paint or stain: use leftovers if you can, or grab a small sample size.
Tools like a miter saw, drill, and brad nailer are commonly recommended for
DIY picture ledges, but you can absolutely do this with a hand saw, miter
box, and hammer if you’re willing to put in a little more elbow grease.
Materials and Tools You’ll Need
Lumber & Hardware
For a simple set of 3–4 sliding picture ledges, plan on:
-
Lumber:
- 1 board for the back (e.g., 1×4).
- 1 board for the base (same width as the back).
- 1 narrower board for the front lip (e.g., 1×2).
-
2–2½ inch wood screws for assembling the ledge and
mounting to the wall. - Brad nails or small finish nails to secure the front lip.
- Wood glue for extra strength at joints (highly recommended).
- Sandpaper (120–220 grit) for smoothing edges.
- Paint, stain, or clear finish, depending on your style.
Tools
You don’t need a full woodshop, just some basics:
- Miter saw or miter box and hand saw for straight cuts.
- Drill/driver and drill bits (including a countersink bit if you have one).
- Brad nailer or hammer.
- Level (a long one is best for multiple shelves).
- Measuring tape and pencil.
- Stud finder or alternative stud-finding method.
- Safety gear: safety glasses, hearing protection, and a dust mask when cutting/sanding.
Step-by-Step: How to Build Sliding Picture Ledge Shelves
Step 1: Cut the Boards to Length
Measure and mark all of your lumber before you start cutting. If you’re
making four 24-inch shelves, mark four 24-inch sections on each of your
three board sizes (back, base, and front lip).
Use a miter saw or a miter box and hand saw to cut along your marks. Keep
your fingers well away from the blade and support the board so it doesn’t
bind or twist while cutting.
Step 2: Dry Fit the U-Shaped Ledge
Lay the boards on a flat surface to form a U shape: the base on the bottom,
the back board standing upright along the back edge, and the front lip
standing at the front edge. This mock-up lets you:
- Check that all pieces are the same length.
- Decide how tall you want the front lip (higher hides more of the frame).
- Make sure everything sits flush without big gaps.
Adjust any cuts if needed. It’s much easier to trim now than after you’ve
started assembling with glue and screws.
Step 3: Glue and Screw the Back to the Base
Run a thin bead of wood glue along the rear edge of the base board. Press
the back board into the glue at a 90-degree angle, forming an L shape. Use
a carpenter’s square to make sure the corner is truly square – crooked
shelves are not the vibe.
Pre-drill through the bottom of the base into the back every 6–8 inches,
then drive 2–2½ inch wood screws to lock the joint together. Pre-drilling
helps prevent splitting, especially near the edges of the boards.
Step 4: Attach the Front Lip
Run glue along the front edge of the base and stand the lip board on its
long edge, creating the U-shaped ledge. Flush the lip with the sides of the
shelf so it looks clean from the front.
Use brad nails or small finish nails to secure the front lip to the base.
If you don’t have a nailer, clamp the lip in place, pre-drill tiny pilot
holes, and tap in finish nails by hand. Wipe away any squeeze-out glue with
a damp cloth before it dries.
Step 5: Sand and Finish
Once the glue dries, sand all surfaces smooth. Focus on:
- Rounded or sharp edges that hands or frames might bump.
- Any uneven joints where the boards meet.
- Exposed screw or nail holes (you can fill them with wood filler first).
Now paint, stain, or clear-coat your shelves. Match your trim for a built-in
look, go bold with a color that pops, or keep the wood natural with a clear
sealer. Let everything dry fully according to the product directions before
you install the shelves or set anything on them.
How to Install Sliding Picture Ledge Shelves Safely
Shelves full of glass frames deserve solid, safe installation. Drywall
alone isn’t designed to hold much weight, so your goal is to hit at least
one wall stud per shelf and use appropriate anchors where you can’t.
Step 1: Plan the Layout on the Wall
Use painter’s tape to mark where each shelf will go. This lets you:
- Adjust the spacing between shelves until it looks right.
- Make sure the whole arrangement is centered over furniture.
- Avoid awkward collisions with light switches or vents.
Once you like the layout, use a level to draw a faint pencil line where the
top of each shelf back will sit.
Step 2: Find the Studs
Use a stud finder to locate studs along your pencil lines and mark them
lightly with a pencil or small piece of tape. No stud finder? You can:
- Tap along the wall and listen for the solid sound that usually means a stud.
- Look near outlets and switchesstuds are often beside electrical boxes.
- Use a strong magnet to find the screws holding drywall to the studs.
Try to align at least one mounting screw on each shelf with a stud. For
longer shelves, ideally hit two studs.
Step 3: Pre-Drill and Install Anchors Where Needed
Where your screw locations don’t line up with studs, use appropriate
drywall anchors rated for the weight you plan to put on the shelves. Light
loads (a few small frames) can use lighter anchors; heavier décor or thick
frames may require toggle or molly bolts.
Avoid adhesive hooks for shelves – designers and pros warn that they’re
not reliable for anything heavy or fragile, especially in changing
temperatures or humidity. When you’re dealing with glass frames, go with
mechanical anchors that actually bite into the wall.
Step 4: Mount the Shelves
Hold the first shelf up to your pencil line and lightly mark screw
locations on the shelf itself. Pre-drill through the back of the ledge
where each screw will go.
Then:
- Drive a screw through the shelf into the stud or anchor at one end.
- Use your level to make sure the shelf is perfectly straight.
- Drive the remaining screws while keeping the shelf level.
Repeat for the remaining shelves, checking that they stay parallel as you
move up or down the wall. A long level or laser level is worth its weight
in gold here.
Styling Ideas for Your New Sliding Ledge Gallery
The fun part: decorating! Sliding picture ledge shelves are extremely
forgiving. You can move frames around, overlap them, or swap them out
whenever the mood strikes.
Mix Frames and Objects
Try styling with a combination of:
- Frames in different sizes (5×7, 8×10, 11×14) for visual variety.
- Both black-and-white and color photos.
- Small plants, candles, or sculptural objects for texture.
- Artwork mixed with family photos so it doesn’t feel too cluttered.
Because the ledges are shallow, choose objects with a slim footprint.
Anything tall or tippy should either go on the lowest shelf or be secured
with museum putty.
Layer and Slide for Drama
Overlap frames by a few inches and slide them around until the arrangement
feels right. Taller frames look great toward the back and sides, with
smaller pieces layered in front. The sliding feature means you can:
- Pull a favorite photo forward when it’s seasonally relevant.
- Rotate kids’ artwork without rehanging anything.
- Shift pieces to highlight new prints or photos.
If you ever get bored with your wall, don’t start patching holesjust remix
the frames. It’s like rearranging your living room, but with less heavy
lifting.
Common Issues and Pro Tips
If the Shelf Looks Crooked
Even a slight tilt is noticeable under a row of frames. If your shelf looks
off:
- Double-check that your pencil layout lines were level.
- Confirm that anchors didn’t shift as you tightened screws.
- Loosen one screw slightly and adjust, then re-tighten.
If the Shelf Feels Wobbly
A little flex is normal with long, shallow shelves, but wobble is not.
Check for:
-
Screws that didn’t fully bite into the stud or anchorremove and install a
fresh anchor if needed. -
Overly long spans with no supportconsider shortening shelves or
adding additional mounting points.
Weight Guidelines
Most picture ledges are meant for frames and small decor, not heavy books
or big potted plants. As a rough rule of thumb, keep each frame light and
avoid stacking anything extremely heavy near the edges. If in doubt, use
stronger anchors and more mounting screws than you think you need.
Real-Life Experiences: What You Learn Building $20 Sliding Ledges
The first time many DIYers tackle sliding picture ledge shelves, they’re
not really chasing a carpentry challengethey’re chasing a feeling. It’s
that moment when a bare wall suddenly turns into the story of your family,
your travels, or your favorite art prints. And the cool part is, you don’t
have to be a pro to get there.
One common experience: the planning phase always looks easier on paper than
it feels in real life. On a sketch, four shelves evenly spaced look
perfect. On your actual wall, you might suddenly realize there’s a thermostat,
a light switch, or a return vent sitting right where your dream gallery was
supposed to go. That’s why painter’s tape is your best friend. Mocking up
the shelves with tape lets you catch those surprises early and adjust the
layout without drilling a single hole.
Another shared lesson: measuring once is how you end up at the hardware
store twice. Anyone who has built picture ledges will tell you that
double-checking board lengths before cuttingand checking again before
installingsaves a lot of frustration. A ¼-inch difference doesn’t sound
like much until you try to line up several shelves and realize one looks
“off” for reasons you can’t quite put your finger on.
You also quickly learn how important it is to hit at least one stud per
shelf. On paper, anchors alone can look strong enough, especially for
lightweight frames. In practice, most people find that shelves mounted into
studs just feel different. They don’t wiggle when you bump them, and they
don’t make you nervous when someone slams a door or kids run down the
hallway. After you’ve installed a set of ledges both ways, you’ll probably
never skip the stud-finding step again.
Then there’s the finishing stage, where personal style really kicks in.
Some DIYers fall in love with the look of natural pine or poplar with just
a clear coat; others realize halfway through that a bold painted color is
exactly what the room needed. The nice thing about picture ledges is that
they’re small enough to experiment with. If you paint them white and later
decide you want them black or wood-tone, it’s not a big project to sand and
repaint. Many people end up changing the finish after living with the
shelves for a few monthsand that’s perfectly normal.
Once the shelves are up, the real “experience” is how they change your
space over time. At first, you might carefully curate a set of matching
frames with coordinated art. But as life happens, kids make new artwork,
you print new photos, or you discover artists you love. Instead of dreading
a full re-hang, you just slide things around. A frame gets moved forward,
another one gets tucked behind, a holiday print shows up in December and
disappears in January. The wall becomes a living, evolving part of your
home rather than a static décor decision you made once and felt stuck with.
People also tend to gain confidence from a project like this. Building a
set of sliding picture ledge shelves for around $20 proves that you can
take on real, functional woodworking projects without fancy equipment or a
massive budget. After you’ve successfully measured, cut, assembled, and
hung shelves that actually stay on the wall, a lot of other DIY projects
start to feel possible: a long hallway ledge, a desk shelf, or even a full
gallery wall that runs up a staircase.
In the end, the best part of the “easy $20 DIY sliding picture ledge
shelves” experience isn’t just saving money. It’s the moment when someone
walks into your home, sees that wall of photos, and says, “Where did you
buy those shelves?” and you get to answer, “Oh, those? I built them.”
Conclusion: A Designer Gallery Wall on a DIY Budget
Sliding picture ledge shelves are one of those rare projects that check
every box: affordable, beginner friendly, high impact, and endlessly
flexible. With a couple of boards, a few screws, and a little planning, you
can recreate the look of high-end gallery walls for around $20and then
rearrange your art anytime without patching a single hole.
Whether you’re channeling the Remodelaholic inspiration exactly or putting
your own spin on it, these shelves earn their keep. They hold memories,
artwork, and snapshots of your life, all on a slim strip of wood you built
yourself. That’s the kind of project that makes your home feel more like
youand that’s worth way more than twenty bucks.