Table of Contents >> Show >> Hide
- Why a Dresser Makes Such a Good Media Center
- How to Choose the Right Dresser for the Job
- How to Plan a Smart Dresser to Media Center Upcycle
- Step-by-Step: Turning a Dresser Into a Media Center
- Best Design Ideas for a Dresser Media Console
- Mistakes to Avoid
- Is a Dresser to Media Center Upcycle Worth It?
- Conclusion
- Real-Life Experiences With a Dresser to Media Center Upcycle
- SEO Tags
There are two kinds of dressers in this world: the ones still living their best bedroom life, and the ones lurking in a garage, silently waiting for a second act. If you have the second kind, congratulationsyou may be sitting on your next favorite media console. A dresser to media center upcycle is one of those rare DIY ideas that is practical, stylish, budget-friendly, and just smug enough to make you grin every time someone asks, “Wait… that used to be a dresser?”
This project works because dressers already bring a lot to the party. They are low, sturdy, and built for storage. Many have solid frames, roomy drawers, and proportions that make sense beneath a television. With a little sanding, strategic drawer removal, and a few cable-management upgrades, an old dresser can become a custom-looking entertainment center that feels far more expensive than it actually is. In other words, it is the furniture version of a glow-up montage.
Whether you love farmhouse style, modern organic interiors, vintage charm, or clean-lined minimalism, a dresser upcycle can be tailored to match your space. Paint it moody green, strip it to a warm wood finish, swap in sleek hardware, add open cubbies for gaming consoles, or keep a few drawers intact for the glorious purpose of hiding remotes, chargers, and the mysterious cords nobody can identify but nobody dares throw away.
Why a Dresser Makes Such a Good Media Center
A traditional media console is basically a storage piece with good manners. It supports a TV, hides clutter, and ideally does not look like a giant electronics shrine. A dresser already does most of that work. It has storage built in, it usually sits at a comfortable height, and it often has more visual character than many store-bought entertainment units.
Another big advantage is value. Secondhand dressers are easy to find at thrift stores, estate sales, online marketplaces, and curbside treasure piles. Even if a piece looks dated, scratched, or aggressively orange in that old-school pine way, the bones can still be excellent. A little imagination lets you trade “grandma’s extra bedroom dresser” for “custom media center with personality.” That is a much better sentence to say out loud.
There is also the sustainability angle, which is not just a nice bonus. Reusing furniture keeps usable materials out of the waste stream, saves money, and reduces the need to buy a brand-new piece. So yes, your makeover can be stylish and a tiny act of environmental virtue. You get points for both taste and thrift.
How to Choose the Right Dresser for the Job
Start With Structure, Not Looks
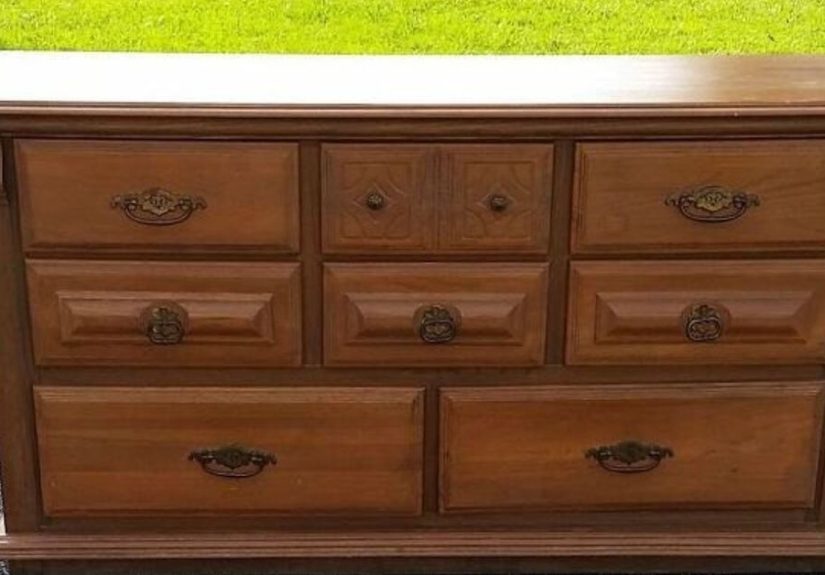
When shopping for a dresser to turn into a media center, focus first on sturdiness. A solid wood or well-built wood dresser is usually the best candidate because it can handle modifications more gracefully than flimsy particleboard furniture. Open every drawer. Wiggle the frame. Check that the top is flat, the legs are stable, and the joints do not feel loose. Cosmetic issues are fine. Wobbly construction is not.
Drawers that stick, chipped paint, dated hardware, and weird stain colors are all fixable. A split frame, sagging top, or severe water damage is far less charming once the TV is sitting on top. This project should feel like an upgrade, not a rescue mission that ends in emotional damage.
Think About Size and Proportion
The dresser should feel balanced beneath your television and fit the room without swallowing it whole. Long, low dressers are especially good candidates because they already resemble a media console. Shorter dressers can also work if your TV is wall-mounted above them. The goal is for the finished piece to feel intentional, not like a furniture identity crisis.
Depth matters too. You need enough room for media boxes, game consoles, speakers, or baskets. If the piece is too shallow, it may look pretty but function like a diva: beautiful, dramatic, and not very helpful. Also think about the back of the dresser. If it has a thin panel or open access points, adding cord holes and ventilation will be easier later on.
How to Plan a Smart Dresser to Media Center Upcycle
Before you touch sandpaper, decide how the piece needs to function. Are you placing the TV on top, or mounting the TV on the wall above it? Do you need space for a soundbar, gaming console, streaming device, router, vinyl records, or family board games? Do you want open shelves in the middle and drawers on the sides? Or do you want mostly hidden storage so your living room does not look like an electronics store exploded?
This is where the best upcycles separate themselves from the “I got excited and started painting” projects. Measure your equipment. Sketch the layout. Decide which drawers stay, which drawers go, and where cables will travel. Planning may not be glamorous, but neither is discovering your game console does not fit after the paint has dried.
Common Layout Options
- Center cubby design: Remove the middle drawers, build one or two open shelves, and keep the outer drawers for hidden storage.
- Full open-console design: Remove most drawers and convert the inside into wide shelving for components and baskets.
- Mixed storage design: Keep some drawers intact, use one side for electronics, and the other for movies, games, linens, or household overflow.
- Wall-mounted TV pairing: Let the dresser act as a stylish anchor below the television rather than the TV base itself.
Step-by-Step: Turning a Dresser Into a Media Center
1. Strip It Down
Remove the drawers, hardware, and anything else that unscrews. Clean every surface thoroughly. Old furniture collects dust, wax, grease, mystery residue, and the general energy of past decades. A good cleaning gives you a proper surface for sanding, priming, painting, or staining.
If you plan to keep some drawers, label them as you remove them so reassembly is less chaotic later. Trust me: “I will definitely remember where this goes” is a famous last thought in DIY.
2. Rework the Interior
Next, decide which drawer openings will become media bays. Remove the necessary drawer glides and supports, but keep the dresser structurally sound. In many makeovers, the central drawer section is opened up and fitted with a shelf. This gives you a spot for a cable box, gaming system, speaker, or decorative baskets.
Use wood cut to size for shelves and support cleats. If you want a polished look, take your time here. Straight shelves, aligned openings, and clean trim work are what make a repurposed dresser look custom instead of cobbled together on a caffeine whim.
3. Add Cable Management and Ventilation
This is the stage that turns a pretty furniture flip into a functional media center. Drill neat cord holes in the back panel or through the top rear edge where needed. Use grommets if you want a cleaner, more finished appearance. Inside the cabinet, plan a simple route so cables are easy to trace and not tangled into a spaghetti nightmare.
Ventilation matters too. Electronics need breathing room. If you are housing components behind doors or within cubbies, leave generous airflow around them and avoid packing shelves too tightly. A media center should contain heat, drama, and family movie night excitementjust not all in the literal sense.
4. Repair and Prep the Surface
Fill gouges, dents, and old hardware holes if needed. Sand rough spots and scuff the existing finish so primer and paint can grip properly. Surface prep is the least glamorous step, but it is also the part that separates a lasting finish from a future peeling disaster.
If the dresser is dark, glossy, or previously stained, primer is your friend. If the piece has ornate details, clean those areas well and avoid letting drips collect in the crevices. This is a makeover, not a frosting exercise.
5. Paint, Stain, or Seal
This is where the personality shows up. Paint works beautifully if you want a bold or updated look. Soft white, charcoal, sage green, navy, black, warm taupe, and muted blue all work well for media consoles. For a more natural style, stain or clear-coat the wood and let the grain take center stage.
Choose a durable finish that can stand up to daily use. A dresser-turned-media-center often gets more traffic than a standard dresser because it becomes the control center of the room. Remotes land there. Drinks try their luck there. Decorative objects gather there. Life happens there. Make sure the finish can handle real life.
6. Upgrade the Details
New hardware can completely change the vibe of the piece. Brass pulls feel warm and classic. Matte black feels modern. Wood knobs can lean organic and casual. Leather pulls add texture. If your dresser has a traditional shape but you want it to look more current, hardware is often the fastest path to a style reset.
You can also add feet, trim, cane inserts, fluted molding, beadboard backing, or wallpaper inside open shelves. These details are optional, but they help the piece feel designed rather than merely reassembled.
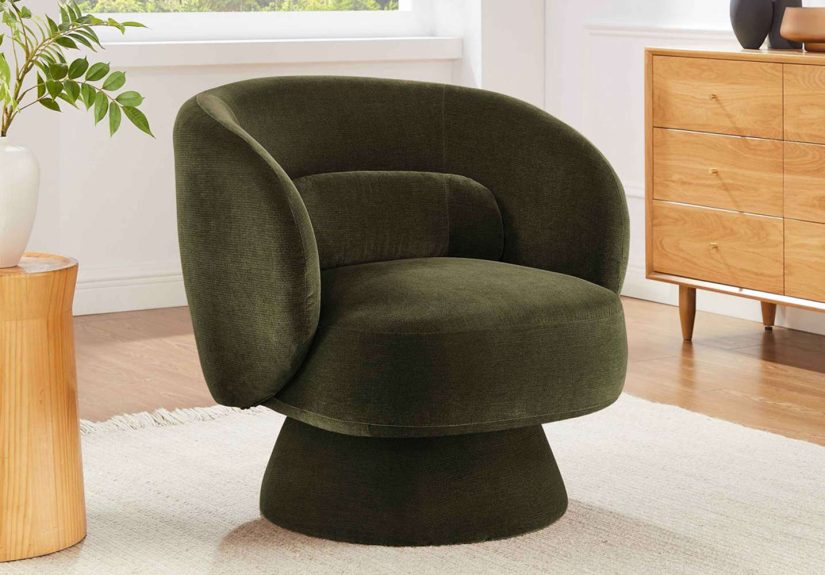
Best Design Ideas for a Dresser Media Console
One of the best things about this upcycle is how flexible it is. A vintage dresser can become a chic, collected TV stand in a traditional or eclectic room. A chunky wood dresser can be painted black and topped with sleek hardware for a modern look. A rustic piece can lean farmhouse with baskets, linen-textured bins, and warm wood tones. A mid-century dresser can become a retro-cool statement piece with tapered legs and clean-lined styling.
If your living room needs hidden storage, keep more drawers. If it needs visual lightness, open the center and style it with books, a soundbar, or woven baskets. If your TV is mounted, decorate the top with lamps, framed art, trailing greenery, or ceramic vases so the dresser looks like real furniture first and media storage second.
That balance matters. The best media centers do not scream, “Welcome to my appliance cave.” They blend technology into the room while still looking warm, personal, and intentional.
Mistakes to Avoid
- Skipping measurements: Always measure your TV, equipment, wall space, and drawer openings before making cuts.
- Ignoring airflow: Closed cabinets can trap heat if electronics are crammed in tightly.
- Rushing surface prep: Paint failure almost always looks worse after you have convinced yourself the hard part is over.
- Forgetting cable access: If cords cannot move easily, the whole setup becomes annoying fast.
- Overdecorating the top: A few accessories look curated; too many make the area feel crowded and compete with the TV.
- Skipping safety: If the piece is tall, heavy, or used in a family space, anchor it properly for added stability.
Is a Dresser to Media Center Upcycle Worth It?
Absolutelyespecially if you want furniture with character and storage that actually suits your life. A store-bought media console can be convenient, but a custom upcycle gives you more control over size, layout, finish, and style. It often costs less, looks better, and feels more personal.
It is also a great project for people who like DIY with a payoff they can see every single day. This is not a tiny craft that disappears into a drawer after you finish it. It becomes a hardworking piece in one of the most-used areas of the home. Every movie night, game day, and streaming binge gets a little boost from the fact that your media center has a backstory.
And honestly, there is something deeply satisfying about taking a furniture piece that was overlooked, outdated, or one curb away from doom and turning it into something stylish and useful. It is practical magic with a paintbrush.
Conclusion
A dresser to media center upcycle is one of the smartest furniture makeovers you can tackle. It gives old furniture a fresh purpose, adds storage exactly where you need it, and creates a living room focal point that feels more interesting than a flat-pack box from aisle fourteen. With thoughtful planning, good prep, and a finish that fits your style, an ordinary dresser can become a media console that looks custom, functions beautifully, and earns compliments on command.
If you have an old dresser gathering dust, do not write it off too quickly. It may be one removed drawer and one well-placed shelf away from becoming the MVP of your living room.
Real-Life Experiences With a Dresser to Media Center Upcycle
The funny thing about this project is that it often starts with mild skepticism. You drag home an old dresser that smells faintly like attic, holiday decorations, and decisions from 1997, and you tell yourself this will absolutely become a gorgeous custom media console. At that exact moment, it still looks like a dresser that lost a fight with time. But that is part of the experience. A dresser to media center upcycle teaches patience in a very hands-on way.
One of the first surprises most people have is how much personality old furniture carries. Once the drawers come out and the hardware is removed, you start noticing the details: dovetail joints, thick wood tops, curved legs, worn edges, hidden stamps, and old repairs that tell you this piece had a life long before it landed in your house. That makes the project feel less like assembly and more like collaboration. The dresser is not trash. It just needs a better career path.
There is also that classic DIY emotional roller coaster. At first, you feel wildly confident. Then you hit the sanding stage and wonder why every project in your imagination features breezy music and zero dust. Then you paint the first coat and panic because it looks streaky. Then the second coat goes on, the new hardware gets installed, the shelf fits perfectly, and suddenly you are standing back like a proud furniture producer at a makeover reveal.
Another common experience is realizing how much hidden storage matters in real life. The finished media center is rarely just for the TV. It becomes the place for remotes, charging cables, gaming controllers, coasters, instruction manuals, candles, extra batteries, and the random deck of cards that somehow migrates into every living room. A piece that once held sweaters now manages modern chaos with surprising grace.
People also tend to underestimate how satisfying the styling phase is. Once the practical work is done, the fun begins. A stack of books, a lamp, a small plant, a ceramic bowl, maybe a basket in the open shelfsuddenly the piece does not just support technology, it softens it. That is a big reason this makeover works so well. It helps a TV zone feel like part of the home rather than a separate electronic command center.
And then there is the social payoff. Guests notice. They ask where you bought it. You get to say, with reasonable pride, “It used to be a dresser.” That sentence never gets old. It is the DIY version of a plot twist, and it lands every time.
More than anything, this project tends to change how people look at secondhand furniture. After one successful dresser to media center upcycle, it becomes very hard to see an old piece and not imagine what else it could be. A worn buffet becomes a bathroom vanity. A cabinet becomes a bar. A bookcase becomes a pantry station. Upcycling trains your eye to look past a piece’s current job and see its potential, and that is a useful skill whether you are decorating on a budget or just trying to create a home with more soul.
So yes, the experience usually includes dust, measuring, minor muttering, and at least one moment where you hold a cable hole cover in your hand and feel strangely powerful. But it also includes creativity, problem-solving, and the very specific satisfaction of making something better than it was. That is what makes this project memorable. You are not just updating furniture. You are giving it a second life in the room where life actually happens.