Table of Contents >> Show >> Hide
- What “4D Printing” Really Means (And What It Doesn’t)
- How Self-Assembling 4D Prints Work
- DIY Reality Check: What You Can Do at Home (And What to Leave to Labs)
- Materials for DIY Self-Assembling 4D Printing
- Design Principles That Make Self-Assembling Prints Actually Work
- Three DIY Self-Assembling 4D Printing Projects (With Practical Tips)
- Troubleshooting: Why Your “Self-Assembling” Print Isn’t Assembling Itself
- Where DIY 4D Printing Is Headed Next
- DIY Experiences: What It’s Like Building Self-Assembling 4D Prints at Home (Extra )
- Conclusion
If 3D printing is the “print it and it sits there looking proud” era, 4D printing is the
“print it and it does something later” era. The “fourth dimension” is time: you print an object that
can self-assemble, self-fold, or change shape when it’s triggered by
something like heat, water, humidity, or light. In research labs, this can mean advanced hydrogels, shape-memory
polymers, and multi-material systems. At home, it means you can build clever, safe, DIY projects that feel a little
bit like teaching plastic to follow instructions.
This guide focuses on DIY self-assembling 4D printing: practical ways makers can create prints that
transform after printing using consumer-friendly tools, smart design, and materials you can actually buy without
borrowing a university clean room. You’ll learn what 4D printing is (and isn’t), which “smart materials” matter for
hobbyists, and how to design projects that reliably pop, fold, curl, or deploywithout turning your kitchen into a
chemistry set.
What “4D Printing” Really Means (And What It Doesn’t)
The core idea: add time to the print
In 4D printing, the printed object is engineered to transform from a “printed state” into a “working state.”
Instead of assembling twenty tiny parts with a screwdriver and regret, you design the transformation into the
structure itself. The transformation is usually driven by one of these triggers:
- Heat (warm water, a heat source, body heat in some cases)
- Moisture / humidity (swelling, softening, or bending)
- Light (often in labs; less common for DIY)
- Mechanical release (stored strain that “unlocks” when constraints are removed)
4D printing vs. “cool 3D prints”
Not every moving print is 4D printing. A springy print-in-place fidget toy is clever, but it’s typically just
mechanical design. The “4D” label fits best when the object’s behavior depends on a programmed material response
(shape memory, swelling, anisotropic bending) or a purposeful change over time after a stimulus.
That said, DIY is allowed to be a little mischievous. If your print ships flat and then self-forms into a 3D shape
with a trigger you planned for, you’re playing in the 4D sandboxeven if your neighbors call it “wizardry” and your
family calls it “another reason the kettle disappeared.”
How Self-Assembling 4D Prints Work
Mechanism #1: Shape memory (heat-activated “remembering”)
Shape-memory polymers (SMPs) can be temporarily deformed and later return to a programmed shape when
triggeredmost commonly by heat. In lab settings, SMP chemistry is tuned precisely. In maker settings, you can still
use the concept: print a part, “program” it into a temporary form, then re-activate it so it recovers.
DIY-friendly takeaway: if you can safely control temperature (often using warm water), you can prototype simple
shape-change behaviors without exotic equipment.
Mechanism #2: Bilayers (one side pulls harder than the other)
A lot of self-folding structures behave like a bimetal strip in a thermostat: two layers respond differently, so the
whole piece bends. In research, bilayers might be hydrogels with aligned fibers or multi-material elastomers. In DIY,
bilayers can be as simple as a rigid plastic plus a softer “hinge” material, or a plastic frame paired with a
moisture-responsive layer (like paper or fabric) that changes dimensions.
Mechanism #3: Anisotropy (direction matters)
3D-printed parts are often anisotropic: they behave differently depending on print direction, layer lines,
infill orientation, and thickness. In 4D work, anisotropy becomes a feature, not a flaw. By choosing print paths and
geometry intentionally, you can encourage a part to curl or twist in a predictable way when softened or heated.
DIY Reality Check: What You Can Do at Home (And What to Leave to Labs)
DIY-friendly: geometry-driven self-assembly
- Flat-pack prints that fold into shape with warm water or gentle heat
- Snap-fit structures that “deploy” when released from a constraint
- Humidity-driven curls using safe, everyday responsive layers
- Dual-material hinges using consumer printers
Not DIY-friendly (or at least “not without serious know-how”)
- Custom resin chemistry and post-curing workflows meant for research
- Reactive chemical triggers
- Processes requiring specialized safety gear or controlled environments
- Biomedical/implant concepts (fun to read about, not fun to DIY)
The goal here is safe, repeatable self-assembling behavior you can prototype on a home printer.
Think “impress your friends” and “learn something real,” not “file a patent from your garage by Tuesday.”
Materials for DIY Self-Assembling 4D Printing
Rigid + flexible combo (the workhorse approach)
If you have access to dual extrusion (or you can pause-and-swap filament), combining a rigid material with a flexible
one is a practical path. A rigid layer provides structure. A flexible layer provides hinges and controlled bending.
This is one of the easiest ways to prototype self-folding behavior with consumer equipment.
Shape-memory filaments (when available)
Some commercially available filaments exhibit shape-memory-like behavior. The specifics vary by brand and chemistry,
but the maker lesson is consistent: you can often create a temporary shape and later trigger partial recovery with
controlled heat. For DIY, keep it simple and treat these materials as experimentaltest small samples first.
Moisture-responsive companions (paper, wood-based, fabrics)
Many natural materials respond to humidity or water. DIY projects sometimes use a 3D printed skeleton plus a thin,
safe, moisture-responsive layer that changes dimensions and creates bending. This approach can produce “living”
motion without special polymersjust smart structure.
Safety note (especially important for DIY)
For home experiments, favor triggers like warm water and gentle heat you can control
safely. Avoid unknown chemicals, fumes, and anything that requires “trust me” safety advice from the internet. If
you’re working with heat tools, use eye protection and adult supervision where appropriate. Your eyebrows are not
replaceable parts.
Design Principles That Make Self-Assembling Prints Actually Work
1) Start with a simple transform
The most reliable DIY 4D prints have one clear job: fold along predefined hinge lines or curl in one direction. If
your first prototype tries to become a transforming drone that also makes espresso, it will become… modern art.
2) Control thickness like it’s your main character
Thin sections bend. Thick sections resist. A self-folding design often depends more on thickness gradients than on
fancy materials. If your hinge region is too thick, it won’t fold. If it’s too thin, it folds… forever.
3) Use “compliance zones”
Plan where the part is allowed to move. Living hinges, flexure joints, and thin webbing are your friends. Keep
“rigid zones” rigid so the shape ends up where you intended.
4) Treat print orientation as part of the design
Layer direction affects strength and bending behavior. If you want a hinge to flex repeatedly, print orientation
matters. If you want a strip to curl under heat, the internal structure and print path can influence the result.
5) Prototype like a scientist (small, fast, measurable)
Print tiny test coupons: a hinge strip, a bilayer bar, a small folding panel. Test triggers, measure angles, repeat.
DIY 4D printing is less “one heroic print” and more “ten small experiments and one victory dance.”
Three DIY Self-Assembling 4D Printing Projects (With Practical Tips)
Project 1: Warm-water self-folding “flat-pack” box corner
Concept: print a flat pattern with thin hinge lines so it can fold into a corner or small open box when warmed and
gently guided into shape. The transformation can be driven by softened hinge zones and stored strain from the flat
geometry.
- Design tip: Make the hinge region thinner than the panels, and add small “stops” so it folds to a consistent angle.
- Trigger tip: Use warm water for gradual, controllable activation (safer than blasting it with intense heat).
- Reliability tip: Add symmetry so the fold doesn’t favor one side and twist like a pretzel.
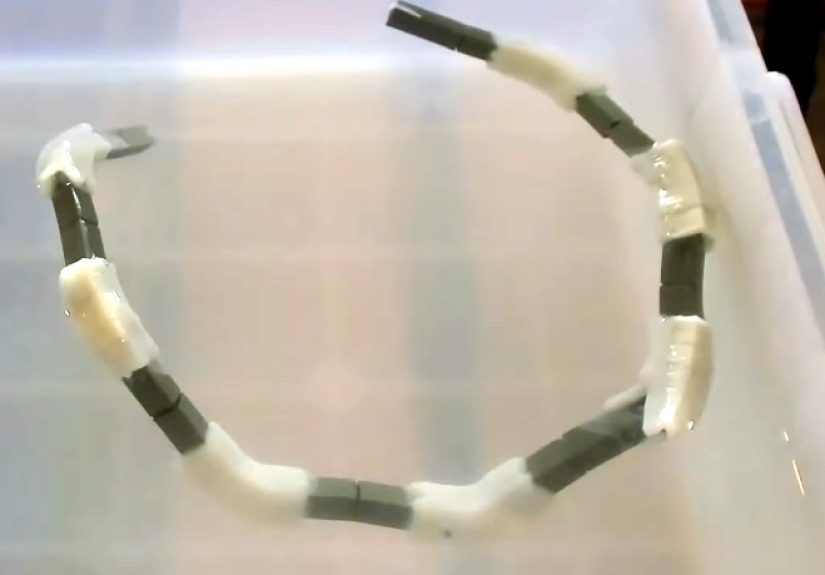
Project 2: Dual-material curling strip (rigid backbone + soft actuator)
Concept: print a strip where one material acts as a stable backbone and the other acts as a more compliant layer. When
warmed, the differential response can encourage a predictable curl. This is a DIY cousin of research bilayer
strategies, simplified for maker hardware.
- Design tip: Keep the “actuating” layer continuous and the backbone segmented if you want smoother curvature.
- Tuning tip: Changing the actuator thickness changes the curl radius dramaticallysmall adjustments matter.
- Debug tip: If it curls unevenly, check for inconsistent extrusion or warping during print.
Project 3: Self-deploying snap-fit structure (assembly without the assembly)
Concept: design a print that is constrained during printing (or by a simple temporary clip) and then “deploys” into
a 3D shape when released. The time component is the programmed release and transformation sequence. This is a great
way to get a self-assembling effect even without specialty materials.
- Design tip: Use compliant joints that can flex during deployment without cracking at layer lines.
- Control tip: Add mechanical stops so the deployed configuration is stable and repeatable.
- Safety tip: Small parts can springkeep eyes and fingers out of the “surprise zone.”
Troubleshooting: Why Your “Self-Assembling” Print Isn’t Assembling Itself
Problem: It won’t bend
- Hinges are too thick or too short
- Material is too rigid at your chosen trigger temperature
- Print orientation is fighting the hinge motion
Problem: It bends, but not where you want
- Thickness gradients are unintentional (or inconsistent)
- Warping during print “pre-programmed” a twist you didn’t ask for
- One side cools or heats faster than the other
Problem: It works once, then fails
- Hinge strain is too high for repeated cycles
- Layer adhesion is weak at the flex point
- Activation is too aggressive (too hot, too fast, too uneven)
The most common fix is also the least glamorous: redesign the hinge zone and print a smaller test piece. 4D printing
rewards patience the way sourdough doesexcept you can’t eat the failures (please don’t).
Where DIY 4D Printing Is Headed Next
Research keeps pushing 4D printing toward more precise, multi-material, programmable behaviorsthink soft robotics,
adaptive textiles, and deployable structures that change shape on cue. For makers, the near-future excitement is
simpler but still awesome: more accessible smart filaments, better multi-material workflows, and design tools that
help you predict shape change instead of guessing and hoping.
The best part is that DIY self-assembling 4D printing isn’t only about “cool motion.” It’s a mindset shift: you’re
designing a process, not just a part. You’re telling materials what to do laterlike leaving a note for the
future, but the note is made of plastic and it folds into a box.
DIY Experiences: What It’s Like Building Self-Assembling 4D Prints at Home (Extra )
DIY 4D printing has a very specific emotional arc. It starts with excitement (“I’m going to print something that
assembles itself!”), passes through confusion (“Why is it doing the opposite of assembling itself?”), and ends in
either triumph or the quiet acceptance that you now own twelve slightly different versions of the same hinge strip.
A common first experience is discovering that self-assembly is picky. A fold line that looks perfect
in CAD can behave like a stubborn snack wrapper in real life: it crinkles wherever it wants. Makers usually learn
fast that controlled motion is less about having the fanciest material and more about designing the “permission to
move” into the part. Thin zones, flexure joints, and mechanical stops start to feel like secret superpowers.
Another classic moment: the first time a print almost works. The corner folds… but overshoots. Or it folds at
the right angle… but twists like it’s auditioning for a pasta commercial. That’s when DIYers begin treating the
printer like a lab instrument. They’ll print three mini test pieces, change one variable (hinge thickness by 0.2 mm,
or the length of a flexure), and run a repeatable warm-water activation. It’s surprisingly satisfyinglike you’re
running a science fair project that fights back.
People also tend to develop a strong opinion about “activation.” Some love warm water because it’s slow and forgiving:
you can nudge a fold, pause, and re-warm. Others prefer gentle heat because it’s fast, but fast can be chaotic. The
shared lesson is that even heating matters. If one side warms first, the part can bend unevenly,
locking in a bias that’s hard to undo. DIYers often solve this with simple habits: activate small parts first, use
consistent temperatures, and avoid rushing the trigger like it’s a microwave burrito.
Then there’s the “unexpected win” category. A maker prints a dual-material strip expecting a mild curve, and it curls
dramatically into a near-perfect loop. Suddenly, they’re brainstorming practical uses: cable organizers that wrap
themselves, shipping-friendly parts that deploy on arrival, or educational demos that show shape change in a way
videos never quite capture. These wins are why DIY self-assembling 4D printing is addictiveeach success feels like a
tiny magic trick you earned through design.
If there’s one universal DIY experience, it’s this: your second prototype will be better than your first.
The first print teaches you what reality does. The second print is where you start telling reality what to do.
And by the third print, you’ll be speaking fluent hinge: you’ll know when to thicken a backbone, when to shorten a
flexure, and when to admit the design needs a mechanical stop because physics is not impressed by optimism.
That’s the real joy of DIY 4D printing: not just making something move, but learning how to choreograph motion with
structure, material behavior, and time. It’s engineering you can hold in your handsometimes while laughing,
sometimes while sighingbut almost always while thinking, “Okay, one more iteration.”
Conclusion
DIY self-assembling 4D printing sits at the sweet spot between serious science and playful making.
You don’t need a research lab to explore time-based shape changeyou need a smart design, safe triggers, and the
willingness to prototype like a curious human. Start small, focus on predictable folds and curls, and treat every
“fail” as a data point. Soon enough, your prints won’t just exist… they’ll behave.