Table of Contents >> Show >> Hide
- Why DIY Monogram Wall Art Is So Popular
- Supplies You’ll Need for Classic Canvas Monogram Wall Art
- Step-by-Step: Hometalk-Style DIY Monogram Wall Art
- Style Ideas for Your DIY Monogram Wall Art
- Where to Use Your Monogram Wall Art
- Pro Tips from the DIY Community
- Troubleshooting Common Monogram Art Issues
- Real-Life DIY Monogram Wall Art Experiences (Extra )
- Conclusion: Your Walls, Your Initials, Your Story
If your walls could talk, they’d probably say, “Hey, can we please get something more exciting than that lonely thumbtack hole?” DIY monogram wall art is one of the easiest ways to give your space personality, and it’s exactly the kind of project you see all over Hometalk-style craft tutorials: simple supplies, big impact, and totally customizable.
Whether you’re decorating a nursery, zhuzhing up a dorm room, or finishing a cozy gallery wall in your living room, a monogram piece instantly says, “This is my space.” The best part? You don’t need fancy tools, a huge budget, or an art degree. Just a few basic materials, an afternoon, and a willingness to get a little paint on your fingers.
Why DIY Monogram Wall Art Is So Popular
Monogram wall art shows up everywherefrom nurseries and kids’ rooms to farmhouse entryways and chic home offices. Online craft communities and decor shops are full of personalized letter prints, wooden initials, and monogram canvases because they check all the right boxes.
1. It’s Personal Without Being Overwhelming
A single letter or monogram feels meaningful, but it doesn’t dominate your wall the way a giant family photo might. You can:
- Use your first initial or last-name initial.
- Create a combined monogram for couples or roommates.
- Make one for each kid’s room or nursery crib area.
2. It Works with Any Decor Style
From modern and minimal to rustic and cottagecore, monogram wall decor can adapt. Crafters use everything from sleek painted canvases to burlap panels, scrap wood, driftwood, faux florals, or rainbow tapes to match their room’s vibe.
3. It’s Beginner-Friendly (Really)
Many DIY tutorials show projects you can finish in under an hour: paint a canvas, glue on a wood letter, maybe add ribbon or flowers, and hang. Some makers even brag that their monogram canvas took less than 10 minutes.
4. It Makes an Amazing Gift
Custom monogram art is a go-to for baby showers, weddings, housewarmings, and teacher gifts. Online print shops and artists sell tons of personalized monogram designs for nurseries and kids’ roomsbut when you DIY it, you can tailor colors, textures, and details to the person you love.
Supplies You’ll Need for Classic Canvas Monogram Wall Art
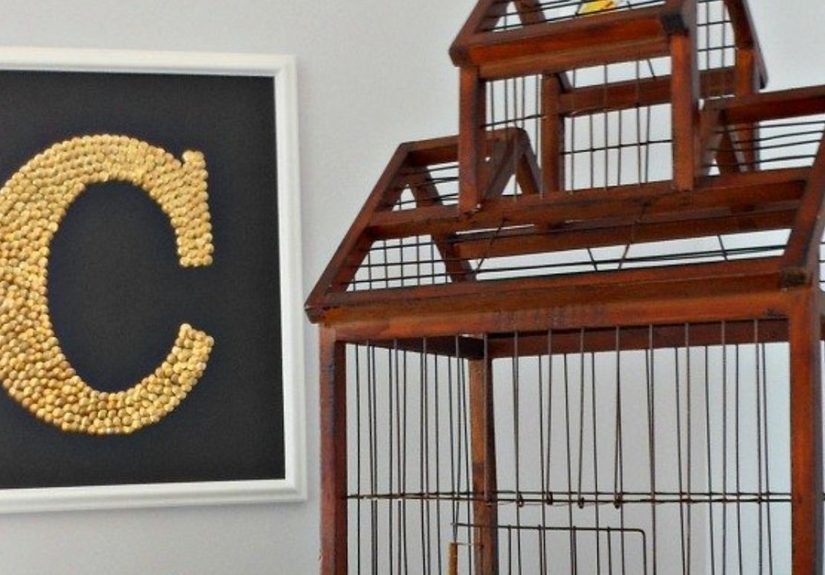
This version is inspired by popular Hometalk-style projects and classic DIY tutorials: a painted canvas with a raised wood letter in the center.
Basic Supply List
- Canvas – 8"×10", 11"×14", or 16"×20", depending on your wall space.
- Wood monogram letter – In your chosen initial; look for 3D or thicker letters for more impact.
- Acrylic paint – At least one color for the background and one for the letter.
- Paintbrushes or foam brushes – One medium brush for the canvas, one smaller brush for detail work.
- Strong craft adhesive or hot glue – To secure the letter to the canvas.
- Optional embellishments – Ribbon, faux flowers, rhinestones, washi or masking tape, wood cutouts, or stencils.
- Hanging hardware – Sawtooth hanger, command strips, or a frame.
Alternative Bases and Materials
Want to branch out from basic canvas? Try:
- Burlap-covered panels – Add rustic texture, great for farmhouse or nursery decor.
- Scrap wood rounds or planks – Perfect for cottage, cabin, or farmhouse styles.
- Driftwood or weathered boards – Ideal for coastal themes or beach houses.
- Floral monogram letters – Cover the letter itself in faux flowers for a romantic, feminine look.
- Rainbow-tape designs – Use colorful masking tape stripes on the canvas behind a bold letter for kids’ rooms.
Step-by-Step: Hometalk-Style DIY Monogram Wall Art
Let’s walk through a straightforward project you can adapt. This is the classic raised-letter monogram you often see in Hometalk gallery wall posts and nursery features.
Step 1: Plan Your Design
Before you touch the paint:
- Choose the letter (single initial, couple’s monogram, or child’s first initial).
- Pick a color scheme based on your roomneutrals for a calm bedroom, bold colors or rainbow stripes for a kid’s space, pastels for a nursery.
- Decide if you want additional texture (burlap, ribbon, flowers, tape pattern, or stenciled background).
Step 2: Prep and Paint the Background
- Lay down a drop cloth or old newspaper.
- Prime your canvas if needed (some come pre-primedcheck the label).
- Use a foam or medium brush to paint the entire canvas in your base color. Two thin coats usually look better than one thick one.
- For extra interest, lightly dry-brush a second color across the surface or create stripes using painter’s tape.
Step 3: Paint the Monogram Letter
- Lightly sand any rough edges on the wood letter if needed.
- Paint the letter in a contrasting color so it pops against the background.
- For more drama, add metallic edges, polka dots, or a subtle ombré effectpopular tricks in monogram-letter tutorials.
- Let everything dry fully before gluing.
Step 4: Attach the Letter
- Place the painted letter on the dry canvas and eyeball the center.
- Use a ruler or measuring tape to make sure the spacing from each edge is even.
- Lightly mark the letter’s position with a pencil.
- Apply strong craft glue or hot glue to the back of the letter, staying about ¼" away from the edges to avoid squeeze-out.
- Press the letter onto the canvas and hold for 30–60 seconds. Let it cure according to the glue instructions (often 24 hours for maximum strength).
Step 5: Add Embellishments (Optional but Fun)
- Ribbon borders: Glue ribbon around the edges of the canvas for a framed look.
- Floral accents: Cluster faux flowers at one corner of the letter for a nursery or wedding vibe.
- Rhinestones or gems: Line the edges of the letter for sparkle in kids’ rooms or glam spaces.
- Small wooden shapes: Stars, hearts, or little animals can tie into a themed room.
Step 6: Attach Hardware and Hang
Add a sawtooth hanger to the back of the canvas or use removable wall strips if you’re in a dorm or rental. Stand back, straighten it a bit (and then again), and admire your personalized art.
Style Ideas for Your DIY Monogram Wall Art
Modern & Minimal
Stick to a monochrome palette: white canvas, black or charcoal letter, clean lines, no embellishments. This works perfectly in home offices, entryways, or Scandinavian-style living rooms.
Rustic Farmhouse
Use a burlap-covered panel, scrap wood background, or distressed painted boards. Stain the wood instead of painting it solid, then layer a white or cream letter on top for contrast.
Nursery & Kids’ Room
For nurseries, crafters love soft pastels, watercolor-style backgrounds, floral monograms, and sweet motifs like animals or balloons. Kids’ spaces handle brighter colors, rainbow stripes, and glitter.
Bold & Playful Rainbow
Cover the canvas with horizontal stripes of colored masking tape in rainbow order, then mount a painted wood letter in the center. Add rhinestones around the edge of the letter for extra sparklethis is a favorite approach in craft-party tutorials.
Floral & Romantic
Instead of decorating the canvas, cover the letter itself in faux flowers, greenery, or paper blooms. This style looks gorgeous in bedrooms, weddings, or feminine home offices.
Where to Use Your Monogram Wall Art
- Entryway: Hang a large last-name initial by the front door to welcome guests.
- Nursery: Place a baby’s initial over the crib or changing station.
- Gallery wall: Mix your monogram canvas with framed photos, quotes, and small mirrors for a collected, Hometalk-inspired gallery wall.
- Dorm room: Create a dorm-sized piece to hang above a bed or desklightweight, easy to pack, and totally Instagrammable.
- Weddings & events: Use a larger version as a welcome sign, then bring it home after the event and hang it in your living room.
Pro Tips from the DIY Community
Get the Layout Right
- Measure from all sides to center your letter; don’t just “eyeball it” unless you love chaos.
- If your letter shape makes it hard to see if it’s straight (looking at you, S and Z), use a small level on the top or side of the letter.
- Do a dry fit first: place the letter and any embellishments without glue, snap a photo, and adjust before committing.
Make Your Colors Work Hard
- Pick one bold “hero” color and two supporting neutrals so your piece looks intentional, not random.
- Echo accent colors already in the roomlike a pillow or rug toneto pull the space together.
- Metallic touches (gold, silver, rose gold) around the edges of the canvas or letter can instantly make the project feel more high-end.
Save Money with Smart Upcycling
- Use scrap wood instead of buying new boards.
- Upcycle old frames by popping out the glass and backing, adding a painted panel, and mounting your letter inside.
- Combine leftover faux flowers or ribbon from past projects into one eclectic, charming piece.
Troubleshooting Common Monogram Art Issues
The Letter Isn’t Centered
If you’ve already glued it and it’s slightly off, don’t panic. Often, adding a cluster of flowers, ribbon, or a small decorative element on one side will visually re-balance the piece.
The Paint Looks Streaky
Add another thin coat instead of a thick one, and let it dry completely between coats. On wood, lightly sanding between layers can help too.
The Glue Bled Out from Under the Letter
Carefully use a craft knife or toothpick to remove visible glue once it’s mostly dry but still slightly flexible. Next time, apply glue at least a quarter inch from the edge of the letter.
The Colors Clash with the Room
The beauty of DIY is that you can repaint. If the canvas color isn’t working, tape off the letter and repaint just the backgroundor vice versa. Neutral backgrounds with colorful letters are usually easier to adapt as your decor changes.
Real-Life DIY Monogram Wall Art Experiences (Extra )
Once you make your first monogram wall art piece, it’s a little bit addictive. People often start with a nursery or dorm room project and then slowly sprinkle initials around the house like decorative confetti.
The Dorm Room That Finally Felt Like Home
Picture a tiny dorm room: beige walls, standard-issue furniture, and fluorescent lighting that screams “exam season.” One college student decided she’d had enough of the bland vibe and made a small 12"×12" canvas monogram in her school colors. She painted the canvas a deep navy, added a bright gold letter, and glued a thin ribbon border around the edge. The whole project cost less than a pizza and took under an hour, but once that monogram went up over her bed, the room stopped feeling like a temporary box and started feeling a little more like herslike a corner of home in the middle of campus life.
A Nursery Wall That Grew with the Baby
Another popular story you see in nursery decor communities is the “grow-with-me” monogram. Parents will create a sweet pastel monogram canvas before the baby is bornmaybe with soft sage and cream stripes and a floral accent in one corner. When the baby grows into a toddler, that same monogram migrates from above the crib to above a reading nook, then later to a big-kid bed. The rest of the decor may change: out go the mobiles, in come the superhero posters or ballerina prints. But that monogram acts like a visual anchor, quietly reminding everyone whose room it is.
From Wedding Sign to Everyday Decor
DIYers also love turning wedding decor into permanent art. A couple might build a large rustic wood sign with their shared monogram and wedding date for the reception entrance. After the honeymoon, that exact piece often comes home and lands above the sofa or in the entryway, carrying a little bit of celebration energy into everyday life. Instead of becoming clutter, the wedding decor becomes a long-term design feature. And if they ever redecorate, they can sand the wood, update the paint colors, and keep the original monogram as a sentimental centerpiece.
Kids’ Craft Night That Actually Turned Out Cute
If you’re brave enough to hand kids paint and glue, monogram art is a surprisingly low-stress family project. Set out small canvases, pre-cut wood letters for each child, and a limited palette of child-friendly colors (think three or four main shades so they can’t accidentally create a brown sludge masterpiece). Encourage each kid to design their own backgroundpolka dots, stripes, starsand then help them glue on their letter. The finished pieces can go on bedroom walls, hang in a hallway gallery, or line up over hooks in a mudroom. The best parts of this kind of project aren’t just the final pieces; it’s the sense of ownership kids feel when they see their initial proudly displayed on the wall.
Why These Experiences Matter
All these small stories share a theme: monogram wall art isn’t just about decorating. It’s about claiming a space, celebrating identity, and making otherwise generic rooms feel a little more “you.” A single, simple letter becomes a shorthand for memoriesa dorm year, a baby’s first room, a wedding day, or a chaotic but laughter-filled craft night. When you hang your finished monogram, you’re not just adding decor; you’re putting a tiny, stylish exclamation point on your personal story.
Conclusion: Your Walls, Your Initials, Your Story
DIY monogram wall art is a rare combo of easy, affordable, and genuinely meaningful. With a canvas or wood panel, a letter, some paint, and a bit of creativity, you can make personalized wall decor that looks like it came from a boutique shopbut secretly cost you more coffee than cash.
Whether you follow a classic Hometalk-inspired design, go modern and minimal, or cover everything in rainbow tape and rhinestones, your monogram art tells visitorsand reminds youwho this space belongs to. So grab that letter, pick your colors, and let your walls finally say something fun about you.