Table of Contents >> Show >> Hide
- Why DIY Kitchen Storage Containers Are Totally Worth It
- Materials You Can Use for DIY Kitchen Storage Containers
- Step-by-Step Tutorial: Breakfast Station Storage Containers
- Smart Labeling & Organization Tips
- Safety and Practicality: What to Watch Out For
- Styling Your DIY Kitchen Storage for Maximum Impact
- Maintenance: Keeping Your Containers Fresh and Functional
- Real-Life Experiences with DIY Kitchen Storage Containers
If your kitchen cabinets explode every time you open them, this DIY kitchen storage containers tutorial is for you.
Instead of buying yet another set of pricey matching canisters, we’re going to raid your recycling bin, hit the dollar store,
and turn ordinary jars, tins, and bottles into charming, practical storage that would make any Hometalk fan proud.
Inspired by classic Hometalk-style projects and popular pantry organization trends, this guide walks you through
step-by-step instructions, clever labeling ideas, and styling tips so your flour, cereal, and coffee look as good as they taste.
Think “Pinterest-worthy pantry” on a “coupon-clipping” budget.
Why DIY Kitchen Storage Containers Are Totally Worth It
1. You save serious money
A set of glass canisters from a big-box store can easily cost more than your weekly grocery bill.
DIY kitchen storage containers let you reuse what you already have: pasta sauce jars, coffee tins, old candle jars,
and even formula or protein powder canisters. With a little cleaning and decorating, they become
stylish storage for flour, sugar, snacks, and more.
2. You control the look and size
One of the biggest perks of handmade kitchen storage is customization. Need tall, slim containers for spaghetti?
Short, wide jars for nuts and seeds? Clear jars to show off your colorful lentils and pasta?
When you DIY, you’re not stuck with whatever set the store bundles together. You pick sizing, labels, finishes,
and how “rustic” or “minimalist” the final look will be.
3. You’re kinder to the planet
DIY storage containers are basically upcycling in disguise. Every coffee tin or glass bottle you reuse
is one less item in the landfill and one less plastic container you need to buy.
Upcycling glass jars as pantry storage has become a staple on home and lifestyle blogs because it’s
eco-friendly, durable, and surprisingly chic.
4. You actually see (and use) your food
Clear jars and labeled containers make pantry organization almost foolproof.
You see what you have at a glance, so you’re less likely to buy duplicates or let food expire in mystery bags
at the back of a shelf. Decanting dry goods like rice, beans, pasta, and cereal into DIY containers
also protects them from pests and keeps everything fresher, longer.
Materials You Can Use for DIY Kitchen Storage Containers
Before we dive into the tutorial, let’s talk about your “raw materials.” Look around your home and stash these:
- Glass jars: Pasta sauce, jam, pickles, olives, and mason jars are perfect for dry goods.
- Metal cans: Coffee cans, formula cans, or decorative tins work well for sugar, flour, or snacks.
- Sturdy plastic containers: Clear, food-safe plastic tubs can be great for bulk items and snacks.
- Labels and markers: Sticker labels, chalkboard labels, paint pens, or oil-based markers.
- Paint and finishes: Spray paint for lids, acrylic paint, clear sealer, or food-safe finishes.
- Decorative extras: Twine, ribbon, washi tape, wooden tags, or small chalkboard tags.
The goal: keep it food-safe on the inside, fun and personalized on the outside.
Step-by-Step Tutorial: Breakfast Station Storage Containers
Let’s build a set of DIY breakfast storage jars inspired by the cozy, practical style you’d see on Hometalk.
These are perfect for oats, granola, cereal, coffee, tea, and baking staples.
Step 1: Choose and prep your containers
-
Gather your jars or cans.
Aim for similar heights for a coordinated look, but don’t worry if they’re not identicalthat “collected” feel is very on trend. -
Clean thoroughly.
Remove labels by soaking jars and cans in warm, soapy water.
Use a scrub pad or a bit of oil to remove sticky residue from glue. -
Dry completely.
Any trapped moisture can lead to clumpy flour or stale cereal, so let everything air dry upside down.
Step 2: Upgrade the lids (where the magic happens)
Factory lids can look a little… “I came from the discount aisle.”
A quick makeover makes them look intentionally designed.
- Lightly sand the lids if they’re metal or glossy plastic. This helps paint stick better.
-
Spray paint the lids in a neutral color like white, black, or soft gray for a modern look,
or go bold with navy, hunter green, or gold for a more dramatic vibe. -
Seal with a clear top coat if you expect the lids to get a lot of handling.
Just keep the paint and sealer on the outside; the inside should stay food-safe.
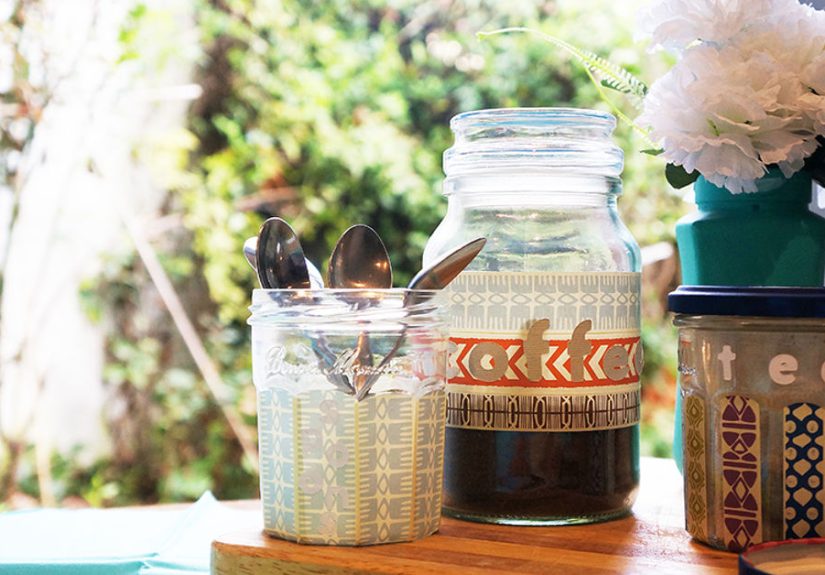
Step 3: Design your labels
Labels are where DIY kitchen storage really shines. They keep everything organized and bring visual harmony to your shelves.
- Minimalist text labels: Use simple white or clear labels with black text for a clean, modern pantry.
- Chalkboard labels: Stick on chalkboard labels and write with a chalk marker so you can erase and relabel as needed.
-
Hand-lettered directly on glass: Use an oil-based paint pen to write directly on jars
(you can remove it later with citrus-based cleaner if you want to change them).
Pro tip: Keep your label placement consistent. Use a ruler or a small strip of tape as a guide so each label sits at the same height.
It makes your DIY containers look professionally designed.
Step 4: Fill and arrange your containers
-
Choose what goes where.
Store everyday items like oats, cereal, and coffee in the most accessible containers and spots. -
Decant gradually.
When you bring home new groceries, empty them into your DIY storage containers rather than
stuffing bags onto shelves. This helps reduce package clutter and makes it easier to see when things are running low. -
Group by category.
Keep breakfast items together, baking ingredients together, and snacks together for a more intuitive layout.
Smart Labeling & Organization Tips
Label for function, not just looks
While pretty script fonts and little flourishes are nice, your kitchen storage containers should also be easy to read.
Use clear, legible text and include the actual item name (like “All-Purpose Flour” instead of just “Flour” if you also store
whole wheat or almond flour).
Add dates and directions when needed
For items like oats, grains, or specialty flours, you can add:
- Purchase or expiration date on the back or bottom.
- Quick cooking notes, like “1 cup rice + 2 cups water, simmer 15 minutes.”
These tiny details make your containers more functional and help prevent food waste.
Use different container types for different zones
- Tall glass jars: Pasta, spaghetti, breadsticks.
- Medium jars: Rice, beans, lentils, granola.
- Small jars: Nuts, seeds, baking soda, salt, loose tea.
- Metal cans: Coffee, sugar, bulk snacks, pet treats.
Mixing sizes while keeping finishes coordinated (like all white lids or all black labels) gives your pantry that
“organized but not stiff” look seen in many trendy home tours.
Safety and Practicality: What to Watch Out For
Always prioritize food-safe surfaces
Anything that touches your food should be food-safe and non-toxic.
For most DIY kitchen storage containers:
- Keep paint, stain, or adhesive only on the outside of jars and lids.
- Use containers originally designed for food where possible.
- Wash and completely dry containers before filling them with dry goods.
Know when to skip plastic
While repurposed plastic containers can work for sealed, dry goods, they’re best for short-term storage
rather than long-term hoarding of grains or flour. Glass is more durable, non-porous, and doesn’t absorb smells or stains.
Don’t forget accessibility
The prettiest storage system fails if you can’t reach anything.
Keep everyday items at eye level, heavy containers on lower shelves, and backstock on higher shelves or in a separate cabinet.
Styling Your DIY Kitchen Storage for Maximum Impact
Now for the fun part: turning your containers into an aesthetic moment.
-
Stick to 2–3 colors.
For example, clear glass jars, white lids, and black labels. Simple color palettes keep the look cohesive. -
Add texture.
Use woven baskets, wooden crates, or metal racks alongside your containers to create layers and visual interest. -
Play with height.
Use risers, tiered shelves, or stacked bins so you can see everything, even in deep cabinets. -
Leave some breathing room.
You don’t need to fill every inch of shelf space. A little empty space makes your kitchen feel calmer.
Your DIY storage doesn’t have to be perfect or matchy-matchy.
Think of it as a curated collection you refine over time as you figure out what truly works for your cooking and shopping habits.
Maintenance: Keeping Your Containers Fresh and Functional
Establish a “refill routine”
Choose one day a week or month to tidy your pantry, refill containers, wipe down lids, and check dates.
It doesn’t have to take long; even 10–15 minutes can keep your DIY system running smoothly.
Clean between refills (most of the time)
For items like flour, oats, or rice, fully emptying and washing containers every few refills helps prevent stale odors.
Just make sure the jar is bone-dry before refilling to avoid clumps and mold.
Be flexible
If a certain container size isn’t working for a particular ingredient (for example, your cereal jar is always empty),
swap things around. DIY kitchen storage containers are meant to adapt with you, not trap you in a system that doesn’t fit.
Real-Life Experiences with DIY Kitchen Storage Containers
After you’ve lived with DIY kitchen storage containers for a while, you realize the project isn’t just about cute jarsit genuinely changes how your kitchen works.
Experience 1: The “cereal avalanche” problem solved
If you’ve ever had three half-empty boxes of cereal fall on your head when you opened a cabinet, you know the struggle.
Switching to clear, labeled containers doesn’t just look nice; it keeps breakfast drama-free.
Instead of digging through crumpled boxes, you see at a glance which cereal is running low and which one your family actually eats.
Many people find that kids snack more responsibly when they can easily see and access food.
A row of labeled jars with cereal, granola, or dried fruit encourages better choices than a jumble of mystery boxes and bags.
Experience 2: Saving money… by seeing what you already own
One of the most surprising benefits of DIY pantry organization is how much money it saves.
When ingredients are hidden in their original packaging, it’s easy to forget you already have three bags of rice.
Once everything is decanted into clear containers, duplicates become obvious.
You naturally start shopping more intentionally because you can see when you truly need a refill.
Over time, that means fewer emergency grocery runs, less food waste, and a more streamlined shopping list.
Even if your containers came from the dollar store, their impact on your budget can feel pretty premium.
Experience 3: Cooking becomes less stressful
DIY kitchen storage containers also make everyday cooking smoother.
Instead of rummaging for ingredients while a pot boils over,
you know exactly where your salt, pasta, and spices live.
Labeled jars and cans act like visual shortcuts for your brainno more guessing which bag holds sugar and which is flour.
If you meal prep, you can dedicate containers to staples you use every week:
rice, oats, beans, snack mixes, or baking ingredients.
Having them visible and ready to go cuts down on prep time and “What on earth do we eat tonight?” panic.
Experience 4: A small upgrade that changes how your kitchen feels
Many people start DIY pantry storage projects because they’re tired of mess,
but they stay in love with them because of how the space feels afterward.
Opening a cabinet and seeing neatly arranged jars and cans can be surprisingly calming.
There’s a sense of control, even when the rest of the house is… less than Instagram-ready.
Friends and family often notice the change, too.
Guests may comment on your “fancy” jars without realizing they used to hold pasta sauce or coffee.
It’s one of those upgrades that looks expensive but is secretly built on leftover containers and a little creativity.
Experience 5: Learning as you go
No one gets their system perfect on the first try.
You might realize that certain jars are too heavy for higher shelves,
that clear containers in a sunny spot aren’t ideal for coffee beans,
or that you prefer wide-mouth jars because they’re easier to scoop from.
The beauty of DIY kitchen storage containers is flexibility.
You can repaint lids, swap labels, reassign jars, or add new containers as your cooking style evolves.
Over time, your system becomes highly personalreflecting what you actually cook, how your family snacks,
and what makes your kitchen feel functional and inviting.
In the end, this isn’t just a craft project; it’s a lifestyle tweak.
With a bit of time and creativity, you transform random jars and cans into a storage system that looks good,
saves space, minimizes waste, and makes everyday life in the kitchen easier.
That’s the heart of the Hometalk spirit: simple DIY projects that actually improve how you live at home.