Table of Contents >> Show >> Hide
- Why Block Hooks Work So Well (Even in Tiny Hallways)
- Materials and Tools
- Plan Your Hook Layout Like a Designer (Without Becoming One)
- Step-by-Step: Make Block Hooks in Under an Hour
- Step 1: Choose and Prep Your Blocks
- Step 2: Decide Your Look (Natural, Painted, or Color-Blocked)
- Step 3: Drill a Pilot Hole in Each Block
- Step 4: Mark Wall Placement
- Step 5: Mount the Blocks
- Option A: Screw Into Studs (Best for Heavy Loads)
- Option B: Use Drywall Anchors (When Studs Aren’t Where You Need Them)
- Option C: Mount a Backing Board First (The “I Want This Bulletproof” Method)
- Make It Strong: Weight, Wall Types, and Common Sense
- Design Ideas: Make Your Hooks Look Custom (Not “Craft Day Chaos”)
- Finishing Touches That Make a Big Difference
- Common Mistakes (So You Don’t Learn the Hard Way)
- Conclusion
- Bonus: of Real-Life Experience With Block Hooks
The hallway is a magical place. You walk in with a full schedule, a half-empty coffee, and a jacket you’ll
“definitely hang up.” Ten seconds later, your coat is on a chair, your bag is on the floor, and your keys have
entered the Witness Protection Program.
Enter the simplest upgrade with an outsized payoff: instant hallway hooks made from wooden blocks.
It’s part storage, part wall art, and part “look at me, I have my life together.” Best of all, it’s modularadd one
hook today, add three more when your hallway starts impersonating a laundry pile again.
This project is inspired by the classic toy-block hook concept: mount individual wooden blocks to the wall so each
block becomes a sturdy, sculptural “peg” for coats, tote bags, dog leashes, and the scarf you keep buying because
“this one is different.”
Why Block Hooks Work So Well (Even in Tiny Hallways)
Traditional coat racks are great, but block hooks have a few secret superpowers:
- They’re space-smart. A few inches of wall becomes useful storageno furniture footprint required.
- They look intentional. A scattered arrangement can read like modern wall sculpture (the good kind).
- They’re flexible. Stagger heights for kids and adults, add more blocks anytime, and customize the layout to your space.
- They’re “forgiving” DIY. One slightly crooked hook is not a failure; it’s “organic composition.”
Materials and Tools
Materials
- Wooden blocks (toy blocks, craft blocks, or scrap wood cut into 2–3 inch chunks)
- Screws (typically 2–3 inches long, depending on block thickness + wall type)
- Wall anchors (if you can’t hit studsmore on choosing the right ones below)
- Optional finishes: paint, stain, polyurethane/topcoat, or wax
- Painter’s tape (for clean color-blocking lines)
- Felt pads (optionalhelps protect delicate items and softens noise)
Tools
- Drill/driver + drill bits
- Stud finder (nice) or a magnet + common sense (also nice)
- Level or laser level (helpful, not mandatory)
- Measuring tape
- Sandpaper (120 and 220 grit are a solid duo)
- Clamp (optional but helpful for drilling safely)
Plan Your Hook Layout Like a Designer (Without Becoming One)
Before you drill anything, do a quick “hallway reality check.” Stand where you naturally drop your stuff. That’s
your hook zone. Now decide what you’re actually hanging:
- Light use: keys, baseball caps, lanyards, dog leash
- Medium use: jackets, tote bags, backpacks
- Heavy use: loaded backpacks, winter coats, purses full of “just in case” items (aka bricks)
If you expect heavy use, prioritize studs or heavy-duty anchors. If it’s mostly light-to-medium items, you have more flexibility.
(Translation: your wall will forgive you more easily.)
Height and Spacing Tips
- Adult coat height: often around 60–70 inches from the floor (adjust for your household).
- Kid-friendly height: 36–48 inches so they can hang their own stuffthen forget anyway, but with enthusiasm.
- Spacing: give bulky coats room (6–10 inches between hooks), tighter for keys and hats.
- Staggering: offset heights so items don’t overlap like a jumbled closet on the wall.
Pro move: cut paper squares the size of your blocks and tape them to the wall first. Shuffle them until the layout
looks right. It’s like interior design… but with less commitment and fewer expensive regrets.
Step-by-Step: Make Block Hooks in Under an Hour
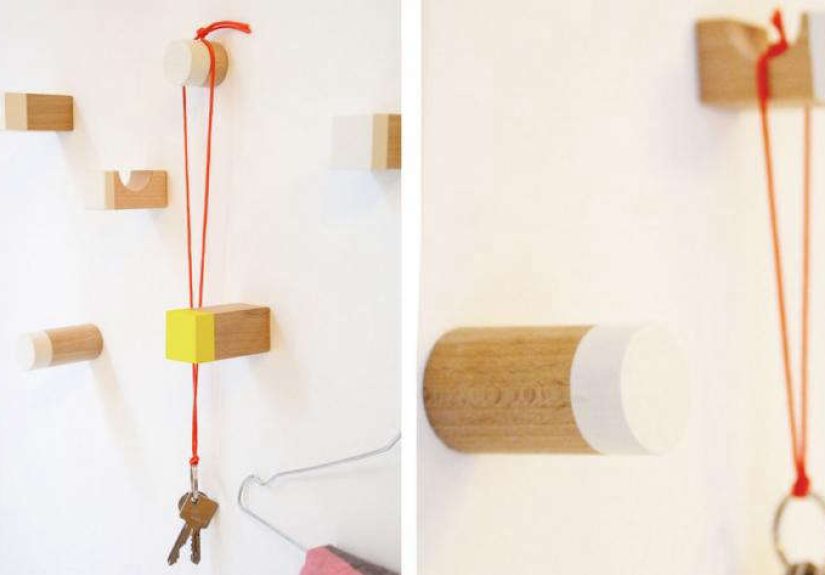
Step 1: Choose and Prep Your Blocks
Pick blocks that feel comfortable in your handbig enough to act as a “peg,” not so tiny they look like wall
crumbs. If your blocks have sharp edges, lightly sand them so they won’t snag knitwear or scrape knuckles.
Quick sanding formula: start with 120 grit to smooth roughness, finish with 220 grit for a clean touch.
Wipe dust off before finishing.
Step 2: Decide Your Look (Natural, Painted, or Color-Blocked)
Wooden blocks can look surprisingly upscale when you keep them natural and add a clear protective finish. Or go bold:
paint them the same color as the wall for a subtle “floating” effect, or use a contrasting color so they pop.
Color-blocking tip: wrap painter’s tape around the block, paint one section, let it dry, then peel for a crisp line.
It’s the DIY equivalent of putting on a blazer: suddenly everything looks more put-together.
Step 3: Drill a Pilot Hole in Each Block
Mark the center of the back face of the block. Drill a pilot hole straight inthis helps prevent splitting and makes
installation easier. If you want the screw head to sit recessed, drill a shallow wider “counterbore” first, then drill
the pilot hole inside it.
Keep the hole straight. This is not the moment for “I’ll eyeball it.” Your wall will remember.
Step 4: Mark Wall Placement
Use your taped paper templates (or the blocks themselves) to mark where each hook will go. A level helps if you want a tidy row,
but a scattered arrangement can look intentionally artisticespecially if you repeat a pattern (like a diagonal or gentle wave).
Step 5: Mount the Blocks
Here’s where you choose your wall strategy:
Option A: Screw Into Studs (Best for Heavy Loads)
If you can hit a stud, do it. Stud-mounted hooks are dramatically stronger and more forgiving of heavy coats and bags.
Find studs with a stud finderor use a magnet to locate drywall screws, then confirm by measuring typical stud spacing.
Drive the screw through the block’s pilot hole and into the stud until the block sits snug against the wall. Don’t over-tighten;
you want “secure,” not “wooden pancake.”
Option B: Use Drywall Anchors (When Studs Aren’t Where You Need Them)
For lighter-to-medium loads, a good drywall anchor can be perfectly reliable if installed correctly. The key is to match the anchor
to the job and respect weight limits. In broad terms:
- Plastic expansion anchors: best for light items (think keys and small accessories).
- Self-drilling anchors: convenient for medium loads, often used for general hooks and small shelves.
- Molly bolts: good strength in hollow walls; great for heavier hooks if installed right.
- Toggle bolts / snap toggles: excellent for heavy loads in drywall because they spread weight behind the wall.
Install the anchor per its instructions, then drive the screw through the block into the anchor. Give the block a firm wiggle test.
If it shifts, fix it nowbefore your winter coat tests gravity at 7:58 a.m. on a Monday.
Option C: Mount a Backing Board First (The “I Want This Bulletproof” Method)
If you’re hanging heavier items and want more flexibility in hook placement, mount a sturdy board (like a 1×4 or 1×6) into studs,
then attach blocks to the board. This spreads weight, reduces wall damage, and makes future rearranging easier. Bonus: it looks like a
custom coat rackbecause it is.
Make It Strong: Weight, Wall Types, and Common Sense
Hooks fail for three reasons: wrong hardware, wrong installation, or “I hung a bowling ball on it because it seemed fine.”
The secret is planning for real life.
Drywall Reality Check
Drywall alone is not a dependable structure for heavy loads. You want either:
(1) a screw into a stud or (2) an anchor designed for the load.
When you’re reading package ratings, build in a safety marginespecially for hooks, where loads can shift and tug.
Don’t Trust Adhesive Hooks for Serious Weight
Adhesive hooks can be great for temporary, lightweight itemsbut humidity, temperature changes, and time can reduce holding power.
For coats, bags, or anything that could injure someone if it falls, use mechanical fastening (screws + studs/anchors).
Safety Tip: Avoid Wiring and Plumbing
Be cautious around outlets, switches, and plumbing walls. If you’re unsure, choose a different spot or use a stud finder with live-wire detection.
“Surprise electrical project” is a terrible genre of DIY.
Design Ideas: Make Your Hooks Look Custom (Not “Craft Day Chaos”)
1) The Minimal Gallery Look
Use identical blocks in a tight gridsame size, same finish. This looks clean and intentional, especially in modern homes.
2) The Playful Color-Block Wall
Paint the front faces in two or three coordinated colors. Keep the sides natural for a “designed” contrast.
Repeat colors across the layout to keep it cohesive.
3) The Family System
Give each person a “column” or “row,” and mount the lower hooks for kids. Add tiny labels or icons if you want to be extra organized.
(Extra is allowed. This is your hallway.)
4) The Bag-and-Key Combo
Mix a few larger blocks (for bags) with smaller ones (for keys and lanyards). Place a small tray or shelf underneath for mail.
Suddenly your entryway becomes functional instead of a daily scavenger hunt.
Finishing Touches That Make a Big Difference
- Seal it: If you paint or stain, add a protective topcoat so the blocks resist scuffs from zippers and bag straps.
- Sand between coats: Light sanding can help finishes feel smoother and look more professional.
- Add felt: A small felt dot on the top face can protect delicate items and dampen sound.
- Check yearly: Tighten any screws that loosen with use and seasonal temperature changes.
Common Mistakes (So You Don’t Learn the Hard Way)
Mistake 1: Skipping the Pilot Hole
Wood splits. It’s not personal. Drill the pilot hole so your block stays solid and your screw goes in clean.
Mistake 2: Using the Wrong Anchor
Not all anchors are equal. If you’re hanging anything heavier than a light jacket, choose a medium-to-heavy duty option and install it correctly.
When in doubt, go stronger.
Mistake 3: Placing Hooks Where the Door Smacks Them
Test the door swing first. A hook in the “door impact zone” becomes a daily annoyanceand occasionally a bruise.
Mistake 4: Installing Too Few Hooks
Your future self is busier than your current self. Add one extra hook now. Your hallway will thank you later.
Conclusion
DIY block hooks are one of those rare projects that hit the sweet spot: fast to build, easy to customize, and genuinely useful every day.
Whether you keep them natural, paint them to match your walls, or turn the whole arrangement into modern wall art, the result is the same:
less clutter, fewer lost items, and a hallway that feels like it belongs to someone who drinks water and remembers appointments.
Start with three blocks. See how it changes your daily routine. Then add more as neededbecause organization is not a personality trait,
it’s a system. (And yes, you can totally build the system out of toy blocks. That’s the fun part.)
Bonus: of Real-Life Experience With Block Hooks
The first time I made block hooks, I had the classic “small entryway, big chaos” setup: one narrow hallway, one doormat, and a growing
mountain of bags that looked like it was breeding overnight. The goal wasn’t perfectionit was survival. I wanted a place for three things:
keys, a daily jacket, and the tote bag I carried everywhere because I insisted I was the kind of person who might spontaneously buy fresh produce.
I started with five wooden blocks. Ambitious! I taped paper templates to the wall and immediately learned Lesson One: the hallway is not as
“centered” as you think. The wall that looked spacious in my imagination was actually competing with a light switch, a thermostat, and the door
trim. So the hooks became a staggered cluster instead of a straight line. This accident turned out to be a winonce coats started hanging,
the offset heights kept sleeves from tangling and made everything look intentional.
Lesson Two arrived when I tried to “keep it simple” by avoiding studs. I used basic plastic anchors for a couple hooks and told myself it would
be fine because I’m “not hanging anything heavy.” Within a week, I watched a loaded tote bag slowly pull one hook forward like it was doing a
suspenseful movie escape. I upgraded to heavier-duty anchors where studs weren’t available, and from that point on the hooks behaved like
responsible adults. The experience taught me something I now repeat like a mantra: hooks are not art, they are infrastructure.
The fun part was finishing. I tested a few looks: one block natural, one painted, one color-blocked with painter’s tape. The painted version looked
sharp for about five minutes until I realized glossy paint highlights every ding, scratch, and “oops” mark. The winner was a simple approach:
lightly sanded blocks, a clean stain, and a protective topcoat. It looked warm and modernand it didn’t show scuffs from metal zippers or bag clips.
My favorite unexpected benefit was how the hooks changed behavior. Suddenly, guests didn’t ask, “Where should I put my coat?” They just hung it up.
Kids used the lower hooks without being told (a minor miracle). And the daily key panic decreased because keys finally had a consistent home.
The hallway still got messy sometimeslife happensbut it stopped being a constant disaster zone. That’s the real win: not a perfect entryway,
but a calmer one.
If I could go back and do one thing differently, I’d start with a backing board mounted into studs, then attach the blocks to the board. It’s the
most forgiving setup for heavy use, and it makes rearranging easy if your needs change. But even my original versionindividual blocks, carefully
mountedproved that small projects can have big impact. For something that takes under an hour, block hooks deliver daily returns. Honestly,
I wish my retirement account worked that efficiently.