Table of Contents >> Show >> Hide
- What AirStone Is (and Why It’s Fireplace-Makeover Gold)
- Fireplace Safety First: Clearances, Heat, and “Don’t Wing It” Zones
- Tools, Materials, and Prep: Set Yourself Up for a Smooth Install
- Layout Like You Mean It: Planning the Pattern
- Step-by-Step: AirStone Installation on a Fireplace Surround
- Step 1: Mark your boundaries and protect nearby surfaces
- Step 2: Establish a level starting line
- Step 3: Consider starting above the opening
- Step 4: Install corner/finished-end stones first (if your design needs them)
- Step 5: Apply adhesive to the back of each stone
- Step 6: Cut stones cleanly and safely
- Step 7: Work around the firebox opening with a plan
- Step 8: Keep seams tight and the pattern balanced
- Step 9: Clean up and let it cure
- Design Moves That Make the Finished Surround Look High-End
- Common Mistakes (So You Don’t Invent New Words Mid-Project)
- Maintenance: Keeping It Looking Fresh
- When to Call a Pro (No Shame, Just Wisdom)
- Conclusion
- My Real-World AirStone Weekend: Notes From the Field (Extra Experience Section)
Welcome back to the fireplace makeover seriesaka the saga of turning a “perfectly functional but aggressively dated”
fireplace into something you’d actually want in family photos. In Part Three, we’re getting to the good stuff:
installing AirStone, the lightweight stone veneer system that can make a plain surround look like it moonlights as a
cozy mountain lodge.
This guide is written for real-life DIYers: people with a level, a little stubbornness, and at least one playlist that
somehow turns every home project into a montage. We’ll cover planning, safety, layout, cutting, corner pieces, and
the step-by-step install processplus a longer “what it actually feels like” experience section at the end so you can
learn from the triumphs (and the tiny chaos).
What AirStone Is (and Why It’s Fireplace-Makeover Gold)
AirStone is a manufactured stone veneer system designed to install with adhesive instead of mortar. Translation:
it’s stone vibes without the “why is there mortar in my socks?” lifestyle. It’s commonly used on accent walls,
kitchen backsplashes, and fireplace surroundsprojects where you want texture, depth, and that expensive-looking
finish without hiring a full masonry crew.
A big reason AirStone works well for a fireplace makeover is speed and simplicity: you’re pressing stones into place
rather than mixing batches of mortar and racing the clock. The system also includes corner/finished-end pieces that
help you wrap edges cleanly, so the finished surround looks intentional instead of like you ran out of patience at the
last six inches.
One important limitation: AirStone is generally intended for vertical surfacesthink surround, bump-out, chase, and
accent wall areasnot horizontal surfaces like hearth tops or countertops. Keep your “stone on the flat surface”
dreams for products specifically rated for that job.
Fireplace Safety First: Clearances, Heat, and “Don’t Wing It” Zones
Before you install anything around a fireplace, you want to identify what you’re working with. A traditional masonry
fireplace behaves differently than a factory-built unit, a gas insert, or a ventless fireplace. Heat patterns and safe
clearances can vary widely by model, BTU rating, and whether a blower is used.
Know your “clearance to combustibles” rules
Many building codes and safety standards include guidance about keeping combustible materials (like wood trim,
wood mantels, and certain finishes) away from the firebox opening. A common rule set you’ll see referenced is:
keep combustibles at least 6 inches from the fireplace opening, and within 12 inches of the opening limit how much
they can project outward (often described as a maximum of 1/8 inch of projection for each inch away from the opening).
Here’s the practical takeaway: even if your stone veneer itself isn’t the thing that’s going to ignite, the area around a
firebox can still get hot enough to damage finishes, discolor lighter tones, or create risks if you add wood trim too close.
Always check your appliance manual and local code requirements before you commit to your final design.
AirStone around fireplaces: still respect heat
AirStone is commonly described as non-flammable and suitable around “typical” fireplaces, but extreme temperatures can
cause discoloration in lighter tones. That means your design should avoid placing any material where your fireplace
manufacturer says “nope,” and you should treat the immediate firebox opening area with extra respect: verify what’s
permitted and keep to the listed clearances.
If anything about your setup feels uncertainunusual heat output, a ventless unit, questionable clearances, damaged
firebrick, cracked surround, or a mystery DIY from a previous ownerpause and consult a pro. The goal is “cozy,” not
“call the fire department.”
Tools, Materials, and Prep: Set Yourself Up for a Smooth Install
Materials
- AirStone wall stones (calculate square footage and buy a little extra for cuts and oops moments)
- Corner/finished-end stones if your surround has outside corners or exposed edges
- Adhesive appropriate for your substrate (interior stone adhesive for most interior walls; polyurethane construction adhesive for wood or moisture-prone areas)
- Painters tape to mask off adjacent walls and keep cleanup easy
- Optional ledger/temporary support (a straight board and screws) for the first row if needed
Tools
- Level (a 2-foot level is great; longer is better if you have it)
- Tape measure and pencil
- Putty knife or trowel for spreading adhesive
- Hacksaw or power saw with a masonry blade (no teeth)
- Vacuum/brush for dust control
- Safety gear: safety glasses, gloves, and a well-fitted dust mask/respirator for cutting
Prep your substrate (this is where pros win)
Adhesive-based installs live or die by surface prep. Your wall needs to be flat, smooth, clean, and rigid.
Remove dust, grease, and anything loose. If paint is peeling or flaking, scrape and sand until it’s solid. If your wall bows,
flexes, or feels “spongy,” address that nowbecause stone veneer is not the moment to discover your drywall has
commitment issues.
If you’re installing over drywall, confirm it’s well-fastened and not damaged by prior heat exposure. If you’re working
over old brick or tile, clean thoroughly and remove anything that could interfere with bonding. For wood surfaces, be
extra cautious: wood can move with humidity changes, so use the recommended adhesive and think carefully about
whether the surface is truly stable for a stone veneer finish.
Layout Like You Mean It: Planning the Pattern
The secret to a “random” stone look is… it’s not random. Spend a little time planning and you’ll avoid the two most
common DIY stone problems:
- Vertical seam city (stacked seams that scream “I installed this on a Saturday”).
- Color clumps (all the dark stones hanging out in one corner like they formed a band).
Do these layout steps before you open the adhesive
- Mix stones from multiple boxes/trays as you work so tones stay blended.
- Dry-fit a few rows on the floor to get a feel for spacing and pattern variety.
- Avoid long continuous seams by alternating sizes and offsetting joints.
- Plan around the opening so cuts look balanced (nobody wants a 1-inch sliver stone right at eye level).
For fireplaces specifically, many installers prefer to treat the area above the opening like a “feature band” and start
there, then work down. It helps you control the most visible area and prevents that sinking feeling when you realize
you’re half an inch off level right where everyone will stare.
Step-by-Step: AirStone Installation on a Fireplace Surround
Step 1: Mark your boundaries and protect nearby surfaces
Use painter’s tape to mask the adjacent wall, trim, and mantel edges. If you’re leaving a clean painted border around
the stone, mark it clearly. This is also the moment to double-check that you’re not installing in any “do not cover”
zones defined by your firebox or insert manufacturer.
Step 2: Establish a level starting line
A level first row is everything. Use a level to draw a straight guideline where your first course will sit. If your hearth
or floor is uneven (it happens), don’t blindly follow itfollow the level line and let the bottom edge be consistent and
intentional.
If needed, use a temporary ledger board to support the first row while the adhesive cures. Some installs benefit from
mechanical support at the bottom until everything sets up solidly.
Step 3: Consider starting above the opening
For fireplace surrounds, it can be smart to begin above the fireplace opening and then work downward. That keeps the
most visible area crisp and reduces the chance of fighting awkward cuts around the opening late in the game when your
patience is running low.
Step 4: Install corner/finished-end stones first (if your design needs them)
If your surround has outside corners or exposed edges, install those corner/finished-end pieces first. These pieces are
designed in matesone squared end and one rolled endso they fit together at a 90-degree angle and look like a
real wrapped corner instead of two flat stones pretending to be architectural.
- Press the squared-end piece so it’s flush with the wall edge.
- Apply adhesive to the mate, but keep adhesive off the portion that wraps around and extends beyond the wall edge.
- Alternate which wall gets the rolled edge as you go up so seams stagger naturally.
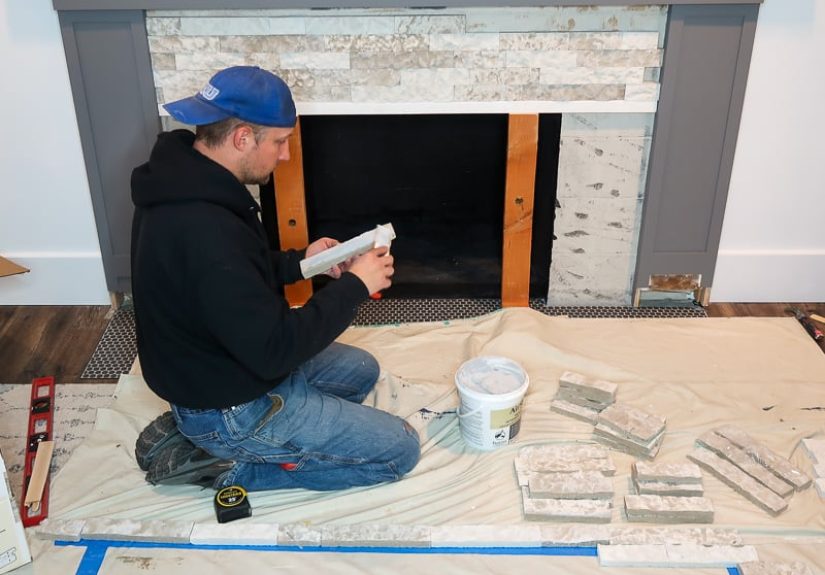
Step 5: Apply adhesive to the back of each stone
Use an appropriate adhesive for your substrate. Apply a generous, even layer to the back of the stonethick enough to
achieve full contact, but not so much it squeezes everywhere. Press the stone firmly and evenly onto the wall so the
adhesive compresses and grabs.
Work in small sections so you can keep everything aligned. Immediately wipe any adhesive off the face of the stone
before it dries. (Future-you will be grateful, and present-you will feel like an adult with their life together.)
Step 6: Cut stones cleanly and safely
You’ll need cutsaround the opening, at the ends of rows, and anytime the pattern calls for it. AirStone can be cut with
a hacksaw or with a power saw equipped with a masonry blade. If you use a power saw, control dust and ventilate the
area well.
Cutting cement-based products can create respirable dust that you don’t want in your lungs. Wear eye protection and a
well-fitted dust mask/respirator, and consider cutting outdoors or using dust suppression methods. This is one of those
“it’s not dramatic, it’s just smart” safety steps.
Step 7: Work around the firebox opening with a plan
The firebox opening is where your install goes from “fun” to “precision craft.” Aim for symmetrical cuts and avoid skinny
slivers. If you’re creating a header look above the opening, dry-fit those stones first and adjust your pattern so the
opening feels centered and intentional.
Keep the required clearance zones clear. Don’t add wood trim, decorative molding, or a mantel too close to the opening.
If your fireplace is factory-built or has an insert, your manufacturer’s instructions are the boss of this project.
Step 8: Keep seams tight and the pattern balanced
Minimize seams by fitting stones snugly together. Alternate stone sizes to break up joint lines. Every few rows, step back
and look at the whole surround. If you see a repeating “ladder” pattern, swap a stone now while it’s easy.
Step 9: Clean up and let it cure
Cleanup methods depend on the adhesive you used. Water-based interior adhesives typically clean with warm water
while still wet; polyurethane construction adhesives often require mineral spirits for cleanup. Once the adhesive cures,
cleanup becomes much harderso don’t “save it for later.”
Follow your adhesive’s cure-time instructions. Avoid blasting the fireplace with high heat immediately after installation;
give the system time to fully set so your hard work stays put.
Design Moves That Make the Finished Surround Look High-End
1) Treat the mantel like a frame, not an afterthought
A mantel doesn’t just sit thereit visually frames the entire project. If you’re adding a wood mantel, keep it at a safe
distance from the opening and size it so it looks proportional to the stone field. Wider surrounds often look best with a
mantel that extends beyond the opening on both sides, giving the whole thing a grounded, built-in feel.
2) Finish edges cleanly
If your stone ends abruptly at a wall edge, use finished-end stones where possible. That single choice separates “DIY
accent wall” from “architectural feature.”
3) Light tones + heat = plan smart
If you chose a light stone tone, be mindful of heat exposure. In many fireplace setups it’s fine, but extreme temperatures
can affect appearance over time. If your unit runs hot, consider placing lighter tones farther from the opening and using
darker tones or a different material at the hottest zones (only where allowed by the manufacturer).
Common Mistakes (So You Don’t Invent New Words Mid-Project)
- Skipping surface prep: Dust, grease, and loose paint are the sworn enemies of adhesion.
- Starting out of level: A crooked first row leads to a “why is my pattern drifting?” mystery later.
- Not blending boxes: Install stones from multiple cartons to keep color distribution natural.
- Ignoring heat/clearances: Your fireplace manual and local code aren’t “suggestions.”
- Using stone on the hearth top: Many veneer systems are not intended for horizontal surfaces.
- Letting adhesive dry on the face: Clean as you go, or regret it as you go.
- Cutting without PPE: Protect your eyes and lungs; dust control is part of the job.
Maintenance: Keeping It Looking Fresh
For routine cleaning, a soft brush, a microfiber cloth, or a vacuum with a brush attachment works well to remove dust.
For smudges, use a damp cloth and gentle cleaning methods appropriate for porous stone-like surfaces. If your surround
is near cooking splatter (like in an open-plan space), you may be tempted to seal ittest any sealer on a spare piece
first and confirm it won’t change the look. Some manufacturers of stone veneer products do not recommend sealing in
general, while others allow it for specific use cases; always verify based on the product you’re using.
When to Call a Pro (No Shame, Just Wisdom)
Call a qualified fireplace professional if you’re dealing with a ventless unit that runs very hot, if you can’t verify safe
clearances, if the surround is cracked or structurally questionable, or if you’re planning to modify anything related to
the firebox, venting, or chimney system. Stone veneer is cosmetic; the fireplace system is life-safety.
Conclusion
Installing AirStone on a fireplace surround is one of those rare DIY projects where the visual payoff is enormous and the
learning curve is friendlyif you prep the surface, plan your layout, respect heat zones, and keep everything level.
Go slow on the steps that matter (prep, corners, first row), and you’ll end up with a surround that looks custom-built
instead of “I watched one video and then panicked.”
Up next in your makeover series? Depending on your plan, it might be trimming out the edges, updating the mantel,
adding built-ins, or choosing a finish for the rest of the wall. But for today, enjoy the moment where your living room
suddenly looks like it got a glow-up and a promotion.
My Real-World AirStone Weekend: Notes From the Field (Extra Experience Section)
Let me tell you what the glossy “before and after” photos don’t show: AirStone installation is a confidence-building
project… right up until you hit your first corner and realize corners are where geometry goes to laugh at you.
My biggest win was starting with a full dry-fit zone. I laid out a few rows on the floor, mixed stones from multiple boxes,
and tried to avoid obvious repeats. The first time I skipped that and pulled stones straight from one carton, I created a
suspiciously perfect cluster of similar tones in one corner. It looked less “natural stone variation” and more “these
stones have a group chat.” Mixing boxes fixed it immediately.
The second real-life lesson: the first row is everything. I wanted to trust the hearth line, because it was already there,
looking all official. But the hearth wasn’t perfectly level, and if I followed it, the whole surround would slowly tilt like a
painting in a haunted house. So I drew a level line and used that as my truth. That one choice made the rest of the
install feel almost relaxinglike, “Oh. We’re building something. Intentionally.”
Corners were the “measure twice, whisper a small prayer once” portion of the weekend. The mate system is smart,
but it demands consistency. I learned to keep my adhesive thickness pretty uniform because tiny differences changed
how the corner pieces lined up. When I got sloppy with adhesive thickness, the corner suddenly felt like it had grown or
shrunk by an eighth of an inchjust enough to make seams look off. After that, I treated the adhesive application like a
routine: same tool, same spread, same pressure. Boring? Yes. Effective? Absolutely.
Cutting day was when I became emotionally attached to dust control. If you cut indoors without a plan, the dust will
travel further than your motivation. I moved cutting outside, wore proper protection, and brushed/vacuumed the backs
of stones before installing. That last step mattered more than I expecteddust on the back is basically a tiny sabotage
team working against adhesion. Once I cleaned the backs consistently, everything grabbed better and felt more secure.
Around the firebox opening, I slowed way down. I dry-fit the header area above the opening first, because it’s the spot
everyone’s eyes go. I also avoided skinny slivers by shifting the pattern slightlysometimes just swapping one stone
size earlier in the row prevented a weird little “stone toothpick” at the end. My favorite trick was stepping back every
couple of rows and squinting at it like a museum curator. If the pattern looked too repetitive, I changed it before the
adhesive set. That saved me from the classic DIY regret: noticing the problem only after it’s permanently glued to your
house.
Cleanup was the final reality check. The best cleanup strategy is: don’t create a cleanup problem. I kept a damp rag
handy, wiped squeeze-out immediately, and refused to tell myself “I’ll get it later.” Because “later” is when adhesive
transforms into a fossil. By the end, the stone face looked crisp, the seams were tight, and the whole surround had that
textured depth that makes the room feel warmer even when the fireplace is off.
If you’re about to do this project, here’s my honest encouragement: you don’t need to be a pro. You just need to be
patient with the prep, stubborn about level lines, and willing to adjust the pattern before it hardens into history. When
you light the first fire (after everything is fully cured and verified safe), you’ll forget the messy partsbecause your
fireplace will finally look like it belongs in the room, not like it came with the house as a practical joke.