Table of Contents >> Show >> Hide
- Why This Dollar Tree Planter DIY Works
- What You’ll Need
- Step-by-Step: DIY Dollar Tree Planter (Farmhouse Distressed Finish)
- Make It Functional: Faux Plant vs. Real Plant
- Picking the Right Soil (This Is Where Plants LiveSo It Matters)
- Plant Styling: The “Thrill, Fill, Spill” Trick
- Outdoor Durability: How to Keep Your Finish Looking Good
- Design Variations (Because One Planter Is Never Enough)
- Common Mistakes (And How to Avoid Them)
- Budget Breakdown (Approximate)
- Experience Notes: What Making These Planters Taught Me (Extra )
- Conclusion
- SEO Tags
You know that moment when you’re strolling through HomeGoods or Hobby Lobby, admiring those dreamy, distressed farmhouse planters…
and then you flip the price tag over and your soul temporarily leaves your body? Same.
The good news: you can get a very similar “I have my life together and own a vintage barn somewhere” vibe for about the price of a fancy coffee
using a Dollar Tree metal planter and a few crafty basics. This tutorial is inspired by the classic
DIY Dollar Tree Planter project from Three Daughters Home, with extra upgrades, real-world planting tips, and
the kind of “oops” lessons you only learn after painting something while wearing your favorite hoodie.
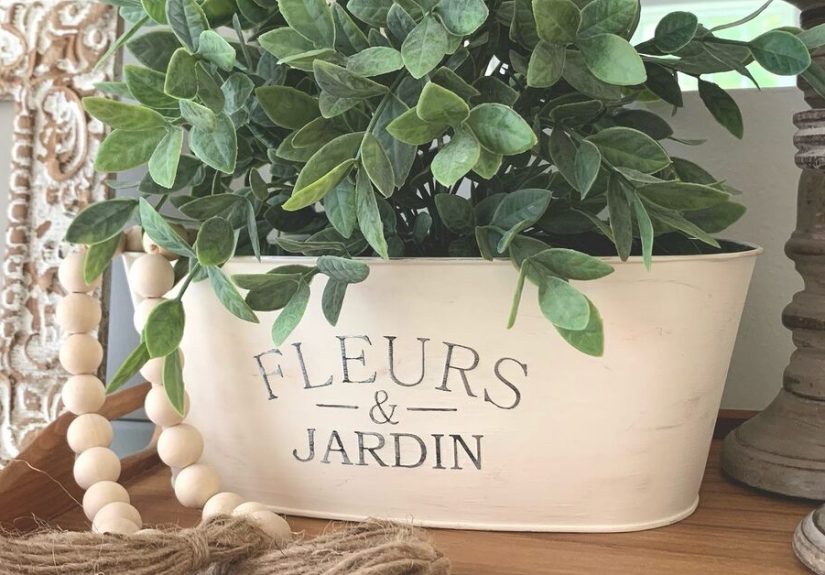
Why This Dollar Tree Planter DIY Works
This project is basically a glow-up: you’re taking a shiny (often slightly loud) dollar-store planter and giving it an aged,
matte, distressed finish that looks boutique. The magic combo is:
- Chalk-style paint for that soft, velvety farmhouse look
- Antiquing wax for instant “found this in a charming French market” energy
- Light sanding to reveal details and make it look naturally timeworn
What You’ll Need
Supplies
- Dollar Tree metal planter (many stores carry multiple designs, including versions with lettering)
- Chalk-style paint (a “parchment” or warm white is a classic farmhouse choice)
- Antiquing wax (a tea-stained or brown tone adds believable age)
- Foam brush (or a soft bristle brush)
- Cloth or paper towels (for applying and wiping wax)
- Fine grit sandpaper (think “gentle persuasion,” not “aggressive remodeling”)
Optional Upgrades
- Clear sealer (especially if you want it outdoors)
- Jute twine or rope (for trim or faux handles)
- Stencils or rub-on transfers
- A plastic nursery pot to use as a liner (recommended for real plants)
- Drill + appropriate bit (only if you plan to add drainage holes)
Step-by-Step: DIY Dollar Tree Planter (Farmhouse Distressed Finish)
Step 1: Prep the Planter (Yes, Even If It Looks “Clean”)
Wipe the planter down with a damp cloth and let it fully dry. If it feels oily, dusty, or suspiciously slick,
use a mild degreaser or a bit of dish soap and water, then dry again. Paint sticks best to surfaces that aren’t secretly coated
in “factory shine.”
Step 2: Paint the Outside (Three Coats = Chef’s Kiss Coverage)
Using a foam brush, apply your chalk-style paint to the outside of the planter. Thin, even coats are the goal.
Let each coat dry before adding the next.
Coverage tip: Three coats often gives the smoothest, most even finishespecially on metal,
where streaks can show up like they’re auditioning for a drama series.
Pro move: If you’re painting in sessions, cover your paint container with foil and pop it in the fridge between coats.
It helps keep paint from drying out, which is great because wasting paint is rude and also emotionally upsetting.
Step 3: Add Antiquing Wax (Instant “Aged” Without Waiting 40 Years)
Once the paint is fully dry, it’s time for wax. This is what creates that soft, antique patina.
Dab a tiny amount of antiquing wax onto a cloth or paper towel and swipe it on in random areas.
- Focus on the top rim and bottom edge where natural wear or rust would happen.
- Touch seams, corners, and raised areas for a believable distressed look.
- Less is moreyou can always add wax, but removing it is a whole personality shift.
If you go too heavy, don’t panic. Let it sit briefly, then soften it by wipingor paint over and try again.
This project is very forgiving, like a grandma who still thinks you’re perfect even when you burn garlic bread.
Step 4: Sand to Distress and Reveal Details
Grab fine grit sandpaper and lightly sand:
- Raised lettering (it’ll reveal the original metal and make the words pop)
- Edges and seams
- Spots where you added wax (for a layered, realistic finish)
The goal is “naturally weathered,” not “dragged behind a truck.” Start gently. You can always sand more.
Make It Functional: Faux Plant vs. Real Plant
This is where a lot of cute DIY planters meet reality. If you’re using a faux plant, you’re donecelebrate.
If you want a real plant, you need a plan for drainage and plant health.
Option A: Faux Plant (Easiest, Cleanest, Always Looks Perfect)
Pop a faux plant right into the planter. Use floral foam or crumpled paper inside to lift it to the right height.
Add moss on top if you want it to look extra realistic.
Option B: Real Plant (Still EasyJust Do This One Smart Thing)
Use your Dollar Tree planter as a cachepot: place a real plant in a plastic nursery pot
inside the decorative metal planter. That way:
- Your plant can drain properly in its own pot.
- You can lift it out to water in the sink or outdoors.
- You avoid rust rings, waterlogged soil, and the dreaded “mystery smell.”
Do You Need Drainage Holes?
If you’re planting directly into the metal planter, yesdrainage holes are essential. Without them, excess water has nowhere to go,
roots lose access to oxygen, and plants can decline fast. If your planter doesn’t have holes, you can drill them (carefully)
or use the cachepot method above.
Bonus tip: If you do add drainage holes, you can place a small piece of mesh or even a coffee filter over the hole
to keep potting mix from washing out. It’s optional, but it can reduce mess.
Picking the Right Soil (This Is Where Plants LiveSo It Matters)
For containers, use a high-quality potting mix (not garden soil). Potting mix is lighter and designed to drain well,
which helps prevent root problems in pots.
Quick Soil Match Guide
- Flowers & herbs: General all-purpose potting mix
- Succulents: Cactus/succulent mix (drains faster)
- Outdoor containers in summer heat: Consider moisture-managing mixes and consistent fertilizing
Plant Styling: The “Thrill, Fill, Spill” Trick
If you want your finished planter to look like something a professional styled for a magazine shoot, use this simple formula:
- Thrill: One taller centerpiece plant (spikes, ornamental grass, or a flowering “star”)
- Fill: Mid-height plants that add fullness (petunias, coleus, begonias)
- Spill: Trailing plants that cascade (sweet potato vine, creeping jenny, ivy)
Keep sun and water needs consistent across your picksmixing a drought-loving plant with a water-hungry one is how container drama begins.
Outdoor Durability: How to Keep Your Finish Looking Good
Chalk-style paint creates a gorgeous matte finish, but it’s not automatically weatherproof. If your planter will live outdoors,
protect your work:
- Seal it: Apply a clear topcoat suitable for outdoor use once everything is fully cured.
- Avoid constant standing water: Elevate planters slightly or use pot feet.
- Start with a clean surface: Paint adhesion improves dramatically when metal is clean and lightly scuffed.
If your metal planter has any rust or chipping paint, remove loose material, sand smooth, and consider a primer designed for metal before painting.
A little prep prevents flaking laterfuture you will be grateful.
Design Variations (Because One Planter Is Never Enough)
Once you make one, your brain will immediately start seeing planters everywhere. Embrace it. Here are a few fun variations:
1) Classic Farmhouse Neutral
Warm white paint + tea-stained wax + light sanding. Add jute twine along the rim for extra texture.
2) French Country
Softer cream paint, heavier wax in seams, and a little extra distressing on edges. Pair with lavender or rosemary for the full vibe.
3) Modern Cottage
Try a muted sage, dusty blue, or charcoalthen lightly wax and sand. It’s farmhouse, but with a sleek haircut.
4) Gift Basket Planter
Skip soil entirely. Fill the finished planter with snacks, soap, tea, or gardening goodies. Tie a ribbon around it and pretend you planned ahead.
Common Mistakes (And How to Avoid Them)
Mistake: Planting directly into a hole-free container
Solution: Use a nursery pot liner or add drainage holes. Your plant needs drainage the way your phone needs a charger.
Mistake: Using garden soil in containers
Solution: Choose potting mix. It’s designed for containers and reduces the risk of compaction and poor drainage.
Mistake: Rushing dry times
Solution: Let coats dry fully. If the finish feels tacky, give it time. Smudged paint is the official mascot of impatience.
Mistake: Over-waxing
Solution: Start small. You can always add more wax, and it’s easier to build a natural look than to reverse a “mud bath” aesthetic.
Budget Breakdown (Approximate)
- Planter: $1–$1.25
- Paint + wax (portion used): varies, but typically just a few dollars per project
- Sandpaper + brush: small cost, often reusable
Translation: you can make multiple planters for less than the cost of one “high-end” versionand you get bragging rights.
Experience Notes: What Making These Planters Taught Me (Extra )
Here’s the funniest thing about this DIY: the first planter feels like a cute craft, and the second one feels like you’ve opened a tiny
factory in your home. I made my first Dollar Tree planter on a weekday afternoon thinking, “This will be relaxing.”
Reader, I was wrongin the best way.
My initial mistake was assuming the metal planter was “paint-ready.” It looked clean, but chalk-style paint is honest. The first coat went on
a little streaky, like it was politely refusing to commit. That’s when I learned the value of a quick wipe-down and thin coats. By the third coat,
the finish turned beautifully matte, and I started feeling extremely powerfullike someone who owns matching storage bins.
The antiquing wax was the moment of truth. I dabbed a little on a paper towel and thought, “That’s not much.”
Then I swiped it across the rim and immediately said out loud, “Oh WOW, okay.” Wax is concentrated drama.
It transforms a fresh paint job into something that looks collected over time, but it will absolutely take over if you let it.
The best method I found was to apply it lightly, step back, then add more only where the planter needed depthmostly along seams,
around the top edge, and at the bottom where wear would be natural.
Sanding was surprisingly satisfying. When I sanded across raised lettering, the original metal peeked through and made it look like
a legit store-bought piece. It also taught me a gentle life lesson: going slowly produces better results. When I got impatient and pressed too hard,
I ended up with one spot that looked less “distressed farmhouse” and more “my dog found it.” I fixed it by dabbing paint and re-waxing,
which is basically the DIY equivalent of concealer.
The biggest practical lesson: decorative planters are not always functional planters. The first time I planted directly into one,
I skipped drainage holes because I was feeling rebellious. A week later, my plant looked sad and my soil smelled like regret.
Now I always use the planter as a cover pot with a plastic nursery liner inside. It’s cleaner, easier to water,
and I can swap seasonal plants without redoing anything.
Finally, I learned that making a few of these in a matching palette creates instant “designer” impact. Three small planters grouped together on a shelf,
filled with faux greenery, look intentional. One lone planter looks like you’re testing a theory. A cluster looks like you’re hosting a home tour.
The best part is that once you’ve done one, the process becomes quickpaint while you listen to a podcast, wax while you pretend you’re on a makeover show,
and sand while you admire your own brilliance. If you mess up, you fix it. If you nail it, you make another. That’s the cycle.
Conclusion
A DIY Dollar Tree planter is proof that “budget-friendly” and “beautiful” can absolutely live in the same sentence.
With chalk-style paint, a little antiquing wax, and light sanding, you can create a distressed farmhouse look that feels high-end
without the high-end price tag. Keep it simple for faux plants, or make it functional for real greenery by using a liner or adding proper drainage.
Either way, you’ll end up with a decor piece that looks curated, cozy, and genuinely charming.