Table of Contents >> Show >> Hide
- What Is Christmas Tree String Art (and Why It Works So Well)
- Supplies You’ll Need
- Choosing the Best Thread for a Christmas Tree Look
- Step-by-Step: How to Make Christmas Tree String Art on Wood
- 1) Pick a Pattern (Simple First, Fancy Later)
- 2) Prep the Board
- 3) Center and Tape Your Paper Pattern
- 4) Mark Nail Placement (Spacing Matters)
- 5) Hammer the Nails
- 6) Remove the Paper Pattern
- 7) Anchor the Thread
- 8) Wrap: Outline First, Then Fill
- 9) Add Details: Trunk, Star, Ornaments
- 10) Finish and Hang
- Three Christmas Tree String Art Designs (With Specific Examples)
- Kid-Friendly Options (No Hammer Required)
- Bonus Craft: 3D “String Ornaments” (A Different Kind of String Art)
- Troubleshooting: Common Problems and Fixes
- Where to Display Christmas Tree String Art
- FAQ
- Experience Notes: 500+ Words of Real-World Lessons From Making Christmas Tree String Art
- SEO Tags
If you’ve ever looked at a piece of string art and thought, “Wow, that person must have a secret art degree,” I have excellent news:
string art is basically connect-the-dots for grown-ups… except the dots are nails and the “pen” is thread.
A Christmas tree is one of the most satisfying designs to make because it’s naturally geometric (hello, triangle),
forgiving if you’re not a human laser-level, and it looks festive even when your cat inevitably tries to “help.”
In this guide, you’ll learn how to make Christmas Tree String Art from scratchchoosing the right board and nails,
transferring a pattern, wrapping thread like a pro, and finishing it so it looks polished (not “middle school art fair,” unless that’s your vibe).
You’ll also get variations for kid-friendly versions, ornament-sized minis, and a few troubleshooting tips for when the thread fights back.
What Is Christmas Tree String Art (and Why It Works So Well)
String art is “nail-and-thread art”: you place nails along an outline (or around anchor points) and weave string between them to create
lines, curves, and surprisingly fancy shapes. A Christmas tree design works particularly well because:
- It’s symmetrical by default (so minor mistakes blend in).
- It’s easy to scale (ornament, wall art, or a big statement piece).
- It invites textureyou can do a clean outline, a filled-in “evergreen” look, or a glowing garland effect.
Supplies You’ll Need
Here’s the classic setup for a nailed wooden string art Christmas tree, plus a few optional upgrades.
If you’re missing something, don’t panicstring art is famously tolerant of substitutions.
Core Materials
- Wood board (smooth pine, plywood, or a stained craft plank)
- Small nails (brad nails, wire nails, or finishing nailsuniform size is your best friend)
- Hammer (a smaller craft hammer gives better control)
- String: embroidery floss, crochet thread, cotton twine, or yarn (see thread tips below)
- Paper pattern (printed tree outline or hand-drawn)
- Tape (painter’s tape is ideal)
- Scissors
Nice-to-Have Extras
- Sandpaper + stain or paint (for a cleaner, more “store-bought” finish)
- Drill + small bit (for pilot holes if your wood splits easily)
- Ruler (for centered placement)
- Tweezers (for yanking tiny paper scraps out from under nail heads)
- Clear sealer (if it’ll live in a humid space or get handled a lot)
Choosing the Best Thread for a Christmas Tree Look
Thread choice changes the whole vibe. Think of it like choosing music for a road trip: technically anything works,
but your passengers will have opinions.
-
Embroidery floss:
Smooth, vibrant, easy to layer. Great for crisp outlines, color-blocking, and ombré effects. -
Crochet thread:
Slightly sturdier and less fuzzy than yarn. Excellent for detailed wrapping and sharp lines. -
Yarn:
Chunkier texture, fills space quickly, but can look fuzzy up close. Best for bold, cozy designs. -
Cotton twine:
Rustic farmhouse energy. Looks amazing on stained wood but can be harder to “draw” crisp details with.
Pro tip: If you’re aiming for “evergreen,” use 2–3 shades of green. If you’re aiming for “modern minimalist,” use one color
and let negative space do the heavy lifting.
Step-by-Step: How to Make Christmas Tree String Art on Wood
Below is the classic process. Read through once before hammering anythingyour future self will thank you.
1) Pick a Pattern (Simple First, Fancy Later)
Start with a clean outline: triangle tree + small rectangle trunk + optional star topper. If you want “branchy” detail,
you can add a tiered silhouette (three stacked triangles) or a slightly curved outline for a softer shape.
2) Prep the Board
Lightly sand the board so it won’t snag your thread. Paint it (white looks crisp), stain it (rustic), or leave it raw (modern workshop chic).
Let paint/stain dry fully before you bring thread into the situation.
3) Center and Tape Your Paper Pattern
Tape the paper to the board so it doesn’t shift. Use a ruler to center the tree horizontally, and leave a bit of margin at the bottom
for the trunk and for your hands while wrapping.
4) Mark Nail Placement (Spacing Matters)
Place marks around the outline where nails will go. For a medium board (about 8×10 or 9×12 inches), a good starting point is
nail spacing of roughly 1/2 inch around the outline. More nails = smoother curves and denser coverage, but also more time wrapping.
If you’re including a star, add nails at each point and a few along the edges so you can wrap it cleanly without it turning into a… festive blob.
5) Hammer the Nails
Hammer nails straight down, leaving the heads raised enough to catch threadusually about 1/4 to 1/3 inch above the wood.
Keep the height consistent so your thread doesn’t hop off like it’s late for an appointment.
If your wood tends to split, consider drilling tiny pilot holes. This is especially helpful near edges or with harder wood.
6) Remove the Paper Pattern
Once nails are set, carefully rip away the paper. Use tweezers to remove stubborn scraps trapped under nail heads.
(Yes, this is oddly satisfying. No, you’re not weird.)
7) Anchor the Thread
Tie a secure knot around a corner nail (bottom-left is a common start). Double-knot if you’re using slippery thread.
Trim the tail close to the knot so it won’t peek out later.
8) Wrap: Outline First, Then Fill
For the cleanest look, do an outline pass around the entire tree shape first. After that, fill it in:
- Geometric fill: jump across the shape in crisscross lines for a modern “string triangle” look.
- Dense fill: wrap many short paths between nearby nails to create a fuller evergreen texture.
- Garland effect: use a main green fill, then add a second color in a loose “swag” line like lights.
Keep tension consistentfirm but not “I’m trying to tow a truck with embroidery floss.” If you pull too hard, you can bend nails inward.
9) Add Details: Trunk, Star, Ornaments
The trunk can be simple: wrap between 4–6 nails to form a rectangle with brown thread. For ornaments, add a few beads threaded directly onto the string
as you wrap, or glue tiny pom-poms after the fact.
10) Finish and Hang
Tie off on a back nail, double-knot, and trim. If the piece will be handled or stored yearly, a light clear sealer can help.
For hanging, you can attach a sawtooth hanger, command strips (lightweight boards), or picture wire on the back.
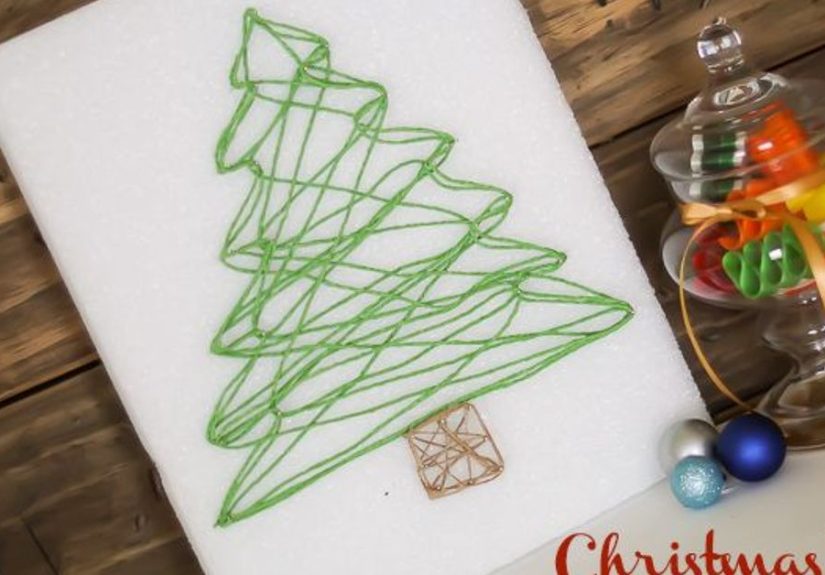
Three Christmas Tree String Art Designs (With Specific Examples)
Design 1: Minimal Outline Tree (Beginner-Friendly)
Look: crisp, modern, Scandinavian.
How: nails only along the outer tree silhouette + trunk + star. Wrap the outline 2–3 times for thickness.
Example: On an 8×10 board, use ~40–60 nails for the full outline and star.
Choose white thread on dark-stained wood for high contrast.
Design 2: Filled Evergreen (Classic Wall Decor)
Look: full, textured tree.
How: outline first, then fill by connecting nails across the interior in layered diagonals. Use two greens (dark base, lighter highlight).
Example: Add a “shadow” effect by keeping darker green closer to the center and lighter green closer to the edges.
The result reads as dimensional even though it’s totally flat.
Design 3: Ombre Tree (Bold + Artsy)
Look: gradient from deep forest to mintor even “sunset tree” if you’re feeling rebellious.
How: divide your tree into 3–5 horizontal zones. Wrap each zone with a different shade, overlapping slightly at the boundaries.
Example: Bottom zone: dark green. Middle: medium green. Top: light green. Star: metallic gold thread.
Kid-Friendly Options (No Hammer Required)
Want the look without the nail-and-hammer soundtrack? Try these:
Option A: Cardstock “Stitch” String Art
Draw a tree outline on cardstock, punch holes along the line, then weave embroidery floss through the holes like simple stitching.
It’s perfect for holiday cards, classroom crafts, or anyone who considers “hammering” a personality trait.
Option B: Cardboard String Art Shapes
Cut a triangle tree shape from sturdy cardboard, add holes around the edge, and wrap yarn around the perimeter to create a webbed texture.
This is great for ornaments and quick weekend projects.
Bonus Craft: 3D “String Ornaments” (A Different Kind of String Art)
Not all holiday string art involves nails. Another popular technique uses string hardened with craft medium around a balloon to create a lightweight ornament.
It takes longer to dry, but it’s gorgeousespecially for outdoor-friendly decor. The key is coating the string thoroughly, working in manageable lengths,
and setting up a workspace that can handle a little mess.
Troubleshooting: Common Problems and Fixes
-
Thread keeps slipping off nail heads: your nails may be too short or hammered too low. Leave more head height,
or wrap each nail once before moving to the next (like a “lock” wrap). - Wood is splitting: move nails slightly farther from edges, use thinner nails, or drill pilot holes.
- Nails are bending: reduce tension and hammer nails straighter. You can also switch to sturdier nails for larger boards.
- Design looks messy: do an outline pass first, then fill with a consistent pattern (all diagonals one direction, then the other).
- Thread is fraying: switch to embroidery floss or crochet thread, or cut shorter working lengths so it doesn’t rub as much.
Where to Display Christmas Tree String Art
This is the fun part: string art is lightweight, easy to store, and looks handmade in the best way.
Try it:
- On a mantel as part of a layered holiday vignette
- In an entryway as “instant festive” wall decor
- As a gallery wall piece mixed with holiday prints
- On a shelf with mini bottlebrush trees and candles
- As a gift (bonus points if you personalize the year on the trunk)
FAQ
How long does Christmas tree string art take?
A simple outline tree can be done in under an hour. A filled-in tree with multiple colors can take 2–4 hours depending on nail count and detail.
What size board should I use?
For a first project, an 8×10 or 9×12 board is a sweet spot: large enough to look impressive, small enough to finish in one session.
Once you’re comfortable, scale up to a statement piece.
Can I reuse a pattern?
Absolutely. If you want repeatable results (hello, handmade gifts), print the same template and keep your nail spacing consistent.
Experience Notes: 500+ Words of Real-World Lessons From Making Christmas Tree String Art
The first time I made a Christmas tree string art piece, I thought I was being wonderfully “creative” by skipping half the prep.
No sanding. No measuring. Just vibes, a hammer, and a printed triangle. It looked… festive-ish. From a distance. In low light.
The second attempt, I did the “boring” stepscentering the pattern, keeping nail heights consistent, and outlining before fillingand
the difference was dramatic. The project went from “cute craft” to “wait, you made that?” in about the same amount of time.
My biggest lesson: nail height is everything. If you hammer nails too low, thread slips off. Too high, and you end up snagging thread
like it owes you money. I now pick one “reference nail” height and try to match the rest visually. It’s not about perfection; it’s about not having
one rogue skyscraper nail that steals all the spotlight.
The second surprise was how much thread choice changes your stress level. Fluffy yarn fills space fast, but it can fuzz and snag,
especially if you wrap and unwrap. Embroidery floss feels more controllable. Crochet thread gives a super clean finish, and it’s become my go-to when
I want crisp linesespecially for stars and tiny details. I’ve also learned to cut shorter working lengths of thread than I think I need. Yes,
you’ll tie on more often, but you’ll spend less time untangling a knot that somehow became a decorative statement piece.
When it comes to design, I’ve tried three “moods”:
-
Minimalist outline tree: It’s the fastest and easiest. This is what I make when I want a clean look and a quick win.
I love pairing white thread with a dark-stained board because it pops instantly. -
Classic filled evergreen: This is the cozy, traditional version. The trick is to build layers: start with darker green lines,
then add lighter green as highlight. If you mix both colors randomly from the start, it can look flat. Layering adds dimension. -
“Lights on the tree” effect: This is where the fun really happens. I fill the tree in green, then I add a loose spiral garland
in gold or red, letting it dip naturally. Then I’ll glue tiny beads on a few intersections so they look like ornaments catching light.
It’s a small detail, but it makes the whole piece look intentional instead of “I wrapped string until I got bored.”
The most practical tip I can give: plan your tie-off points. Early on, I’d finish a color in the middle of the design,
tie a knot wherever, and then wonder why there was an awkward bump right on the front. Now I try to start and finish near the trunk area
or along a bottom corner where it’s less noticeable. If I’m switching colors (like adding a gold garland), I tie off on the back whenever possible.
Finally, don’t underestimate the power of stepping back every 10 minutes and looking at your tree from a few feet away.
Up close, string art can look like chaotic geometry homework. From a normal viewing distance, it suddenly becomes clean lines and cozy texture.
That perspective check saves you from “fixing” something that wasn’t brokenand it keeps the project fun, which is the whole point.