Table of Contents >> Show >> Hide
- What Is Chicken Parmigiana?
- Key Ingredients for the Best Chicken Parmigiana
- Step-by-Step Chicken Parmigiana Recipe
- Pro Tips for Crispy, Non-Soggy Chicken Parm
- Lighter & Modern Variations
- What to Serve with Chicken Parmigiana
- Make-Ahead, Storage & Reheating
- Extra of Real-World Chicken Parmigiana Experience
- Conclusion
If there were a Mount Rushmore of comfort food, Chicken Parmigiana would absolutely be up there in a cheesy, tomato-sauce crown.
Also known as chicken parmesan or just “chicken parm,” this Italian-American classic is everything we want on a
cozy night: crispy breaded chicken, bright marinara sauce, and a blanket of melty mozzarella and Parmesan.
In this guide, you’ll learn exactly how to make a restaurant-quality Chicken Parmigiana recipe at home, how to keep the breading
ultra-crispy (no sad soggy cutlets allowed), and a few modern twists inspired by popular U.S. food sites and Italian-American cooks.
What Is Chicken Parmigiana?
Traditional Chicken Parmigiana starts with thin chicken cutlets breaded in seasoned crumbs and Parmesan, pan-fried golden,
then finished in the oven under marinara and cheese. It’s related to classic Italian melanzane alla parmigiana
(eggplant parm), but the chicken version actually evolved in the Italian-American communities of the United States in the early 20th century.
Over time it became a staple in family restaurants, red-sauce joints, and weeknight dinners across the country.
Today, you’ll find Chicken Parmigiana served:
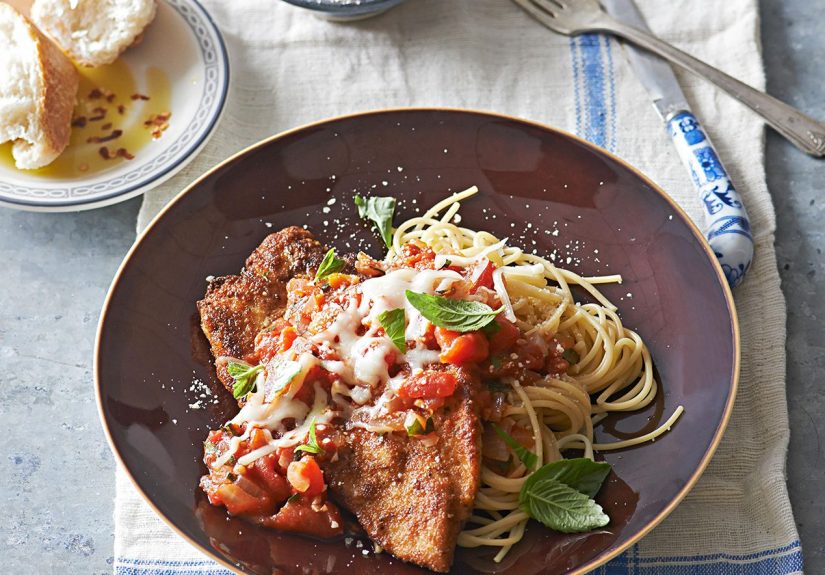
- Over a bed of spaghetti or other pasta
- Alongside a pile of fries and salad (especially in Australia)
- Stuffed into garlic bread or a soft roll as a chicken parm sandwich
However you serve it, the core idea is the same: crisp chicken, vibrant tomato sauce, and rich, stretchy cheese in perfect balance.
Key Ingredients for the Best Chicken Parmigiana
Chicken Cutlets
Boneless, skinless chicken breasts are the classic choice. To keep them juicy and cook them quickly, slice each breast horizontally
into two thinner cutlets, then pound them to an even thickness of about 1/2 inch. Even thickness means even cooking and less risk of
drying out the meat.
The Breading
For a crispy, flavorful crust, most U.S. recipes use a three-part breading station:
- Flour, seasoned with salt and pepper, to dry the surface and help the egg adhere.
- Egg mixture, usually beaten eggs sometimes with a splash of milk or cream.
-
Breadcrumbs + Parmesan:
- Use Italian-style breadcrumbs or panko for extra crunch.
- Stir in grated Parmesan for savory depth and a slightly nutty flavor.
Many modern cooks swear by panko breadcrumbs for that shattering crunch, especially when baked or air-fried.
Marinara Sauce
A good Chicken Parmigiana recipe lives or dies on the sauce. You can use:
- A high-quality jarred marinara (check for olive oil and real tomatoes, not corn syrup).
- Homemade sauce simmered with garlic, onion, crushed tomatoes, basil, and a pinch of red pepper flakes.
The key: keep the sauce bright and not overly sweet, and don’t drown the chicken. Too much sauce = soggy breading.
Cheese
You’ll typically see a combination of:
- Low-moisture mozzarella for meltability and that iconic cheese pull
- Fresh mozzarella in slices for a more luxurious version
- Parmesan or Pecorino Romano for salinity and umami
Some restaurant versions also add provolone or even a slice of ham, but we’ll keep it classic here.
Step-by-Step Chicken Parmigiana Recipe
Serves: 4 | Total time: about 45–55 minutes
Ingredients
For the Chicken
- 2 large boneless, skinless chicken breasts (about 1.5–2 lb total), halved horizontally into 4 cutlets
- 1 teaspoon kosher salt, plus more to taste
- 1/2 teaspoon freshly ground black pepper
- 1/2 cup all-purpose flour
- 2 large eggs
- 2 tablespoons milk or cream
- 1 cup Italian-style or panko breadcrumbs
- 1/2 cup finely grated Parmesan cheese
- 1 teaspoon Italian seasoning or dried oregano
- 1/2 teaspoon garlic powder (optional)
- Neutral oil for frying (such as canola, vegetable, or light olive oil)
For Assembly
- 1.5–2 cups marinara sauce
- 1.5 cups shredded low-moisture mozzarella cheese
- 1/4 cup grated Parmesan or Pecorino Romano
- Fresh basil leaves, torn or sliced (optional, for garnish)
- Cooked spaghetti or your favorite pasta, for serving (optional)
Directions
-
Prep the chicken.
Place the halved chicken breasts between two sheets of parchment and gently pound with a meat mallet or rolling pin until
they’re an even 1/2 inch thick. Season both sides with salt and pepper. -
Set up the breading station.
Put flour in one shallow dish. In a second dish, whisk eggs with milk. In a third dish, combine breadcrumbs, Parmesan, Italian seasoning,
and garlic powder. -
Bread the cutlets.
Dredge each piece of chicken in flour (shake off excess), dip into the egg mixture, then press firmly into the breadcrumb mixture
on both sides. Set breaded cutlets on a clean plate or wire rack. -
Preheat the oven.
Heat the oven to 400°F (200°C). Place a wire rack on a baking sheet to keep the cutlets crisp as they finish baking. -
Pan-fry the chicken.
Pour about 1/4 inch of oil into a large skillet and heat over medium-high until it reaches roughly 325–350°F
(the oil should shimmer and a breadcrumb should sizzle on contact). Fry chicken in batches, 3–4 minutes per side, until
golden brown and cooked through to at least 160°F internally. Don’t crowd the pan or the oil temperature will drop and the
crust can turn greasy. -
Drain and arrange.
Transfer fried cutlets to the prepared rack on the baking sheet so air can circulate underneath. This helps keep them crispy
instead of steaming on a flat pan. -
Add sauce and cheese (without drowning them).
Spoon 2–3 tablespoons of marinara onto the center of each cutlet, leaving the edges mostly exposed so the crust stays crisp.
Top each with a generous handful of mozzarella and a sprinkle of Parmesan. -
Bake.
Bake at 400°F for about 10–12 minutes, until the cheese is melted, bubbly, and just starting to brown in spots and the chicken
registers 165°F. If you like a more deeply browned top, broil for 1–2 minutes at the end (watch closely). -
Serve.
Let the chicken rest 3–5 minutes. Top with fresh basil. Serve over pasta, with a green salad, or tucked into toasted rolls
as outrageously good chicken parm subs.
Pro Tips for Crispy, Non-Soggy Chicken Parm
Several experienced cooks and food writers agree on a few key tricks for Chicken Parmigiana that stays crunchy even after saucing and baking:
-
Keep the oil hot enough.
Aim for 325–350°F. Too cool, and the breading soaks up oil and gets heavy instead of crisp. -
Use a rack, not just a pan.
Rest fried cutlets and bake them on a wire rack so hot air can circulate underneath. This prevents the bottom from steaming and going soggy. -
Go easy on the sauce.
Many popular recipes emphasize using just enough marinara to coat the center of the cutlet instead of drowning it. Think “topping,”
not “bath.” -
Don’t assemble too far in advance.
If you top the cutlets with sauce and cheese and then let them sit, the breading absorbs moisture. Fry the chicken, then sauce and cheese
right before baking or broiling. -
Consider the sheet-pan slide trick.
Some modern recipes bake the cheese and sauce on a separate pan, then slide the gooey cheese blanket onto already-crispy cutlets just before serving,
which keeps the crust extra crunchy.
Lighter & Modern Variations
You can absolutely enjoy Chicken Parmigiana in a lighter or slightly more health-conscious way without losing its soul:
-
Baked Chicken Parm.
Instead of pan-frying, spray breaded cutlets with a bit of oil and bake at 425°F until crisp and cooked through, then add sauce and cheese.
This cuts down on added fat while still delivering a satisfying crunch. -
Whole-wheat or panko breadcrumbs.
Whole-wheat crumbs add more fiber, and panko gives a lighter, airier crust. -
Air fryer chicken parm.
Many home cooks now use the air fryer for crisp cutlets with minimal oil, then quickly melt the cheese at the end. -
Chicken thighs.
If you love extra-juicy meat, you can swap in boneless thighs. They need a bit more cooking time but stay very tender. -
Eggplant or veggie parm.
To go more classic Italian, replace chicken with eggplant slices or even cauliflower steaks, using the same breading and baking method.
What to Serve with Chicken Parmigiana
Chicken Parmigiana is rich and hearty, so it pairs well with sides that either soak up the sauce or lighten the plate:
- Spaghetti, linguine, or penne tossed with a little olive oil and garlic
- Garlic bread or a crusty baguette
- Simple green salad with lemony vinaigrette
- Roasted vegetables like broccoli, zucchini, or green beans
- Mashed or roasted potatoes if you’re going full comfort-food mode
Make-Ahead, Storage & Reheating
One reason Chicken Parmigiana is so beloved among busy families is that it reheats surprisingly well, especially if you pay attention to texture.
-
Make-ahead:
You can bread and fry the chicken cutlets up to a day in advance. Store them in the fridge on a wire rack, uncovered or loosely covered, to keep the crust dry.
Add sauce and cheese just before baking. -
Refrigeration:
Store leftovers in an airtight container in the fridge for 3–4 days. -
Reheating:
Reheat on a baking sheet in a 350°F oven until hot and the cheese is re-melted, 10–15 minutes. This revives the crisp edges better than the microwave. -
Freezing:
Freeze breaded (but not yet sauced) cutlets on a tray, then transfer to a bag for up to 2–3 months. Bake from frozen, then add sauce and cheese.
Extra of Real-World Chicken Parmigiana Experience
If you cook Chicken Parmigiana a few times, you start to notice little details that make the difference between “pretty good” and “people texting you later about that chicken you made.”
This is where experience really kicks in.
The first thing many home cooks learn the hard way is that thickness matters more than almost anything else. If your chicken cutlets are uneventhick in the middle, thin at the edgesyou’ll either
overcook the thin parts or leave the middle underdone. Taking the extra two or three minutes to pound each piece to an even thickness completely changes the final result. The chicken cooks faster,
browns more evenly, and feels more like a restaurant dish than a random Tuesday experiment.
Another real-world lesson: your first batch of cutlets is usually the “test batch.” That’s totally normal. When the chicken hits the oil, you’ll see just how hot it really is. If the breading browns
too fast, it’s a sign you need to back off the heat a bit. If the cutlet just sits there looking sad and pale with almost no bubbling, your oil is too cool and the coating can end up greasy.
After one or two pieces, you’ll get a feel for the sweet spot.
Saucing is also a surprisingly personal choice. Some people like their chicken parm absolutely drowning in marinara, while others want just enough to flavor the chicken and leave the breading exposed.
Over time, you’ll probably find your happy middle. A lot of cooks discover that using less sauce on the chicken itself and serving extra on the side gives everyone at the table control over how saucy
their plate is. It’s a simple tweak that keeps the crust crisp and the sauce lovers happy.
Then there’s the cheese situation. The first time you splurge on fresh mozzarella and real Parmigiano Reggiano or good Pecorino Romano, you’ll see why so many Italian-American recipes emphasize cheese quality.
The flavor is more complex, the melt is more luxurious, and the little browned spots on top taste almost caramelized. If you’re cooking for a crowd, you can absolutely mix fresh and low-moisture mozzarella to
stretch the budget while still getting great results.
Chicken Parmigiana also adapts well to different occasions. For a cozy weeknight, you might serve it simply over pasta with a green salad. For a game-day spread or casual hangout, turning the cutlets into
chicken parm sliders or sandwiches is an instant crowd-pleaser. Split soft rolls, tuck in sliced cutlets, spoon a little extra marinara over the top, and add more cheese if you want to go all-in.
It’s messy in the best possible way.
If you cook for kidsor picky adultsChicken Parmigiana can quietly introduce them to more “grown-up” flavors. A little basil on top, a hint of crushed red pepper in the sauce, or a side of roasted vegetables
can gradually broaden their comfort zone. You can even create a mini “parm bar” with bowls of extra Parmesan, red pepper flakes, chopped herbs, and extra sauce, so everyone customizes their plate.
Over time, most people who make this dish regularly build their own house version: maybe slightly more garlic in the breading, maybe a touch of smoked paprika, maybe a marinara that always includes a splash
of red wine. After you nail the base recipe, feel free to experiment. The structurebreaded cutlet + tomato + cheesecan handle a lot of personality.
And finally, don’t underestimate how good leftover Chicken Parmigiana can be. Cold or room-temperature chicken parm on crusty bread makes an incredible next-day lunch. Some people even chop leftover cutlets
into a salad with arugula, cherry tomatoes, and shards of Parmesan for a “parm salad” that’s far more exciting than it sounds. Once you have a batch of good chicken parm in the fridge, it tends to disappear
faster than you expect.
The more you make Chicken Parmigiana, the more it becomes one of those “signature” dishes people associate with yousomething you can whip up for birthdays, lazy Sundays, or when someone needs a little extra
comfort on a rough week. Master the basics once, and you’ll have a reliable, crowd-pleasing recipe you can lean on for years.
Conclusion
Chicken Parmigiana is classic for a reason: it hits all the right notescrunchy, cheesy, saucy, and deeply satisfying. With a few key techniques
(even cutlets, hot oil, light saucing, and a quick bake), you can easily match or beat restaurant versions in your own kitchen. Whether you keep it traditional
over spaghetti or turn it into sandwiches, this Chicken Parmigiana recipe is a reliable go-to whenever you want comforting Italian-American flavor at home.