Table of Contents >> Show >> Hide
- What Are Cherry Kuchen Bars?
- Why This Cherry Kuchen Bars Recipe Works
- Ingredients
- Equipment You’ll Want
- Step-by-Step: How to Make Cherry Kuchen Bars
- Pro Tips for Bakery-Style Results
- Troubleshooting
- Variations (Because One Pan Is Never Enough)
- Make-Ahead, Storage, and Freezing
- Serving Ideas
- FAQ
- A Few Cherry Kuchen Bar “Life Lessons” (About of Real-World Experience)
- Conclusion
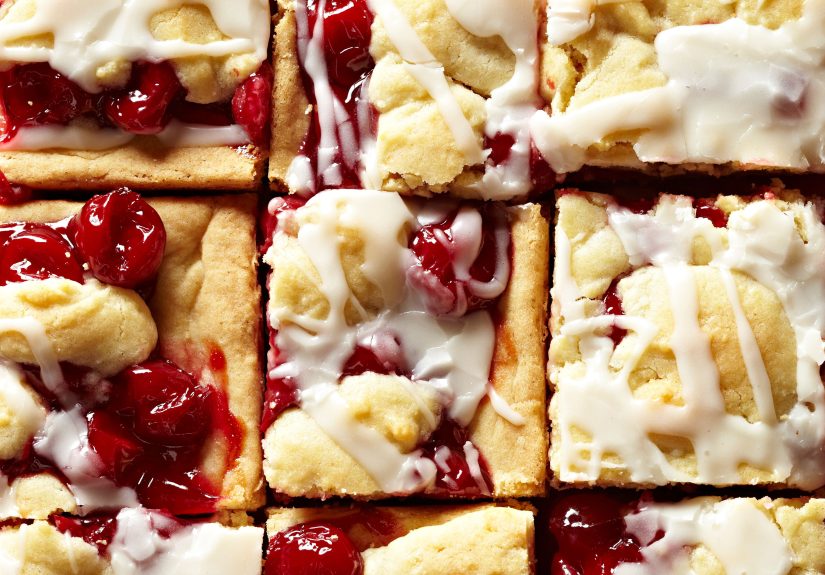
If cherry pie and a buttery coffee-cake cookie bar had a charming little Midwest-meets-Germany baby, it would look a lot like this
Cherry Kuchen Bars recipe. You get a tender, vanilla-scented base (think: soft sugar cookie energy), a glossy layer of cherries,
and a simple glaze that makes the whole pan look like it’s ready for a bake sale, a potluck, or a “just one more piece” situation.
These bars are beloved because they’re easy, crowd-friendly, and forgiving. You don’t need a lattice top. You don’t need fancy pastry skills.
You mostly need a pan, a mixer, and the courage to not “taste test” half the cherry layer before it hits the oven.
What Are Cherry Kuchen Bars?
“Kuchen” is German for “cake,” and in many American kitchens (especially in communities with German and German-Russian baking traditions),
kuchen-style desserts often show up as simple, homey cakes with fruit and sometimes custard or streusel. In the U.S., Cherry Kuchen Bars
evolved into a practical, portable version: a thick, buttery batter baked in a sheet pan, topped with cherry filling, and finished with a glaze.
Translation: it’s a cherry dessert that doesn’t demand a pie plateor a pep talk.
Why This Cherry Kuchen Bars Recipe Works
A tender bar that stays soft
A blend of fat (traditionally butter plus shortening) helps the bars bake up tender with a soft bite that doesn’t turn dry the next day.
Butter brings flavor; shortening helps that plush, bakery-style texture. If shortening isn’t your thing, you can use all butteryour bars will
taste extra buttery, just a touch more delicate.
Cherry filling without the drama
Using prepared cherry pie filling keeps the process fast and consistent. If you want a more “from-scratch” vibe, you can absolutely make your own
cherry filling (I’ll show you how below), but the classic version is unapologetically convenient.
Glaze = instant personality
The glaze is the final flourish: sweet, simple, and ridiculously effective at making people think you worked harder than you did.
(Let them believe it.)
Ingredients
For the bar base
- 1/2 cup unsalted butter, softened
- 1/2 cup shortening (or use more butter; see swaps)
- 1 3/4 cups granulated sugar
- 1 1/2 teaspoons baking powder
- 1/2 teaspoon fine salt
- 3 large eggs, room temperature if possible
- 1 teaspoon vanilla extract
- 1/4 teaspoon almond extract (optional, but very “cherry shop” in the best way)
- 3 cups all-purpose flour
- 1 to 3 teaspoons milk (only if needed to help spread the batter)
For the cherry layer
- 1 can (21 oz) cherry pie filling
- Optional: 1 teaspoon lemon zest to brighten the flavor
For the simple glaze
- 1 1/2 cups powdered sugar
- 2 to 3 tablespoons milk (add slowly)
- 1/4 teaspoon vanilla or almond extract
- Optional: 1 tablespoon melted butter for a slightly richer glaze
- Optional: pinch of salt (yes, even in frostingtrust the process)
Equipment You’ll Want
- Stand mixer or hand mixer
- Rubber spatula
- Jelly roll pan (15 x 10-inch) for classic thinner bars, or 9 x 13-inch for thicker bars
- Parchment paper (recommended for easy lifting and slicing)
- Cooling rack
Step-by-Step: How to Make Cherry Kuchen Bars
-
Prep the oven and pan.
Preheat oven to 350°F. Line a 15 x 10-inch jelly roll pan with parchment paper, leaving overhang for lifting.
Lightly grease the parchment (a quick spray is fine). -
Cream the fats and sugar.
In a large bowl, beat the softened butter and shortening for about 30 seconds. Add sugar, baking powder, and salt.
Beat until the mixture looks fluffy and lighter in color, about 2–3 minutes. This step is doing more work than it seemslet it. -
Add eggs and flavor.
Beat in the eggs one at a time, scraping the bowl as needed. Mix in vanilla (and almond extract if using). -
Add flour (don’t overmix).
Add flour in 2–3 additions, mixing on low just until combined. The dough will be thicksomewhere between cookie dough and very stubborn cake batter.
If it’s unspreadable, mix in 1–3 teaspoons milk. -
Build the base layer.
Scoop about 2/3 of the dough into the prepared pan and spread it into an even layer. A lightly greased spatula helps.
If the dough keeps pulling back like it has weekend plans, press it gently with your fingers. -
Add the cherries.
Spoon the cherry pie filling evenly over the base. If you’re adding lemon zest, sprinkle it over the cherries now. -
Top with the remaining dough.
Drop small spoonfuls of the remaining dough over the cherry layer. You’re not frosting a cakelittle “islands” are perfect.
They’ll spread as they bake, creating that classic kuchen bar look. -
Bake.
Bake for 28–35 minutes (jelly roll pan) or 35–42 minutes (9 x 13-inch), until the top is lightly golden and
the cherry filling is bubbling in spots. -
Cool completely.
Cool in the pan for at least 1 hour, then lift out using parchment and cool fully before glazing.
(Glazing warm bars = vanishing glaze. Delicious, but visually chaotic.) -
Glaze and slice.
Whisk powdered sugar with extract and milk until it drizzles easily. Add milk a teaspoon at a time.
Drizzle over cooled bars, let set for 10–15 minutes, then slice into squares.
Pro Tips for Bakery-Style Results
1) Spread thick dough like a calm person
- Use a lightly greased spatula or the back of a spoon.
- If it fights you, let it rest 5 minutessoftened dough spreads easier.
- Parchment paper is your best friend for clean slicing later.
2) Make the cherry layer taste “fresh”
- Add lemon zest (or a tiny squeeze of lemon juice) to brighten canned filling.
- Almond extract in the dough or glaze amplifies cherry flavor without extra cherries.
3) Clean cuts, no crumbling
- Cool completely before slicing.
- For extra neat slices, chill the bars 20–30 minutes, then cut.
- Wipe the knife between cutsyes, it’s annoying. Yes, it’s worth it.
Troubleshooting
My bars are dry
Overbaking is the usual culprit. Pull the pan when the edges are golden and the top looks set. Also, measure flour carefullyspoon and level
(or weigh it) instead of scooping directly from the bag like a flour excavator.
The top dough sank into the cherries
Totally normal in spots. Those little dough “rafts” sometimes take a dip. You’ll still get gorgeous, tasty barsjust with more marbling.
Call it “rustic” and say it confidently.
The glaze disappeared
The bars were too warm. Cool fully next time. If it already happened, drizzle a second time and pretend you planned the double-glaze moment.
Variations (Because One Pan Is Never Enough)
1) From-scratch cherry filling (tart, bright, and worth it)
If you have fresh or frozen pitted cherries, make a quick filling that tastes like summer.
In a saucepan, combine:
- 4 cups cherries (fresh or frozen)
- 1/3 to 1/2 cup sugar (to taste)
- 2 1/2 tablespoons cornstarch
- 1/2 cup water or cherry juice
- 1 teaspoon lemon juice
Cook, stirring, until thick and glossy (about 5–8 minutes), then cool before spreading on the dough.
This version is especially good if you like a slightly less-sweet cherry bite.
2) Streusel topping upgrade
Want more “coffee cake” vibes? Add streusel. Mix:
1/2 cup flour + 1/4 cup brown sugar + pinch of salt + 4 tablespoons butter,
plus optional oats or cinnamon. Sprinkle over the top dough before baking.
You’ll get extra crunch and a “where did you buy these?” texture.
3) Creamy kuchen twist (custard-meets-bar)
For a more traditional kuchen feel, whisk together 1 egg + 3/4 cup sour cream + 2 tablespoons sugar + 1 teaspoon vanilla.
Pour it gently over the cherry layer before adding the top dough dollops. It bakes into a soft, tangy custard layer that’s ridiculously good.
4) Swap the fruit
This base works beautifully with blueberry, apple, peach, or mixed berry pie filling. If you switch fillings, keep almond extract optional,
and match the glaze flavor (vanilla is universal; almond is especially great with cherry and peach).
Make-Ahead, Storage, and Freezing
- Room temp: Store in an airtight container for up to 3 days.
- Fridge: Up to 5 days (great for extra-clean slices).
- Freezer: Freeze up to 3 months. Layer parchment between bars to prevent sticking. Thaw overnight in the fridge.
Serving Ideas
- Warm slightly and top with vanilla ice cream (classic).
- Serve with coffee or tea for an afternoon “kuchen break.”
- Add a spoonful of whipped cream and a few toasted sliced almonds for a dressed-up look.
- Cut small squares for cookie traysthese travel well and disappear faster than you’d think.
FAQ
Can I use all butter instead of shortening?
Yes. The bars will be a bit more buttery in flavor and slightly more tender/crumbly. They’re still delicious. If you’re taking them to a party,
let them cool well before slicing for best structure.
Do I have to use almond extract?
Nope. Vanilla works perfectly. Almond just makes the cherry flavor pop in a “bakery display case” way.
Can I bake this in a 9 x 13-inch pan?
Yesyour bars will be thicker and will need a longer bake time. Watch for a lightly golden top and bubbling cherries.
Why is my dough so thick?
That’s the point. Thick dough holds up to the cherry layer and bakes into a soft bar cookie texture. If it’s genuinely impossible to spread,
add a teaspoon of milk at a time.
A Few Cherry Kuchen Bar “Life Lessons” (About of Real-World Experience)
The first time I made cherry kuchen bars, I confidently assumed the batter would spread like cake batter. It did not. It spread like a toddler
being asked to put on shoes. I stood there with a spatula, gently negotiating with dough that kept pulling back into a mound, and I briefly
wondered if kuchen was actually German for “please stop.”
Here’s what I learned: the dough is thick on purpose, and thick dough behaves better when you stop trying to “smooth” it like frosting.
Instead, press it into place. If you line the pan with parchment, you can use your fingertips (lightly greased) to press it down evenly without
ripping the paper or losing your patience. Also, letting the dough sit for a few minutes after mixing makes it a touch easier to handlelike it
needs a moment to collect itself.
Next came the cherry filling. I once opened a can and thought, “This looks like a lot.” Spoiler: it’s not too much. The cherry layer is the
whole point. That said, I did learn to spread it gently. If you push too hard, you can drag the base dough around and create thin spots that
bake faster than the rest. Now I spoon the filling in little piles across the surface, then nudge it outward with a small offset spatula
like I’m herding cherries into formation.
The top layer is my favorite part because it rewards low effort. Early on, I tried to spread the remaining dough into a full sheet and it became
a sticky mess. Then I embraced the classic “dollop method,” and everything got better. Little spoonfuls look rustic and bake into those
golden patches that scream “homemade in the best way.” Some sink, some don’teither way, the bars taste like cherry pie’s more relaxed cousin.
Glaze timing is the big “oops” moment for most peoplemyself included. I once glazed the bars while they were still warm because I was impatient,
and the glaze basically evaporated into the surface like it had an appointment. The fix was simple: cool completely, then glaze. Now I treat it as
a two-step ritual: bars cool, glaze goes on, glaze sets, then slicing. If I’m in a hurry, I pop the pan in the fridge for 20 minutes before
glazing. It’s not traditional, but neither is speed-running dessert.
Finally, here’s the sneaky truth: these bars are better the next day. The cherry layer settles, the texture becomes more cohesive, and slicing is
cleaner. So if you’re baking for company, make them ahead and let them chill overnight. You’ll look like a planning geniuseven if you were
just trying to avoid last-minute kitchen chaos.
Conclusion
This Cherry Kuchen Bars recipe is the kind of dessert that earns repeat requests: easy to bake, easy to serve, and basically
designed for sharing. Whether you stick with classic cherry pie filling or go full from-scratch with tart cherries, you’ll end up with sweet,
buttery bars that feel like traditionwithout requiring a rolling pin or a pastry degree.