Table of Contents >> Show >> Hide
- Start With the “How Will We Actually Use This?” Test
- Pick the Right Spot (Convenient + Safe + Not a Smoke Trap)
- Design the Layout Like a Tiny Outdoor Restaurant
- Choose a Foundation: Pavers, Concrete, Deck, or Gravel
- Build the Base Right (Because the Base Is Your Backyard’s Skeleton)
- Make Seating Comfortable (Not Just “Technically Available”)
- Design a Grill Station That Works (and Doesn’t Stress You Out)
- Choose Materials That Can Take a Beating (Weather + Heat + BBQ Sauce)
- Safety and Maintenance (Because Fun Is Better Without Sirens)
- Budgeting: Three Realistic Build Levels
- Backyard Stories & Lessons Learned (Extra of Real-World Experience)
- Conclusion
If your backyard currently has the vibe of “a lawn that exists” (no judgment), you’re one smart weekend away from
turning it into the place everyone suddenly wants to hang out. An outdoor sitting and grill area is basically the
grown-up version of building a fortexcept this one comes with burgers, string lights, and fewer arguments about
whose turn it is to be the dragon.
This guide walks you through planning, designing, and building a comfortable, safe, and good-looking outdoor
sitting and grill areawithout turning your home into a smoke-scented souvenir shop. You’ll get practical layout
ideas, material options, budgeting tips, and the “stuff nobody tells you until it’s too late” details that make the
difference between a backyard upgrade and a backyard regret.
Start With the “How Will We Actually Use This?” Test
Before you buy a single paver or fall in love with a pergola on the internet, answer three questions:
- How many people do you usually host? (Two chairs and a grill is a vibe. Ten people and one chair is chaos.)
- What do you cook most? Quick weeknight grilling, low-and-slow weekends, or “I just want hot dogs and peace”?
- What’s your climate reality? Sun, rain, snow, wind, bugsyour backyard has a personality. Design for it.
A simple way to avoid overbuilding: plan for your regular life, then add one “party mode” upgrade (like extra
folding-chair storage, a movable prep cart, or a longer serving ledge). Most outdoor spaces fail because they’re
designed for a fantasy lifestyle where everyone has time to marinate things.
Pick the Right Spot (Convenient + Safe + Not a Smoke Trap)
Keep heat and flames away from combustible stuff
Your grill needs breathing room. Place it well away from siding, deck railings, and anything overhead that can
catch fire (including branches and eaves). Many safety resources and outdoor-kitchen planning guides commonly
recommend roughly 10 feet of clearance from combustible materials as a practical rule of thumb, but
you should always follow your grill manufacturer’s instructions and local rules.
Think about wind, smoke, and “neighbor diplomacy”
Stand in your yard on a breezy day and notice where the wind pushes smoke. If the natural airflow funnels directly
into your back door, you’ll be seasoning your curtains. Aim for a location that vents smoke away from doors,
windows, and seating.
Convenience matters (but don’t hug the house)
You want a short walk to the kitchen, but not so close that grill heat becomes a home improvement project you
didn’t ask for. Many homeowners love a “close enough to carry food, far enough to stay safe” sweet spotoften
within a short, comfortable trip from the back door.
Call before you dig
If your plan involves digging (for footings, paver base, posts, gas/electric conduit, or drainage), contact your
local utility marking service first (in the U.S., that’s commonly “811”). It’s fast, free, and dramatically better
than learning where your gas line is by surprise.
Design the Layout Like a Tiny Outdoor Restaurant
Use zones: cook, prep/serve, sit
The easiest way to make an outdoor grill area feel intentional is to define three zones:
- Cook zone: grill + safe landing space for hot tools and platters
- Prep/serve zone: counter, cart, or table where food gets assembled and drinks live
- Sit zone: chairs/bench + a table, ideally in a place that doesn’t get blasted by smoke
Plan for traffic
People move in loops: kitchen → grill → seating → drinks → grill again. Leave clear walking lanes so guests don’t
have to do the awkward “excuse me” shuffle behind the cook. A wide path also helps you carry trays without doing
interpretive dance.
Give the grill a “safety bubble”
A practical approach is to keep a clear “working zone” around the grill so the cook can move safely. Some fire
safety guidance suggests maintaining a 3-foot safe zone around grills to keep kids and pets out of
danger. Even if you don’t have kids or pets, it’s still helpfulbecause grown-ups can also be surprisingly
enthusiastic about wandering into hot zones.
Choose a Foundation: Pavers, Concrete, Deck, or Gravel
Your foundation choice affects cost, longevity, maintenance, and the overall look. Here’s the real-world rundown:
Paver patio (highly popular for DIY)
Pavers are modular, forgiving, and easy to repair (replace one paver instead of redoing an entire slab). The
secret is the base: most paver failures trace back to poor preparation and compaction.
-
Typical layers: compacted sub-base + several inches of compacted aggregate base + about
1 inch bedding sand + pavers + joint sand. - Compaction matters: compact the base in lifts (layers), not all at once, so it doesn’t settle later.
-
Drainage matters: patios are commonly sloped gently so water runs away from your house (often in the
neighborhood of 1%–2%, roughly 1/8″ to 1/4″ per foot depending on site conditions).
If you want the “best of both worlds,” you can also incorporate a small paver pad for the grill and a larger gravel
seating area with edginggreat for budgets and drainage.
Poured concrete (clean, solid, not as forgiving)
Concrete is durable and easy to clean after a messy cookout. It can also crack over time, and repairs are more
obvious. If you go this route, the quality of the subgrade prep and control joints makes a big difference.
Deck (cozy, elevated, but watch the fire risk)
Decks feel warm and “living-room-ish,” but grills and combustible materials require extra care. If your grill is on
a deck, follow manufacturer instructions and local rules, keep it away from railings/siding, and protect the deck
surface with appropriate heat-resistant mats or pads rated for that purpose.
Compacted gravel (budget-friendly, modern, excellent drainage)
Gravel with edging can look stylish and is one of the easiest DIY foundations. Choose the right aggregate, compact
it well, and use stabilizing grids if you want a firmer surface under furniture.
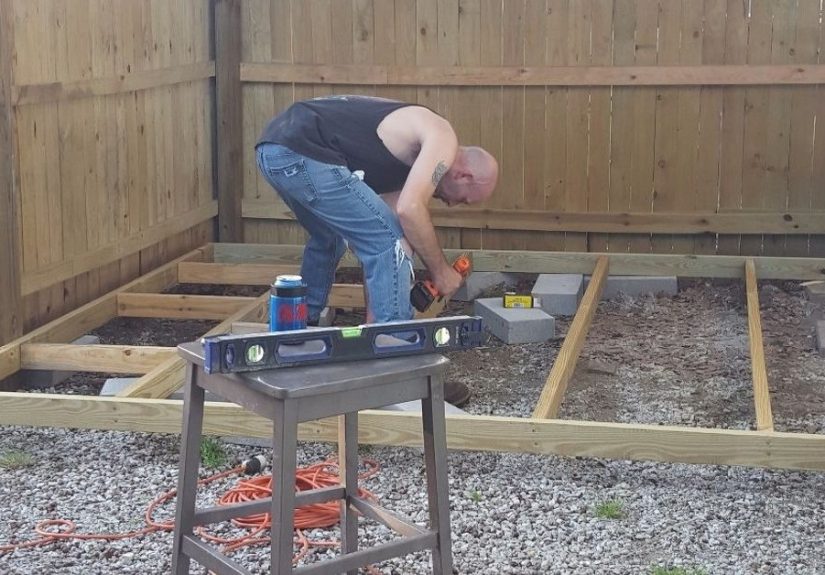
Build the Base Right (Because the Base Is Your Backyard’s Skeleton)
Whether you choose pavers or gravel, this rule stays true: the base is the project. The visible
part is just the outfit.
What “doing it right” usually includes
- Excavation to the right depth (enough room for base layers + paver thickness)
- Geotextile fabric in areas with soft/clay soil (helps prevent base mixing and sinking)
- Compacted aggregate base installed in layers (lifts) and compacted thoroughly
- Correct slope so water drains away from the house and doesn’t puddle under furniture
- Edge restraint so pavers don’t “wander” over time like they’re seeking a better life
If you’re building in a freeze/thaw region, base depth and drainage become even more important. When water freezes
and expands, it can shift pavers unless the base is stable and well-draining.
Make Seating Comfortable (Not Just “Technically Available”)
Furniture vs built-ins
Movable furniture is flexible and usually cheaper upfront. Built-ins (like a seating wall or bench) feel custom
and can double as extra buffet space. Many landscape designers aim for a seating-wall height around
18–22 inches because it matches chair-like comfort.
Shade is not optional in real life
If your grill area is full sun, it might look amazing at 8 a.m. and become a skillet at 2 p.m. Options:
- Pergola: great structure, easy to add shade cloth or vines later
- Umbrella: fastest fix, choose one with a sturdy base
- Sail shade: modern look, needs solid anchor points
Add “small comfort” upgrades that feel fancy
- Outdoor cushions in weather-resistant fabric
- A side table at every 2–3 seats (people love a place to land a drink)
- A storage bench (hides covers, games, and your secret stash of extra tongs)
Design a Grill Station That Works (and Doesn’t Stress You Out)
Give yourself landing space
The #1 quality-of-life upgrade is a non-flammable surface near the grill where you can set trays, tools, and hot
pans. It can be a built-in counter, a metal cart, or a stone-topped tableanything stable and heat-tolerant.
Plan for fuel and utilities safely
If you’re staying with propane tanks, build a discreet but ventilated place to store extrasaway from heat. If you
want a natural gas line, treat it as a licensed-pro job: it typically involves permits, proper fittings, shutoff
requirements, and inspection depending on where you live. Translation: amazing convenience, but don’t DIY the
dangerous parts.
Electricity: outdoor-rated and protected
Outdoor outlets are commonly required to be GFCI-protected and installed with weather-resistant covers. If you’re
adding outlets for lighting, a mini fridge, a fan, or a rotisserie, consult a qualified electricianespecially
because code requirements and local adoption can vary.
Don’t forget lighting
Good lighting turns “nice patio” into “we live here now.” A layered approach works best:
- Task lighting: bright light near the grill/prep area
- Ambient lighting: string lights, sconces, or post lights
- Accent lighting: step lights, wall caps, or uplighting on plants
Choose Materials That Can Take a Beating (Weather + Heat + BBQ Sauce)
Surface materials
- Pavers/stone: durable, repairable, lots of styles
- Concrete: clean modern look, can stain or crack
- Porcelain pavers: sleek and stain-resistant, needs proper base
- Gravel: drains well, budget-friendly, needs edging
Countertop options (if you add prep space)
For outdoor counters, prioritize non-porous or properly sealed materials. Stainless steel is popular because it’s
hygienic and heat-resistant, but it can get very hot in direct sun and shows smudges. Concrete looks fantastic,
but usually needs periodic sealing. Natural stone can be durable, but some types need sealing and may stain if
neglected.
Safety and Maintenance (Because Fun Is Better Without Sirens)
Grill safety habits worth adopting
- Open the lid before lighting a gas grill.
- Never grill indoors or in enclosed areas like garages.
- Keep the grill attended while it’s hot or lit.
- Keep a fire extinguisher nearby (and know how to use it).
-
Clean grease and drip trays regularlygrease buildup is a common culprit behind flare-ups and
grease fires.
Protect your investment
- Seal pavers or concrete if recommended for your material and climate.
- Use furniture covers or store cushions when storms roll in.
- Keep joints topped up with appropriate joint sand if you have pavers.
- Check and tighten hardware on pergolas, umbrellas, and seating annually.
Budgeting: Three Realistic Build Levels
1) Simple and solid (DIY-friendly)
- Compacted gravel or a small paver pad
- Grill + rolling prep cart
- Table and chairs + umbrella
- String lights (outdoor-rated)
2) The “we host now” upgrade
- Larger paver patio with edging
- Defined seating zone (sectional or built-in bench)
- Dedicated prep counter and storage
- Low-voltage landscape lighting
3) Outdoor-kitchen territory
- Built-in grill surround + counter runs
- Sink or beverage center (where permitted)
- More power (outlets) and better task lighting
- Shade structure (pergola/pavilion)
Pro tip: spend more on the base and layout, and less on “extras” you can add later. A perfect foundation makes
future upgrades painless.
Backyard Stories & Lessons Learned (Extra of Real-World Experience)
Talk to anyone who has built an outdoor sitting and grill area and you’ll hear the same pattern: the build is
exciting, the first cookout is glorious, and then reality shows up with a clipboard and says, “Let’s discuss what
you forgot.” The good news is that most of these lessons are funny in hindsightprovided you learn them before the
“oops” turns into a redo.
One of the most common experiences homeowners share is how quickly the space becomes the default hangouteven when
you didn’t plan for that level of popularity. People drift toward warmth, food smells, and comfortable seats like
it’s a law of physics. That’s why the “landing spots” matter: a little side table, a ledge on a seating wall, a
sturdy cart that can hold a tray. When those surfaces don’t exist, guests start balancing plates on their knees,
cups end up on the ground, and suddenly you’re running an obstacle course of salsa and lawn chairs.
Another universal moment: the first time you grill on a windy day. Smoke doesn’t politely rise and vanish like it
does in advertisements. It swirls, it chooses favorites, and it will absolutely aim for the one person wearing a
white shirt. This is where people learn the value of placing seating slightly upwind and giving the cook a spot
that feels protectednot trapped. Even shifting the grill a few feet can change the whole experience. Many builders
end up doing a “test cook” before finalizing the layout: set up the grill and a couple chairs temporarily, cook
something simple, and pay attention to wind and foot traffic. It’s the easiest way to avoid building the world’s
most beautiful smoke lounge by accident.
Then there’s lightingoften underestimated until the first evening gathering. Without task lighting, the cook
becomes a shadowy figure squinting into the grill like they’re trying to read ancient runes. Without ambient
lighting, guests start using their phone flashlights, which makes everyone look like they’re telling ghost stories.
The best builds usually layer light: one bright, practical source near the grill, then softer lighting around
seating. People often say this single upgrade made the space feel “finished,” even if everything else was simple.
And finally: maintenance surprises. The most experienced backyard hosts will tell you the secret isn’t fancy gear,
it’s the boring habit of cleaning grease trays, brushing grates, and keeping the area tidy. That routine prevents
flare-ups, keeps pests from treating your grill like a buffet, and makes the next cookout feel easy instead of
daunting. The best outdoor spaces aren’t the ones that look perfect on day onethey’re the ones that still work
beautifully after a year of birthdays, weeknight dinners, and “we should grill more often” resolutions that
actually happen.
Conclusion
Building your own outdoor sitting and grill area is part design project, part comfort upgrade, and part “future you
will thank present you” investment. If you focus on a smart location, a stable foundation, a simple three-zone
layout (cook, prep, sit), and a few comfort essentialsshade, lighting, landing spaceyou’ll end up with a backyard
that’s easy to use on random Tuesdays and impressive on big weekends. Keep safety front and center (clearances,
ventilation, and clean grilling habits), and you’ll create a space that feels like your home got biggerwithout the
cost of building a new room.