Table of Contents >> Show >> Hide
- The quick bathroom lighting blueprint (so every idea works better)
- 22 bathroom lighting ideas to brighten your space
- 1) Put sconces on both sides of the mirror (your face will look instantly better)
- 2) Swap “over-the-mirror glare bars” for a softer vanity light
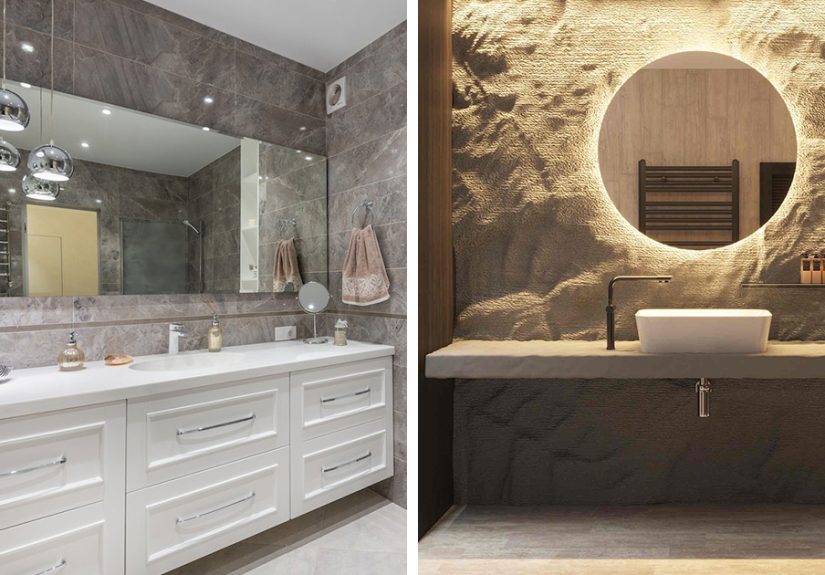
- 3) Choose an LED backlit mirror for instant glow (and less clutter)
- 4) Try a lighted medicine cabinet (function disguised as design)
- 5) For double vanities, treat each sink like it deserves its own lighting plan
- 6) Use a flush-mount ceiling light for low ceilings (bright, clean, no head bumps)
- 7) Upgrade to a semi-flush mount when you have a little ceiling height to spare
- 8) Add a statement chandelier (yes, even in a bathroom)
- 9) Try mini pendants in a powder room for big style with a small footprint
- 10) Use recessed lights to fill dark corners (and make the room feel larger)
- 11) Install shower-safe recessed lighting (because steam is not a suggestion)
- 12) Add toe-kick LED strips under the vanity (the best nightlight you’ll ever own)
- 13) Light a shower niche or shelf for a spa look
- 14) Use cove lighting to bounce light off the ceiling
- 15) Add a picture light over art (or even above a decorative mirror)
- 16) Try wall-wash lighting to show off textured tile or a statement wall
- 17) Put your vanity lights on a dimmer (and your overhead lights on a dimmer, too)
- 18) Create lighting zones: Morning Mode, Night Mode, Guest Mode
- 19) Choose bulbs that flatter skin tones (not just “bright”)
- 20) Use a skylight or solar tube to bring in real daylight
- 21) Upgrade the exhaust fan to one with an integrated light
- 22) Add “dim-to-warm” lighting for nighttime calm
- Common bathroom lighting mistakes (and how to avoid them)
- Mini checklist: plan your bathroom lighting like a pro
- Real-world experiences: what actually changes when you fix bathroom lighting
- Conclusion
Bathroom lighting is a sneaky little dictator. It decides whether your morning face looks “well-rested and thriving”
or “extra in a zombie movie.” The good news: you don’t need a full renovation (or a flattering Instagram filter) to
make your bathroom feel brighter, bigger, and more put-together. You just need the right mix of lightplaced in the
right spotswith bulbs that don’t make everyone look like they’re auditioning for a vampire role.
Below are 22 bathroom lighting ideas that designers and pros lean on again and againbecause they work. You’ll get
practical placement tips (so your mirror stops throwing weird shadows), style upgrades (so the room feels finished),
and a few safety/comfort notes (because wet spaces and electricity should never be “vibes-based” decisions).
The quick bathroom lighting blueprint (so every idea works better)
1) Layer your lighting: ambient + task + accent
The best bathrooms don’t rely on one lonely ceiling light. They use layers:
ambient lighting for overall brightness, task lighting for the mirror/vanity, and
accent lighting to add depth (and make the space feel more expensive than it was).
When these three layers work together, the room feels evenly litand your face stops looking like a science project.
2) Choose a flattering color temperature and stick with it
Color temperature is measured in Kelvins (K). In bathrooms, most people like a clean, neutral white for grooming
(often around 3000K–4000K) and a warmer glow for nighttime wind-down. The trick is consistency:
mixing wildly different temperatures in the same sightline can make your bathroom feel chaoticlike it can’t commit
to a personality.
3) Prioritize high CRI for the vanity
CRI (Color Rendering Index) is basically “how true-to-life do colors look under this light?” For makeup, shaving,
skincare, and general “is this shirt navy or black?” moments, aim for CRI 90+ around the mirror.
Your future selfies will send thank-you notes.
4) Don’t ignore moisture ratings (damp vs. wet)
Bathrooms are humid. Showers can be direct-splash zones. Choose fixtures rated appropriately, especially for shower
locations. If you’re unsure, treat any “could get sprayed” spot like it will get sprayedbecause it will.
5) Brightness isn’t one-size-fits-allthink lumens
For vanity lighting, many pros recommend planning for a strong baseline of brightness, then using dimmers to tailor
it. A common guideline is that vanity lighting should be bright enough for detailed tasks, while the rest of the
room can be comfortably layered. Translation: your bathroom can be both “get-ready functional” and “bubble-bath
serene” on the same day.
22 bathroom lighting ideas to brighten your space
1) Put sconces on both sides of the mirror (your face will look instantly better)
Side-mounted sconces provide cross-illumination, which reduces shadows under your eyes, chin, and nose. Place them
roughly at eye level (or centered on the mirror height) so the light hits your face evenly. This is the most
reliably flattering vanity setupand it looks polished in almost any style.
2) Swap “over-the-mirror glare bars” for a softer vanity light
If side sconces aren’t possible, choose a vanity bar with a diffuser (frosted glass or a shade) to soften glare.
Mount it high enough to spread light down the mirror without blasting your pupils into tomorrow.
3) Choose an LED backlit mirror for instant glow (and less clutter)
Backlit mirrors provide even, shadow-reducing illumination and can make a small bathroom feel more modern. They’re
also great in tight spaces where wall real estate is limited. Bonus points if it’s dimmable and has an anti-fog
featurebecause wiping steam off a mirror with your sleeve is a lifestyle, not a luxury.
4) Try a lighted medicine cabinet (function disguised as design)
These give you integrated, even light right where you need it. They’re especially helpful in bathrooms with awkward
layouts, windows in the wrong spot, or vanities that can’t accommodate side lighting. The result feels sleekand
you get storage without extra fixtures.
5) For double vanities, treat each sink like it deserves its own lighting plan
Two sinks don’t automatically mean one giant light. Often, two separate fixtures (or balanced sconces per mirror)
look cleaner and provide more even light. Think symmetry, not “spotlight on the middle like a stage reveal.”
6) Use a flush-mount ceiling light for low ceilings (bright, clean, no head bumps)
Flush mounts are the MVP for bathrooms with low ceilings. Choose one with a wide diffuser for even ambient light,
and pair it with strong vanity lighting so you’re not relying on overhead light alone.
7) Upgrade to a semi-flush mount when you have a little ceiling height to spare
Semi-flush fixtures add visual interest while still keeping the profile practical. They’re perfect for bridging
“builder basic” into “thoughtfully designed” without turning your bathroom into a chandelier obstacle course.
8) Add a statement chandelier (yes, even in a bathroom)
In a primary bath or a roomy space with safe clearance, a chandelier adds instant drama. Keep it proportionate:
one elegant fixture can feel boutique-hotel; a too-big fixture can feel like the bathroom is wearing costume jewelry
to brunch.
9) Try mini pendants in a powder room for big style with a small footprint
Powder rooms are the place to have fun. A pair of mini pendants can look high-end and sculptural while providing
targeted light. Just be mindful of placement so they don’t cast harsh shadows on the mirror.
10) Use recessed lights to fill dark corners (and make the room feel larger)
Recessed lights are great for evenly distributing ambient light, especially in bathrooms with awkward corners.
Avoid placing a single recessed light directly over the mirror/vanity, which can create “haunted house” shadows.
Instead, use them to supplement the room’s overall brightness.
11) Install shower-safe recessed lighting (because steam is not a suggestion)
If you want light inside the shower, choose a fixture rated for that environment and install it properly. The goal
is bright, safe illumination without risking moisture issues. This is one place where “close enough” is not a vibe.
12) Add toe-kick LED strips under the vanity (the best nightlight you’ll ever own)
Soft LED strips under the vanity create a floating effect and provide low-level guidance for nighttime trips.
It’s practical, looks high-end, and saves you from the trauma of turning on full-brightness lights at 2 a.m.
13) Light a shower niche or shelf for a spa look
A subtle waterproof LED strip or small accent light inside a niche highlights tile, makes storage easier to use,
and instantly upgrades the space. It’s a small detail that reads “designer” without screaming it.
14) Use cove lighting to bounce light off the ceiling
Hidden LED tape in a ceiling cove creates a soft, even glowgreat for relaxing baths and winding down at night.
Since the light is indirect, it reduces glare and makes the room feel calmer and more expansive.
15) Add a picture light over art (or even above a decorative mirror)
If you have artwork in your bathroom, a slim picture light draws attention to it and adds a boutique feel. It also
helps break up the “everything is functional” vibe with a touch of intentional style.
16) Try wall-wash lighting to show off textured tile or a statement wall
A well-aimed light can emphasize tile texture, shiplap, plaster, or stone. This is how you make walls look rich
and dimensional rather than flat. It’s the lighting equivalent of adding contourtastefully.
17) Put your vanity lights on a dimmer (and your overhead lights on a dimmer, too)
Dimmers let you shift from “precision grooming” to “peaceful spa” in one slide. They also help prevent the most
common bathroom lighting tragedy: everything being bright all the time, for no reason.
18) Create lighting zones: Morning Mode, Night Mode, Guest Mode
Separate switches (or smart scenes) let you choose what you need: vanity + overhead for mornings, toe-kick +
cove lighting at night, everything on for cleaning. Lighting feels luxurious when it’s intentional.
19) Choose bulbs that flatter skin tones (not just “bright”)
Look for high CRI and a neutral color temperature at the mirror. If you’ve ever applied makeup in a bathroom that
made you look greatthen stepped into daylight and realized you’re suddenly a different personthis solves that.
20) Use a skylight or solar tube to bring in real daylight
Nothing beats actual sunlight for making a bathroom feel airy and open. If a skylight isn’t possible, a solar tube
can still flood the space with natural-looking light. It’s especially useful in windowless bathrooms.
21) Upgrade the exhaust fan to one with an integrated light
A fan-light combo can improve ventilation and add usable light, especially in smaller bathrooms. Some models also
include heathandy if your bathroom feels like stepping onto an ice rink in winter.
22) Add “dim-to-warm” lighting for nighttime calm
Dim-to-warm LEDs mimic the cozy glow of incandescent light as they dim, which feels relaxing in the evening.
It’s perfect for baths, bedtime routines, and anyone who wants their bathroom to stop yelling at them after dark.
Common bathroom lighting mistakes (and how to avoid them)
Relying on one overhead light
Overhead-only lighting creates shadows on the face and often leaves corners dim. Fix it by layering: add dedicated
vanity task lighting plus at least one ambient source.
Mixing different bulb colors in the same view
A warm bulb over the shower + a cool bulb at the vanity can make the room feel visually “off.” Choose a consistent
temperature family, then use dimming to set the mood.
Ignoring moisture ratings in splash zones
Steam, condensation, and spray are real. Use fixtures rated for damp areas in general bathroom spaces, and wet-rated
fixtures where water can directly hit them.
Picking a fixture that’s the wrong scale
Too small looks unfinished. Too large feels crowded. As a rule of thumb, match the visual weight of the lighting to
the size of the mirror/vanityespecially over double vanities.
Mini checklist: plan your bathroom lighting like a pro
- Start with layers: ambient + vanity task + accent.
- Pick your “mirror truth” light: high CRI (aim for 90+) and a flattering neutral temperature.
- Decide where dimmers go: ideally on vanity and ambient circuits.
- Confirm ratings: damp-rated for humid areas; wet-rated where spray is possible.
- Map your switches: zones beat one switch that does everything badly.
- Test glare: avoid bulbs shining directly into eyes or reflecting harshly in the mirror.
Real-world experiences: what actually changes when you fix bathroom lighting
If you ask homeowners what finally pushed them to upgrade their bathroom lighting, the answers are surprisingly
consistent: “I couldn’t see what I was doing,” “the room felt smaller than it is,” or the classic, “I looked
inexplicably tired every morning and I refused to accept that as my personality.” Lighting isn’t just decoration
hereit’s daily-life infrastructure.
One of the most common before-and-after stories starts with the dreaded single ceiling fixture. In the “before”
bathroom, the overhead light is technically bright, but it’s bright in the least helpful way: it beams straight
down, creating shadows that make shaving and makeup harder. After the upgrade, the change is usually simple:
sconces move to both sides of the mirror (or an LED mirror/medicine cabinet gets installed), and suddenly the face
in the mirror looks normal again. Not “Hollywood glam,” just “human in daylight.” That’s the goal.
Another frequent experience shows up in small bathrooms and powder rooms: people try to compensate for limited
space by cranking up a harsh bulb. The room gets brighter, surebut also colder and less inviting. The better fix
tends to be layered light at multiple heights: a soft flush mount for overall illumination, a focused vanity source
for tasks, and a low glow (like toe-kick LED) for nighttime navigation. The bathroom feels brighter without feeling
aggressive. It’s the difference between “well-lit” and “interrogation room.”
Moisture-rated lighting is another lesson people learn the hard wayusually after a fixture fogs up, corrodes, or
just doesn’t age well in a humid space. In practical terms, the “experience” of choosing the correct rating is that
you stop thinking about the fixture altogether because it simply keeps working. A shower-rated recessed light, for
example, doesn’t feel like a fancy feature day-to-day. It feels like peace of mind: bright, consistent light where
you need it, without worrying whether steam is slowly destroying the wiring.
Then there’s the dimmer revelation. Lots of people assume dimmers are optionaluntil they install them and realize
they’ve been living without a basic quality-of-life feature. Morning routines benefit from full brightness and high
color accuracy. Night routines benefit from softer light that doesn’t shock the system. A dimmer turns one bathroom
into multiple bathrooms: “weekday efficiency,” “spa night,” and “please don’t blind me at 2 a.m.” all become
available without changing a single fixture.
Finally, the most practical real-world takeaway: plan lighting with the mirror in mind, not the ceiling. People
often pick a pretty overhead fixture first, then wonder why the vanity feels dim. The smoother remodels do the
opposite: they decide how the face will be lit at the mirror (placement, brightness, CRI, temperature), then add
ambient and accent layers to support the rest of the room. When you design from the mirror outward, the bathroom
not only looks betterit works better. And that’s the kind of upgrade you notice every single day.
Conclusion
Great bathroom lighting isn’t about buying the fanciest fixtureit’s about building the right mix. Start with
flattering, high-quality light at the vanity, add even ambient illumination, and finish with accents that make the
space feel calm and intentional. If you do nothing else, add side lighting at the mirror and a dimmer. Your bathroom
will feel bigger, brighter, and more “designed,” and your reflection will stop filing complaints.