Table of Contents >> Show >> Hide
- What is a Kitchen Backsplash and Why Should You Care?
- 💡 Key Functions & Practical Considerations
- Choosing Materials: The Good, the Better, the “WowI didn’t think of that”
- Design Trends & Styles for Kitchen Backsplashes
- Installation & Practical Tips (So It Doesn’t Turn Into a “Sad Backsplash” Story)
- How to Match Your Backsplash to Your Kitchen
- Budgeting & Resale Considerations
- Conclusion
- My Real-Life Adventures in Backsplash Land (Because I’ve Been There)
Welcome to the splash zone but maybe less “tidal wave” and more “stylish shield.” In the world of kitchen design, the backsplash is that unsung hero: working overtime behind your stove, soaking up splatters from last night’s bacon experiment, and all the while quietly whispering, “I make you look good.” In this article, we’ll dive deep into everything you need to know about kitchen backsplashes from what they do and what they’re made of, to the top design trends for 2024-25, smart material choices, and how to make your backsplash both functional *and* fab. Let’s roll up our sleeves (metaphorically but apron optional) and get into it.
What is a Kitchen Backsplash and Why Should You Care?
First off, let’s define our terms. A backsplash (also spelled “splashback” in some places) is the vertical surface located between your countertop and upper cabinets or between the cooktop and hood that protects the wall from moisture, grease, and food splatter.
Why do you care? Because your kitchen is the place things *happen* boiling, frying, mixing, cheering at the perfect soufflé rise. Without a proper backsplash, your wall could end up resembling Jackson Pollock circa breakfast time: splatters, stains, grime, maybe even a fingerprint or two from that midnight snack run. So the backsplash gets the job done. But that’s not all these days it’s also a pretty major design moment. As design editors at House Beautiful note, the backsplash is “one of the ways that designers love to infuse character and interest into a cook space.”
💡 Key Functions & Practical Considerations
- Protection: Shields your drywall or plaster from water, steam, grease and food splatter.
- Cleanability: A well-chosen backsplash is easier to clean than painted drywall fewer stains, less elbow grease.
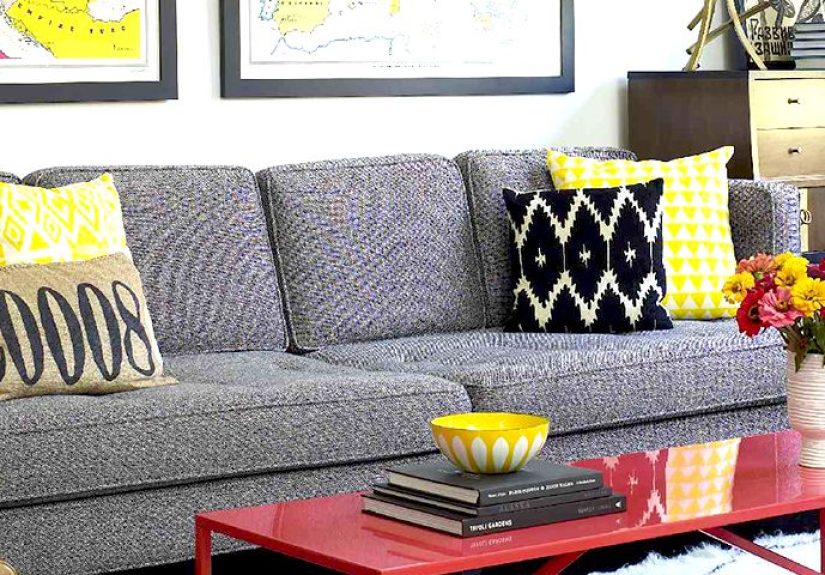
- Style focal point: Because it sits right at eye level and often runs the length of a counter, the backsplash can *make* the look of your kitchen. Think accent tile, bold color, or unusual material.
- Height & positioning matters: A common rule of thumb is that the backsplash runs from the countertop up to the underside of the upper cabinets though many designers extend it higher sometimes.
Choosing Materials: The Good, the Better, the “WowI didn’t think of that”
When it comes to backsplash materials, the options are plenty each with pros and cons. Let’s take a closer look at some of the major contenders.
Ceramic and Porcelain Tiles
The reliable workhorses of the backsplash world. From simple 3×6 subway tiles to large format geometric pieces, ceramic and porcelain offer vast variety, solid durability, and usually friendly price points. Many design guides recommend them as top choices.
Pros: easy to clean, lots of design flexibility, widely available.
Cons: grout lines can be additional maintenance, lower cost usually means less wow factor.
Glass, Stone & Metal Options
Want to kick your backsplash up a notch? Consider glass tiles (which reflect light and bring visual sparkle) or stone/metal panels. For example, a stone slab behind the range creates seamless, high-end appeal.
Metal tiles (think stainless steel or copper) bring an industrial-chic vibe and are very wipeable.
Mixed Materials & Full Slab Backsplashes
A big trend is blending materials or even extending the countertop material up the wall for a continuous look. For 2025, designers predict more solid stone slab backsplashes replacing the standard tile grid.
Example: You pick the same quartz used for your countertop, have it cut to go up the wall 16-22 inches (or even full height) behind the stove, for a sleek, clean surface with minimal seams.
What to Consider When Picking Materials
- Heat resistance (especially behind ranges).
- Ease of cleaning fewer grout lines equal fewer traps for grime.
- Material cost and installation cost; large slabs tend to cost more.
- Design style: Is your kitchen ultra-modern, rustic farmhouse, transitional? The material should match.
- Durability and maintenance: Natural stone may need sealing.
Design Trends & Styles for Kitchen Backsplashes
Let’s talk style: what’s *in*, what’s timeless, and which trends you might enjoy now (and still want to enjoy in five years). Because nobody wants a backsplash they’ll cringe at later.
Timeless Looks That Never Go Out of Style
Design editors at The Spruce highlight several backsplash ideas that “will always look good,” including classic subway tile, natural stone, and neutral palettes.
If your aim is longevity and resale-friendly appeal, sticking with a simple white subway tile, a neutral glass mosaic, or stone with subtle veining is a smart move.
Trends for 2024-25
Here’s what’s been gaining traction lately:
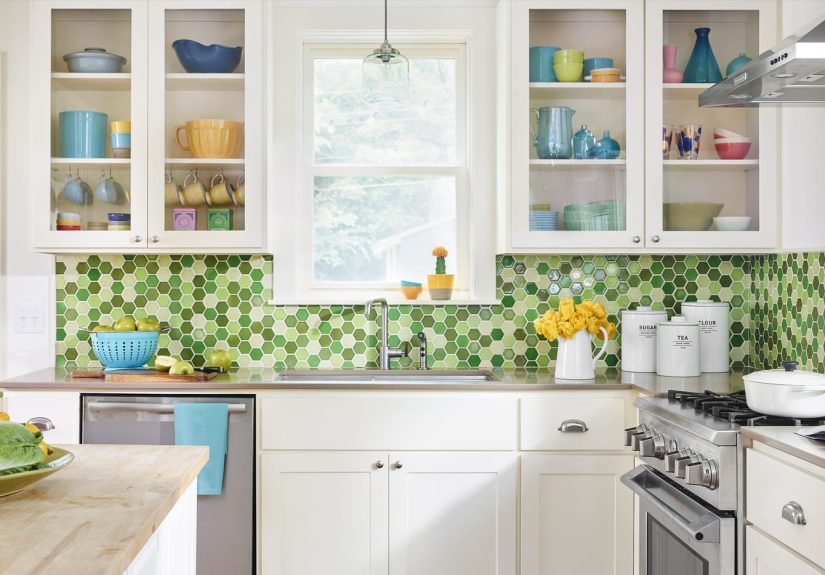
- Glossy finishes over matte: Glossy tiles reflect light and tend to make smaller kitchens feel bigger.
- Mixed material backsplashes: Combining glass, metal, stone or tile creating one designed moment.
- Solid slab backsplashes: As mentioned above, using countertop material to continue up the wall for a cohesive look.
- Bolder colors and patterns: Designers are less afraid of color for backsplashes; dark moody tones, tile shapes beyond rectangles, and patterns are on the rise.
When To Keep It Simple vs Go For Drama
If your kitchen is open to public view (hello, social media-friendly houses) you might want the backsplash to *pop.* If it’s a rental, or you’re thinking resale in a few years, you might err on the classic side. The big hint from designers: avoid overly busy backsplashes in a home you want to sell.
Installation & Practical Tips (So It Doesn’t Turn Into a “Sad Backsplash” Story)
Here are some real-world pointers to make sure your backsplash lives up to its glam potential not just in the design magazine, but in everyday life.
- Align with cabinet bottom: The tile or panel should generally meet the bottom plane of the upper cabinets for a clean line.
- Coordinate with lighting: Under-cabinet lighting will change how the backsplash tile looks (shadows, reflections). Designers say consider the angle and finish.
- Grout color matters: Even if your tile is flawless, a mismatched or stained grout line can ruin the look. Choose a grout color that complements and consider epoxy grout in high-splatter zones for easier cleaning.
- Extend behind range hood: The area behind your cooktop sees the most drama (oil, steam, heroic pan-flipping). Don’t skimp here consider full height to hood or a clean panel material with minimal seams.
- Maintenance plan: High-gloss or glass tiles look great but may show smudges easier; natural stone requires sealing; metal may show fingerprints. Choose accordingly.
How to Match Your Backsplash to Your Kitchen
Your backsplash doesn’t live in isolation it coordinates with your cabinets, countertop, flooring, lighting and overall vibe. Here are some matching tips.
- Consider cabinet color: If you have bold cabinetry (deep blue, forest green, black), you might use a neutral, light backsplash to balance. If your cabinets are white or neutral, your backsplash is a chance for texture or subtle color pop.
- Match countertop material? If you love the seamless look, yes – extending the countertop material (e.g., quartz or marble) up the wall creates a unified appearance. However, if contrast is your thing, choose a different but complementary texture or color.
- Flooring tie-in: If you have patterned floor tile, you might choose a simpler backsplash so the space doesn’t feel chaotic, or match tone and subtly echo the pattern.
- Shape and tile size: Large format tiles for minimalism; small mosaics for decorative flair; vertical lay for extra height feel; horizontal lay to widen the space.
Budgeting & Resale Considerations
Yes, this old house (literally and figuratively) needs a budget plan. Your backsplash cost is tied to material, installation complexity (cutting around outlets, warming drawers, etc.), height of coverage, and whether any substrate preparation is needed (especially in older homes).
Keep in mind: if you’re planning to sell the house in a few years, neutrals and timeless materials tend to appeal more broadly. According to designers, “busy backsplashes” are among features people regret.
On the flip side, if you’re staying put, choose something you personally love. Consider spending a bit more here you’ll see that splash zone every day.
Conclusion
A kitchen backsplash is much more than just a place to catch splatters it’s a chance to express style, enhance functionality, and sharpen your kitchen’s personality. By choosing the right material, aligning it with your kitchen’s look and your life habits (hello, bacon lovers), and installing it thoughtfully, you’ll have a backsplash that serves you well for years. Whether you go classic subway tile or push into bold mixed-material territory, remember: your backsplash should look like it was meant to be there not like it simply got stuck on as an afterthought. Happy remodeling (or day-dreaming)!
Additional 500-word Personal Experience Section
My Real-Life Adventures in Backsplash Land (Because I’ve Been There)
Okay, full disclosure: I once purchased a 12×24 glossy porcelain tile for my kitchen backsplash, thinking I was getting sleek minimalism. The tile looked great (and still does), but what I underestimated? The grout lines. Before I installed, I figured: “grout is grout.” Then I spent every Sunday afternoon staring at fine lines between tiles, noticing how they caught dust, how they darkened with cooking steam, how the white caulk at the corners turned grey like an old T-shirt. Let this be your friendly warning.
Lesson learned: we upgraded our grout to an epoxy-based variant. Worth every penny. Now when I finish cooking eggs or sauté garlic, I wipe the backsplash with a damp cloth and half a second later I’m back enjoying wine instead of scrubbing. The gloss tile came alive with under-cabinet lighting reflecting subtle highlights, making the kitchen feel brighter and larger than it is. Bonus.
Later, when I tackled a short “accent wall” behind the open shelving area, I experimented with a mixed-material design: a lower field of ceramic subway tile (because budget friendly and practical) and then a vertical band of glass-metal mosaic to draw the eye upward. The result? It became THE conversation starter when friends came over for brunch. “Is that glass or metal? How did you mix those materials?” they asked. My vague answer: “Magic and tile adhesive.” (Okay – I said something more coherent.)
But it wasn’t all sunshine and perfect installations. I picked a high-shimmer finish for that accent strip, which reflected light beautifully at first, until I realized it made the cabinet hardware’s stainless steel finishes look slightly dingy next to it. So I swapped out the cabinet pulls to a matte black finish. The contrast looked intentional, not after-thoughty. So upgrade your hardware when upgrading your backsplash: they’re partners in crime, whether you planned it or not.
Most recently, I toyed with the idea of extending the countertop quartz up the wall behind the cooktop for a seamless slab look. I received quotes and nearly fainted at one (okay, slight exaggeration). While it *looked* stunning in the showroom render, in my house with slightly wobbly walls and quirky outlet placement it became a logistics nightmare. So I saved the budget, used a large format porcelain slab instead (installed vertically) and the effect is nearly identical to my eye – fewer seams, fewer grout lines, easy maintenance. The moral: sometimes the *idea* of the “premium” material is more important than the price tag, and there’s always a smart substitution that gets you 90 % there for 50 % of the cost.
Here’s what I’ll leave you with: choose a backsplash material you *can live with*, not just one you’ll love for a week. Pick grout and lighting together with your tile so everything plays nice. And finally every time you wipe down your backsplash, let it remind you: you chose this. You chose to blend form and function. You chose to protect the wall *and* to show your personality. That’s kitchen design done right.
Now go splash boldly (and wipe smartly).