Table of Contents >> Show >> Hide
- Before You Build: The 6 Mini-Greenhouse Rules (So You Don’t Cook Your Plants)
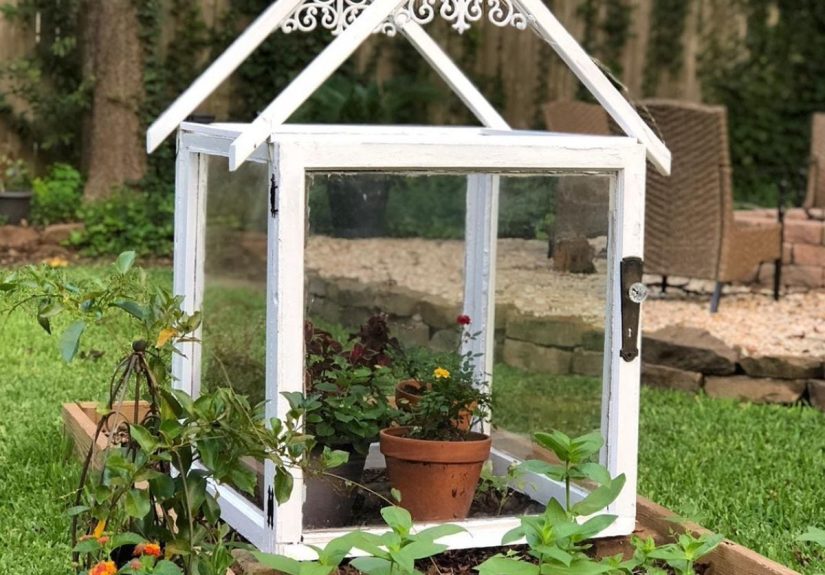
- Idea #1: The Classic Old-Window Cold Frame (a.k.a. “Mini Greenhouse Royalty”)
- Idea #2: The No-Saw “Brick-and-Window” Cold Frame
- Idea #3: PVC Hoop Tunnel Over a Raised Bed (Low Tunnel, Big Wins)
- Idea #4: The Clear Storage-Tote Mini Greenhouse (Seedlings’ Favorite Bubble)
- Idea #5: Milk Jug “Winter Sowing” Greenhouses (Nature Does the Scheduling)
- Idea #6: Soda Bottle Cloches (Tiny Greenhouses with Big Attitude)
- Idea #7: Tomato Cage Cloche (A Personal Space Bubble for Bigger Plants)
- Idea #8: The Indoor Seed-Starting “Humidity Dome” Zone (Micro Greenhouse on a Shelf)
- Idea #9: The IKEA Greenhouse Cabinet (Because Your Plants Deserve a Condo)
- Mini Greenhouse Care Cheat Sheet
- FAQ: Quick Answers to Common Mini Greenhouse Questions
- DIYers’ Experiences: What People Actually Learn After Building Mini Greenhouses (About )
- Conclusion
Want greenhouse perks without greenhouse prices? Same. The good news: you can create a cozy, plant-friendly microclimate with stuff you already have (or can snag cheap). A “mini greenhouse” can be as simple as a plastic bottle over a seedlingor as fancy as an IKEA cabinet turned into a tropical plant penthouse.
In this guide, you’ll get 9 DIY mini greenhouse ideas that work for balconies, patios, raised beds, and indoor seed-starting. Each one includes materials, steps, and the kind of practical advice you only learn after you accidentally steam your seedlings like dumplings. (Spoiler: ventilation is your new best friend.)
Before You Build: The 6 Mini-Greenhouse Rules (So You Don’t Cook Your Plants)
- Vent early, vent often. Sunlight can turn a covered space into a toaster in minuteseven when the outside air feels chilly.
- Drainage is non-negotiable. If water can’t escape, roots will complain loudly (via rot).
- Stability matters. Wind loves lightweight plastic. Use rocks, stakes, clips, or bricks as “do not fly away” insurance.
- Clear ≠ always better. Clear covers maximize light, but also maximize heat. Know when to shade or crack open the lid.
- Keep leaves off wet plastic. Condensation dripping on foliage invites disease. Give plants headroom.
- Match the build to the goal. Seed starting, hardening off, overwintering greens, and housing humidity-loving plants all want slightly different setups.
Idea #1: The Classic Old-Window Cold Frame (a.k.a. “Mini Greenhouse Royalty”)
A cold frame is basically a bottomless box with a transparent lid that captures solar warmth. It’s one of the best DIY mini greenhouse ideas for extending the seasonespecially for greens.
Best for
Hardening off seedlings, growing cool-season crops (lettuce, spinach, kale), and giving spring transplants a head start.
Materials
- Old window (or a sheet of clear polycarbonate)
- Exterior-grade lumber (cedar lasts longer) or bricks/blocks
- Hinges + handle (optional but convenient)
- Weather stripping (optional for tighter seal)
How to build it
- Pick a sunny spot (south-facing is ideal) with good drainage.
- Build a box sized to your window. Make the back taller than the front so the lid slopes and sheds rain/snow.
- Attach the lid with hinges, or set it on top so it can be lifted.
- Add a prop stick (or automatic opener if you’re feeling fancy) to hold the lid open for ventilation.
Pro tips
- Put a cheap thermometer inside. You’ll be shocked how fast temps spike on sunny days.
- Use it like a “transition zone” for seedlings: open the lid wider each day before planting outdoors.
- If you’re using very old windows, consider safety: repair cracked glass and avoid flaking paint.
Idea #2: The No-Saw “Brick-and-Window” Cold Frame
If power tools aren’t your love language, this is your low-drama option. Stack bricks, concrete blocks, or straw bales into a rectangle, then top it with a window or clear panel.
Best for
Renters, beginners, and anyone who wants results today (not after a woodworking montage).
Materials
- Bricks, concrete blocks, or straw bales
- Old window or clear panel
- Optional: boards to level the top surface
How to build it
- Lay out your rectangle where it gets sun.
- Stack the sides 1–2 layers high.
- Place the window on top and prop it open on warm days.
Pro tips
- Blocks make it easy to adjust height (taller for trays, shorter for greens).
- Weigh down the lid so gusts don’t redecorate your yard.
Idea #3: PVC Hoop Tunnel Over a Raised Bed (Low Tunnel, Big Wins)
This mini hoop house is the MVP for spring and fall. Flexible hoops plus plastic (or row cover) create a protected tunnel that warms the bed and shields seedlings from wind and pests.
Best for
Raised beds, early greens, brassicas, carrots, and “I want to plant two weeks earlier” energy.
Materials
- 10-foot lengths of PVC (or EMT conduit for windier areas)
- Rebar stakes (to anchor hoop ends)
- Greenhouse plastic or frost cloth
- Clamps, twine, or batten strips to secure cover
How to build it
- Push rebar stakes into the ground along both sides of the bed.
- Slide PVC ends over the rebar to form hoops.
- Drape the cover and secure edges with boards, rocks, or landscape staples.
- Vent as needed by lifting one side like a burrito flap.
Pro tips
- Add a string “ridgeline” over the hoops so plastic doesn’t sag and puddle.
- Leave extra plastic length on the ends so you can twist-and-clip it shut.
- On sunny days, check it before noonyour plants would like to remain uncooked.
Idea #4: The Clear Storage-Tote Mini Greenhouse (Seedlings’ Favorite Bubble)
Flip a clear plastic bin over trays or small pots and you’ve got a quick-and-cheap mini greenhouse. Think of it as a reusable cloche for a whole flat of seedlings.
Best for
Seed starting outdoors in unpredictable spring weather, protecting seedlings from wind, and creating a humid space for germination.
Materials
- Clear storage tote (ideally with a lid)
- Seed trays or small pots
- Optional: a brick/rock to weigh it down
How to build it
- Place trays on level ground (or a table) where they’ll get bright light.
- Invert the tote over them, or use the lid as a hinged top if the tote design allows.
- Add ventilation by cracking a corner open, especially after germination.
Pro tips
- If it fogs up like a sauna mirror, you need more airflow.
- Drill a few small holes near the top edge if you want “set it and forget it” ventilation.
Idea #5: Milk Jug “Winter Sowing” Greenhouses (Nature Does the Scheduling)
Winter sowing is the gardening equivalent of letting your plants handle their own paperwork. You sow seeds in a cut milk jug, set it outside, and let seasonal temperature swings cue germination.
Best for
Cold-hardy flowers and vegetables, seeds that benefit from cold stratification, and gardeners who prefer low-maintenance methods.
Materials
- Clean, translucent milk jugs (or similar containers)
- Seed-starting mix
- Seeds + label (seriously, label it)
- Tape or zip ties
How to build it
- Poke drainage holes in the bottom.
- Cut the jug around the middle, leaving a small hinge uncut.
- Add moist mix, sow seeds at the right depth, and label.
- Close and secure with tape, leaving the cap off for airflow.
- Set outside in a sunny spot and check moisture occasionally.
Pro tips
- Keep lids off so heat can escape and rain/snow can help regulate moisture.
- Choose sturdy containersthin plastic can crack after repeated freeze-thaw cycles.
Idea #6: Soda Bottle Cloches (Tiny Greenhouses with Big Attitude)
This is one of the easiest DIY mini greenhouse ideas: cut the bottom off a clear 2-liter bottle and place it over a seedling. Instant protection from chill, wind, and some pestsplus a gentle warmth boost.
Best for
Individual seedlings, new transplants, and protecting tender starts on cold nights.
Materials
- Clear 2-liter bottles (or larger clear bottles)
- Utility knife/scissors
- Optional: small stake to keep it from blowing away
How to build it
- Cut off the bottom cleanly.
- Press the bottle slightly into the soil around the plant.
- Remove the cap (or loosen it) for ventilation on sunny days.
Pro tips
- If you want extra stability, warm the cut edge slightly (carefully) to reduce sharpness and stiffen the rim.
- Don’t leave it capped in full sun unless your goal is “plant soup.”
Idea #7: Tomato Cage Cloche (A Personal Space Bubble for Bigger Plants)
Wrap a tomato cage (or three stakes teepee-style) with clear plastic to create a taller cloche that protects larger transplants. It’s like a pop-up phone booth for your plantminus the awkward eye contact.
Best for
Tomatoes, peppers, eggplants, and any transplant that needs height and wind protection.
Materials
- Tomato cage or sturdy stakes
- Clear plastic sheeting or painter’s plastic
- Clips/zip ties/tape
How to build it
- Place the cage around the plant.
- Wrap plastic around the cage, leaving a gap or flap for airflow.
- Secure with clips/zip ties and anchor the bottom edge.
Pro tips
- Create a simple “door flap” you can open daily to vent heat.
- If condensation is heavy, you need more air exchange (or less watering).
Idea #8: The Indoor Seed-Starting “Humidity Dome” Zone (Micro Greenhouse on a Shelf)
Indoors, a mini greenhouse is less about frost and more about consistent moisture. A humidity dome over trays speeds germinationthen you gradually open vents to prevent damping-off (the seedling tragedy nobody asked for).
Best for
Seed starting, cuttings, and propagation when your home air is dry.
Materials
- Seed tray + clear dome (or a clear bin/lid)
- Seed-starting mix
- Optional: heat mat + small fan nearby for gentle airflow
How to use it
- Cover trays until seeds germinate.
- Once you see sprouts, open vents slightly or crack the dome.
- Remove the dome when seedlings are up and growing, then focus on strong light and careful watering.
Pro tips
- High humidity is great for germination, not always for seedlings. Transition them to normal air gradually.
- Bottom watering helps reduce algae and fungus on the soil surface.
Idea #9: The IKEA Greenhouse Cabinet (Because Your Plants Deserve a Condo)
If you love houseplantsespecially humidity lovers like anthuriums, alocasias, and many orchidsan IKEA cabinet greenhouse is a sleek indoor mini greenhouse. With weather stripping, grow lights, and small fans, you can maintain a stable environment that’s much kinder than most heated homes.
Best for
Indoor tropical plants, propagation stations, and anyone who wants their living room to look like a botanical influencer’s dream.
Materials
- Glass-front cabinet (common IKEA models are popular for this)
- Weather stripping/foam tape
- LED grow lights
- 2 small fans for air circulation
- Thermometer/hygrometer (non-negotiable if you care about results)
How to set it up
- Seal gaps with foam tape to hold humidity.
- Add lighting appropriate for the plant types you keep.
- Install fans to prevent stagnant air and condensation buildup.
- Monitor and adjust: humidity, temperature, and watering habits.
Pro tips
- More humidity isn’t always better. If you see constant dripping condensation, increase airflow.
- Keep water away from electrical components and use drip loops for cords.
Mini Greenhouse Care Cheat Sheet
- Ventilation: Crack open covers when sunnyeven in cool weatherto prevent overheating.
- Watering: Covered spaces hold moisture longer. Water less often, but check regularly.
- Hardening off: Use cold frames/tunnels like a “training wheel” step before full outdoor life.
- Pest control: Covers can reduce pests, but also create cozy hiding spotsinspect plants weekly.
- Cleanliness: Wash domes/covers between seasons to reduce disease pressure.
FAQ: Quick Answers to Common Mini Greenhouse Questions
What’s the cheapest DIY mini greenhouse?
Plastic bottle cloches, milk jugs for winter sowing, and clear storage-tote covers are usually the lowest-cost optionsoften free if you’re reusing what you already have.
Do mini greenhouses work in small spaces like balconies?
Yes. A clear tote, a shelf setup with a cover, or even a few bottle cloches can create meaningful protection and warmthjust watch wind and direct sun heat spikes.
How do I prevent mold and damping-off?
Use clean containers, don’t overwater, and add airflow. As soon as seeds sprout, begin venting. When seedlings are established, remove covers and focus on light and good watering habits.
DIYers’ Experiences: What People Actually Learn After Building Mini Greenhouses (About )
Here’s the funny part about mini greenhouses: they’re simple… until you use one for three sunny afternoons and realize you’ve invented a plant sauna. A lot of DIY gardeners report the same “aha” moments, so you can skip the trial-and-error and go straight to the thriving.
1) The sun is sneaky. People expect overheating on hot days, but the real surprise is a bright, crisp morning. Even when it’s 45°F outside, a closed cold frame or tote can rocket upward fast. The common fix is hilariously low-tech: a stick, a rock, or a clip that holds the lid open an inch. Many gardeners end up keeping a dedicated “vent prop” nearby because it becomes part of the daily routinelike coffee, but with more chlorophyll.
2) Condensation is feedback, not decoration. A little fogging is normal, but heavy droplets raining on leaves? That’s your mini greenhouse telling you it needs more airflow. DIYers often notice that once they crack a vent and add gentle circulation (even outdoors by lifting one side of plastic), plants look sturdier and disease pressure drops. Indoors, this is where tiny fans and vented domes earn their keep.
3) Wind will humble you. The first time a gust launches a plastic cover into the neighbor’s yard, you’ll suddenly become very interested in “anchoring solutions.” People commonly solve this with bricks on corners, boards along edges, clips on hoops, or stakes. The best setups look less like a showroom and more like a practical “please stay put” engineering projectand that’s a compliment.
4) Moisture lasts longer than you think. In covered environments, soil can stay damp for days. DIYers often adjust by watering less frequently but checking more consistently. A quick finger test (or lifting a pot to feel its weight) becomes a habit. Indoors, bottom watering is a popular upgrade because it reduces splashing, algae, and overly wet stems.
5) Venting becomes the difference between ‘early harvest’ and ‘sad salad’. Gardeners who succeed long-term treat mini greenhouses like living systems: open in the morning if it’s sunny, close in late afternoon to hold warmth, and adjust based on the week’s weather. The “set it and forget it” approach can work for short windows, but the best results come from small daily tweaks.
6) The biggest win is confidence. After a season using a cold frame, tunnel, or jug method, DIYers often report they’re bolder about planting earlier, trying new varieties, and stretching the growing season. Once you realize you can control a few degrees of warmth and a bit of wind protection, gardening feels less like gambling and more like a skill you can level up.
Conclusion
A mini greenhouse doesn’t have to be fancy to be effective. Whether you’re flipping a clear tote over seedlings, building a cold frame from an old window, or turning a cabinet into a humidity haven, the goal is the same: create a stable microclimate where plants can grow faster, stronger, and longer into the season.
Pick one project that fits your space and comfort level, add ventilation from day one, and you’ll quickly see why these DIY mini greenhouse ideas are such a game-changer for gardeners who like big results in small footprints.