Table of Contents >> Show >> Hide
- Tip 1: Start With a Site “Detective Walk” (Before You Buy Anything)
- Tip 2: Make a Simple Base Map (Yes, With MeasurementsBut Keep It Chill)
- Tip 3: Design for How You Live (Create “Outdoor Rooms”)
- Tip 4: Use Design Principles to Make Everything Look Intentional
- Tip 5: Practice “Right Plant, Right Place” (And Don’t Fight Your Yard)
- Tip 6: Build Beds in Layers for Four-Season Interest
- Tip 7: Invest in Soil, Mulch, and WaterYour Landscape’s “Boring” Essentials
- Common Beginner Landscaping Mistakes (So You Can Skip the Pain)
- Beginner Experiences: What Learning Landscape Design Feels Like (About )
- Conclusion: Your First Landscape Plan Should Be Simpleand That’s a Feature
Landscaping can feel like one of those hobbies where everyone else secretly received a rulebook at birth.
Suddenly you’re Googling “what is a foundation plant” while standing in your yard holding a shovel like it’s a microphone.
The good news: great landscape design isn’t magicit’s a process. And as a beginner, your superpower is that you’re not
“stuck” in old habits yet.
This guide breaks landscape design into seven beginner-friendly tips you can actually usewithout needing a drafting degree
or a bulldozer. You’ll learn how to read your site, sketch a plan that makes sense, choose plants that won’t ghost you by July,
and build a yard that looks intentional (even if you’re learning as you go).
Tip 1: Start With a Site “Detective Walk” (Before You Buy Anything)
Beginner mistake #1 is shopping first and thinking later. (It’s also how many of us own a waffle maker shaped like Texas.)
Landscape design starts with understanding what you already havebecause your yard has opinions: sun, shade, slope, wind,
drainage, and soil all influence what will thrive.
Do a quick site inventory
Walk your yard at different times of day and jot notes. You’re looking for patterns, not perfection.
- Sun and shade: Which areas get full sun, part shade, or deep shade?
- Water behavior: Where does water pool after rain? Where does the soil dry out fast?
- Slope and drainage: Slopes can be beautifulbut they also move water and soil downhill.
- Views: What do you want to highlight (a big tree) or hide (the trash cans doing their best)?
- Access and traffic: Where do people naturally walk? Where do pets sprint like tiny Olympic athletes?
- Utilities: Note irrigation heads, AC units, meters, and any areas you shouldn’t dig.
Beginner-friendly win: If you’re planning to dig for edging, shrubs, or a small path, call 811 (in the U.S.)
before you dig. It’s not glamorous, but neither is discovering a buried cable with your shovel.
Tip 2: Make a Simple Base Map (Yes, With MeasurementsBut Keep It Chill)
You don’t need fancy software to design a better yard. You do need a basic map. A scaled drawing helps you avoid the classic
beginner move: planting a “small” shrub that grows into your walkway like it pays rent.
How to create a base map without losing your weekend
- Measure the big stuff: Property lines (if you know them), house footprint, driveway, patio, fences.
- Add doors and windows: Especially the ones you look out of oftenviews matter.
- Mark existing features: Trees you’ll keep, utility boxes, downspouts, and slopes.
- Use graph paper: Pick an easy scale (example: 1 square = 1 foot or 2 feet).
- Make copies: You’ll want multiple draftsdesign is iterative, not a one-shot miracle.
Specific example: If your patio is 12′ x 14′, sketch it to scale and then “place” a dining set footprint
(about 7′ x 7′ for a small table with chairs) before you plan planting beds. You’ll instantly see how much room you actually have.
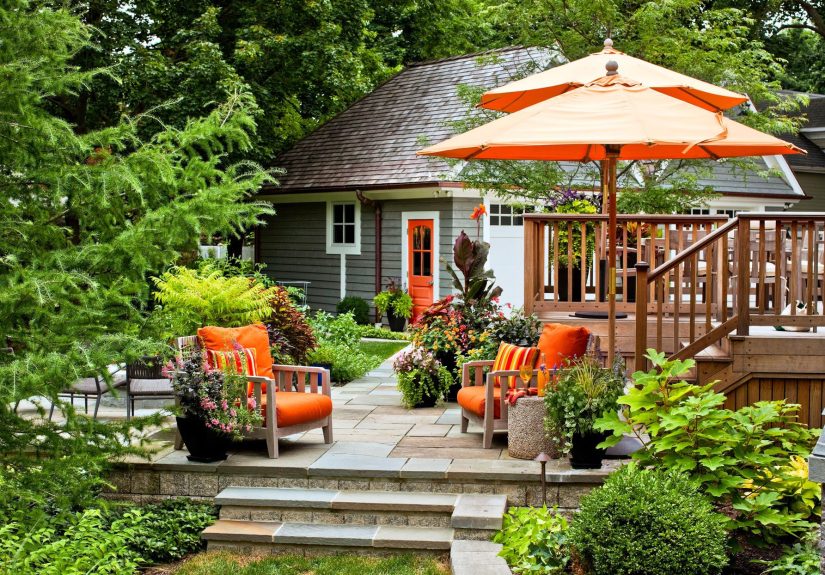
Tip 3: Design for How You Live (Create “Outdoor Rooms”)
A yard isn’t just a plant museumit’s functional space. When beginners think “landscaping,” they often picture flowers first.
Try flipping the order: design activity zones first, then fill in with plants and materials.
Common outdoor “rooms” beginners can plan
- Welcome zone: The front walk/entry that sets the tone (and curb appeal).
- Hangout zone: A patio or seating nook for relaxing, grilling, or hosting.
- Service zone: Trash bins, storage, dog run, compostimportant, but not center stage.
- Play/path zone: Clear routes for walking, hauling groceries, or kids running laps.
Beginner-friendly trick: On your base map, draw “bubble shapes” for each zone (like a rough Venn diagram).
Then connect them with simple paths. This keeps your layout logical before you commit to details.
Micro-upgrade with big impact: Lighting belongs in the “room” conversation, not as an afterthought. Even basic,
low-voltage landscape lighting feels like your yard upgraded to a nicer neighborhood. Plan fixture locations early so you’re not
weaving cables through finished beds later.
Tip 4: Use Design Principles to Make Everything Look Intentional
Here’s the secret professionals won’t gatekeep: design principles do most of the heavy lifting. When a yard looks “put together,”
it’s usually because it follows a few visual rulesunity, balance, proportion/scale, rhythm/repetition, and a focal point.
You don’t need to memorize terms like you’re studying for a landscape design pop quiz; you just need to apply them simply.
Quick ways beginners can use design principles
-
Unity (cohesion): Repeat a few materials and plant types. Example: the same mulch color and the same 2–3
shrub varieties throughout the yard. -
Repetition (rhythm): Repeat a shape or plant group along a path. Example: three matching planters or
clusters of the same ornamental grass. -
Balance: You don’t need symmetry everywhere, but the visual “weight” should feel even. If one corner has
a big tree, the opposite side might need a layered bed to keep things from feeling lopsided. -
Scale and proportion: Match plant sizes to the house. A tall, blank wall often needs taller plants or a
small treetiny flowers alone can look like sprinkles on a loaf of bread. -
Focal point: Give your eye a place to landan ornamental tree, a simple bench, a boulder, or a container
grouping near the entry.
Beginner rule of thumb: Limit yourself to a small “plant palette” at first. Too many different plants can look
chaotic and be harder to maintain. Fewer plant types, repeated well, often looks more professional.
Tip 5: Practice “Right Plant, Right Place” (And Don’t Fight Your Yard)
Landscaping gets dramatically easier when you stop trying to force sun-loving plants to survive in shadeor water-hungry plants
to thrive in a dry corner. “Right plant, right place” means choosing plants that naturally fit your conditions: light, soil,
moisture, and climate zone. It’s also a shortcut to low-maintenance landscaping.
Beginner plant-picking checklist
- Light: Full sun (6+ hours), part sun/shade, or full shade?
- Soil moisture: Consistently wet, average, or dry?
- Hardiness zone: Choose plants suited to your USDA zone and local climate.
- Mature size: Read the tagthen believe it. Future-you will be grateful.
- Maintenance level: Be honest. If you travel often, pick tougher plants and simpler beds.
Why natives can be beginner-friendly: Native plants are often well-adapted to local conditions and can support
pollinators and wildlife. “Native” doesn’t mean “no maintenance,” but it often means “less drama.”
If you’re new, start with a few native foundation plants and expand as you learn.
Specific example: If your side yard is narrow and shady, skip sun perennials and consider shade-tolerant shrubs,
ferns, and groundcovers. Add a simple stepping-stone path so the space feels purposeful, not accidental.
Tip 6: Build Beds in Layers for Four-Season Interest
A beginner yard often looks great in May… and then turns into a “where did my design go?” situation by late summer or winter.
The fix is structure and layers. Think of your landscape like an outfit: you need more than one accessory to make it work year-round.
A simple layering formula
- Backdrop: Small trees, tall shrubs, fences, trellises (your “walls”).
- Middle layer: Medium shrubs and perennials (your “furniture”).
- Front edge: Low plants and groundcovers (your “trim” that makes it look finished).
Beginner-friendly structure plants: Evergreens, ornamental grasses, and sturdy shrubs can provide shape even when
flowers aren’t blooming. Then you add seasonal color with perennials and annuals where it makes senselike near the entry or patio.
Design trick: “From big to small”
Place the big items first (trees, paths, patios, large shrubs). Then fill with medium and small plants. This prevents the common
beginner issue of planting a bunch of little things and later realizing there’s no good spot for the “anchor” elements.
Tip 7: Invest in Soil, Mulch, and WaterYour Landscape’s “Boring” Essentials
If design is the story, soil and water are the grammar. You can have gorgeous ideas, but if the fundamentals are off, the yard
will constantly fight you. The great news? The fundamentals are learnable, and they make everything else easier.
Start with soil (even if you’re not a “soil person”)
A basic soil test can guide you on pH and nutrients, so you’re not guessing. If you’ve ever fertilized randomly and hoped for the best,
you’re not alone. But targeted fixes save time and money over the long run.
Mulch like a pro (and avoid the “mulch volcano”)
Mulch helps suppress weeds, moderates soil temperature, and reduces evaporation. For many beds, a few inches is typicaltoo little
won’t help much, and too much can reduce airflow. Keep mulch pulled back from plant stems and tree trunks to reduce disease and pest problems.
- Depth: Often around 2–4 inches depending on material and goals.
- Spacing: Keep mulch a few inches away from the base of plants and trunks.
- Refresh: Top up as it decomposes, rather than piling on endlessly.
Water smart (your plants don’t want a daily flood)
Beginners often overwater out of kindness, which is basically the gardening version of texting “u up?” too often. Watering too frequently
can lead to shallow roots and more disease. Instead, aim for deep, less frequent watering that matches your soil and weather.
Drip irrigation or soaker hoses can deliver water efficiently, and modern irrigation controllers can adjust to conditions so you’re not watering during rain.
Common Beginner Landscaping Mistakes (So You Can Skip the Pain)
- Planting without a plan: Impulse planting is fun until it’s crowded chaos.
- Ignoring mature size: Tiny plant today, shrubzilla tomorrow.
- Too many plant varieties: A “collector’s garden” is a vibejust not the easiest beginner vibe.
- Forgetting maintenance access: Leave room to prune, weed, and walk without doing yoga in the shrubs.
- Overcomplicating shapes: Simple curves and clean edges often look more polished (and are easier to mow).
Beginner Experiences: What Learning Landscape Design Feels Like (About )
Most beginners don’t fail at landscaping because they lack taste. They struggle because they start in the middlebuying plants,
installing features, changing thingswithout first learning how their yard behaves. One common “first season” experience goes like this:
you plant a row of sun-loving flowers along the fence because it looks bright in the afternoon, and for two weeks it’s perfect.
Then summer arrives, the morning shade turns out to be longer than you thought, and half the row blooms while the other half sulks.
The lesson isn’t “you’re bad at this.” It’s “your site is a real place with real conditions,” and those conditions are the design brief.
Another beginner experience is the “path revelation.” You might swear you’ll walk on the stepping stones you installed, but every time
you take the trash out, you cut across the grass at the same angle. After a month, there’s a visible worn trailyour yard literally
voting for a different route. Instead of fighting it, beginners who improve fastest treat these moments as feedback:
“Okay, the path wants to be here. Let’s make it official.” Suddenly your landscape feels more natural because it matches real life.
There’s also the classic “too many choices” spiral at the garden center. You fall in love with twelve plants that each look amazing
on their own, then you get home and realize you’ve created a plant talent show with no theme. A more satisfying beginner experience is
choosing a small palettemaybe two shrubs, one ornamental grass, and two perennialsand repeating them. The first time you do this,
it feels almost too simple, like you’re cheating. Then you step back and notice the yard looks calmer, more cohesive, and strangely…
expensive. (Because repetition is what “designed” landscapes do.)
Mulch is where beginners often earn their unofficial badge. You spread it, you admire it, and then you get ambitious and pile it around
tree trunks like you’re frosting a cake. Later you learn about keeping mulch away from trunks and stems. The good beginner experience here
is that landscaping is forgiving when you course-correct early: you can rake mulch back, adjust depth, sharpen edges, and the bed instantly
looks better. That’s a recurring themesmall fixes have big visual payoffs.
Finally, beginners usually have an “I get it now” moment with maintenance. The dream is a yard that looks great all the time with zero effort.
The reality is a yard that looks great because your design supports your habits. When you group plants by water needs, choose the right plant for the
right place, keep bed lines simple, and plan access, maintenance stops being a never-ending chore and becomes a quick routine. And that’s when
landscaping becomes funbecause your yard stops feeling like a problem you’re behind on, and starts feeling like a space you’re building on purpose.
Conclusion: Your First Landscape Plan Should Be Simpleand That’s a Feature
If you remember one thing, make it this: beginner landscape design is about smart decisions, not complicated projects. Start with a site walk,
map what you have, design for how you live, and use a handful of design principles to keep everything cohesive. Choose plants that fit your conditions,
build beds in layers so the yard looks good beyond spring, and invest in fundamentals like soil, mulch, and water-wise care.
A great yard doesn’t happen overnightbut it also doesn’t require perfection. It requires a plan you can grow into.
Start small, repeat what works, and let your landscape evolve. Your future self (and your knees) will thank you.