Table of Contents >> Show >> Hide
- Before You Start: Know What Kind of DVD You Need
- Way 1: Burn the Video as a Data DVD in Windows File Explorer
- Way 2: Use Windows Media Player to Burn a Video File to DVD
- Way 3: Burn a Video to DVD on a Mac Using Finder
- Way 4: Create a Playable DVD-Video with Authoring Software
- Way 5: Create a DVD Folder or ISO First, Then Burn the Disc
- Which Method Should You Choose?
- Common Mistakes That Ruin a DVD Project
- Extra Tips for Better Results
- Real-World Experiences: What People Usually Learn the Hard Way
- Conclusion
DVDs may sound a little old-school in the age of cloud storage, streaming, and “I swear it was saved somewhere on my phone,” but they still do one very useful thing: they make video feel permanent. Whether you want to archive family footage, hand off a wedding video to relatives, save classroom recordings, or create a disc that works in a living-room DVD player, knowing how to put a video on a DVD is still a handy skill.
Here is the catch: not every DVD is the same. Sometimes you are simply copying a video file onto a disc as data. Other times, you are creating a DVD-Video disc that a standard DVD player can read. Those two goals sound similar, but they are not twins. They are cousins who show up wearing the same jacket and cause confusion at Thanksgiving.
In this guide, you will learn five practical ways to put a video on a DVD, what each method is best for, what equipment you need, and how to avoid the classic mistakes that turn a blank disc into a shiny coaster.
Before You Start: Know What Kind of DVD You Need
Before you drag a single file anywhere, decide how the disc will be used.
Option 1: Data DVD
A data DVD is basically storage on a disc. You copy your MP4, MOV, AVI, or other video files onto it. This is great for backup, sharing files, or playing video on a computer and some smart TVs or media players. It is simple and fast. The downside is that many traditional DVD players will not play it.
Option 2: DVD-Video
A DVD-Video disc is the format designed for regular DVD players. This is the kind of disc that can include menus, chapters, and proper playback on a TV-connected player. Making one usually requires authoring software because the video has to be converted into the correct DVD structure.
What You Need
- A computer with a DVD burner, or an external USB DVD burner
- Blank discs such as DVD-R, DVD+R, DVD-RW, or DVD+RW
- Your video file or edited project
- Enough space and time for encoding if you want a DVD-Video disc
As a general rule, a standard single-layer blank DVD holds about 4.7 GB, which is often described as roughly 120 minutes of DVD-quality video, though actual results depend on bitrate and format. That means your 4K vacation masterpiece may need some resizing before it makes the leap to disc.
Way 1: Burn the Video as a Data DVD in Windows File Explorer
This is the easiest method when your goal is to store a video on a DVD rather than create a disc for a standard DVD player.
Best for
- Backing up personal videos
- Sharing files with someone who will use a computer
- Saving MP4 or MOV files without converting them
How It Works
In Windows, you can insert a blank DVD, open the drive in File Explorer, and choose the burning mode. Then you drag your video files into the disc folder and complete the burn process.
Steps
- Insert a blank DVD into your burner.
- Open File Explorer and select the DVD drive.
- When prompted, name the disc.
- Choose With a CD/DVD player if you want a more finalized disc style.
- Drag your video files into the disc window.
- Click the option to burn or finish the session.
Pros
- Built into Windows
- No extra software needed
- Fast for basic storage
Cons
- Usually will not work in an old-school living-room DVD player
- No menus, chapters, or disc styling
Example: If you recorded a school recital on your phone, copied the MP4 to your laptop, and just want Grandma to have the file for safekeeping on her computer, this method works beautifully.
Way 2: Use Windows Media Player to Burn a Video File to DVD
Windows Media Player is often associated with music, but it can also burn data discs. That makes it another convenient option for putting a video file on a DVD when you do not need a full DVD-Video disc.
Best for
- People already organizing media in Windows Media Player
- Simple video file storage on a DVD
- Users who prefer a media-library interface instead of File Explorer
Steps
- Open Windows Media Player.
- Select the Burn tab.
- Choose Data CD or DVD.
- Insert a blank disc.
- Drag the video files into the burn list.
- Start the burn.
This route is similar to File Explorer in terms of outcome. You are still making a data disc, not automatically creating a DVD movie disc that plays everywhere.
Why People Like It
Some users find the burn list easier to manage, especially when they are selecting multiple files from a media library. It is also handy when your files are already organized inside Windows Media Player.
Where It Falls Short
No fancy menus. No chapter markers. No magical transformation of an MP4 into a Hollywood-style DVD. It is efficient, but it is not glamorous.
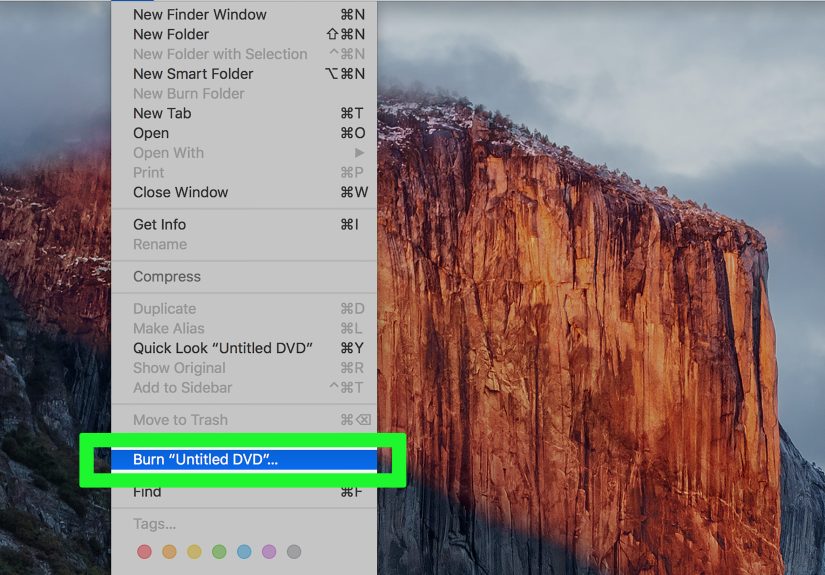
Way 3: Burn a Video to DVD on a Mac Using Finder
Mac users are not locked out of the DVD club. If you have an external burner or compatible optical drive, Finder can burn files directly to a blank disc.
Best for
- Mac users who want to archive or share video files
- Creating a data DVD from Finder
- Simple backup jobs without separate software
Steps
- Connect a DVD burner if your Mac does not have one built in.
- Insert a blank DVD.
- Create a burn folder or prepare the files you want to copy.
- Drag your video file into the burn folder.
- Choose Burn and follow the prompts.
This is one of the cleanest ways to put a video on a DVD if your only goal is storing the file itself. It is especially useful for family footage, classroom files, church media, or client delivery where the recipient will open the disc on a computer.
A Helpful Reality Check
Many modern Macs do not include optical drives, so an external USB SuperDrive or another compatible burner may be necessary. Also, not every media item from Apple services can be burned, especially anything with usage restrictions. Your own video files are the safest bet.
Way 4: Create a Playable DVD-Video with Authoring Software
This is the method people usually mean when they say, “I want to put a video on a DVD.” They want the disc to play in a regular DVD player connected to a television. For that, you normally need DVD authoring software.
Best for
- Wedding videos
- Home movies for relatives
- Training videos
- School performances
- Any disc intended for a standard DVD player
What Authoring Software Does
Programs such as Adobe Premiere Elements, Corel VideoStudio, or CyberLink PowerDirector can convert video into DVD-compliant format, build the proper disc structure, and add menus or chapters. That is a big step up from simply copying a file onto a disc.
Typical Workflow
- Import your video into the software.
- Edit if needed.
- Choose a disc option such as DVD-Video.
- Add menus, titles, chapters, or background music if desired.
- Preview the project.
- Burn directly to disc, or export to a DVD folder first.
Why This Method Matters
A standard DVD player expects a certain structure, not just a random MP4 copied to a disc. Authoring software handles the conversion and packaging. This is the method that makes your disc behave like a “real DVD.”
Pros
- Best compatibility with standalone DVD players
- Can include menus and chapters
- Looks more polished and professional
Cons
- Takes more time
- Usually requires paid software
- Encoding can take a while, especially for longer videos
Example: If you are delivering a dance recital video to parents who still use DVD players at home, this is the smart route. A data DVD may leave them staring at their TV like it personally offended them.
Way 5: Create a DVD Folder or ISO First, Then Burn the Disc
This method is popular with people who want more control and fewer surprises. Instead of burning straight to the disc, you first create a DVD folder or ISO image, then burn that to the blank DVD afterward.
Best for
- Projects you want to test before burning
- Making multiple copies of the same DVD
- Avoiding wasted blank discs during trial and error
Why It Helps
If your software lets you export a DVD folder or ISO image, you can check the structure, archive the project, and create more copies later without re-encoding the whole video. It also makes troubleshooting much easier because you are not guessing whether the problem happened during conversion or during the burn itself.
Typical Steps
- Create the DVD project in authoring software.
- Choose DVD folder or ISO as the output.
- Save the project to your hard drive.
- Test it if possible.
- Burn that folder or ISO to a blank DVD using disc-burning software.
Why This Is Great for Repeats
If you need ten copies for a graduation event, church program, or team highlight reel, this workflow is much more efficient than rebuilding the same disc from scratch each time.
Which Method Should You Choose?
Here is the simple version:
- Choose File Explorer if you just want the video file stored on a DVD.
- Choose Windows Media Player if you like using a media-library approach for a data disc.
- Choose Finder on Mac if you want a quick data DVD from macOS.
- Choose authoring software if you need the disc to play in a regular DVD player.
- Choose ISO or DVD folder output if you want better testing, archiving, or multiple copies.
Common Mistakes That Ruin a DVD Project
1. Using the Wrong Disc Type
If compatibility matters, test DVD-R and DVD+R with your target player. Older hardware can be picky. Rewritable discs can also behave differently than write-once discs.
2. Assuming a Data DVD Will Play Everywhere
This is the most common misunderstanding. A data DVD is storage. A DVD-Video disc is a proper video disc for most standalone players.
3. Burning Too Fast
Slower burn speeds can improve reliability in some situations. If a disc fails or stutters, trying a lower speed is often worth it.
4. Skipping the Preview Step
Menus, chapter points, and aspect ratio issues are easier to fix before the disc is burned.
5. Forgetting the Hardware Check
Many newer laptops do not include optical drives at all. Before troubleshooting software for half an hour, make sure the machine can actually burn discs. Your future self will be impressed by this rare act of patience.
Extra Tips for Better Results
- Use good-quality blank discs from a reputable brand.
- Keep your project length realistic for the disc capacity.
- Label discs gently with a soft marker designed for optical media.
- Store finished DVDs in cases rather than loose in a drawer of chaos.
- Keep a digital backup even after the disc is done.
Real-World Experiences: What People Usually Learn the Hard Way
The funny thing about DVDs is that they seem simple until they are not. On paper, the task sounds easy: take video, put video on disc, enjoy triumphant success. In real life, there is usually one tiny detail waiting in the shadows like a villain in a very low-budget action movie.
One common experience is the “It worked on my computer” moment. Someone burns an MP4 to a data DVD, pops it into a laptop, and everything looks great. Then they carry it proudly to the living room, insert it into a standard DVD player, and absolutely nothing happens. That is usually the day they discover the difference between a data disc and a DVD-Video disc. It is not a fun surprise, but it is an educational one.
Another real-world lesson comes from family events. People often want to preserve weddings, anniversaries, birthday parties, or old camcorder footage. In those cases, the goal is rarely just storage. They want a disc that feels finished, something with a menu, maybe chapters, and smooth playback on a television. This is where authoring software earns its keep. Yes, it takes longer. Yes, encoding can test your patience. But the final result feels much more intentional and useful, especially for relatives who still love physical media.
There is also the issue of hardware. Many users sit down to make a DVD and only then realize their sleek modern laptop has no optical drive. Not a slot. Not a tray. Not even the emotional support of a blinking disc light. External USB burners solve that problem quickly, but it is still one of the most common surprises in the process.
Disc quality matters more than many people expect. Cheap blank media can lead to failed burns, playback glitches, or discs that age badly. That becomes painfully obvious when someone burns a once-in-a-lifetime video, writes a title on the disc with dramatic pride, and then finds out it freezes halfway through. Reliable media, careful handling, and reasonable burn speeds help more than flashy settings ever will.
People also learn that workflow matters. Burning directly to disc feels convenient, but creating an ISO or DVD folder first can save time, especially for repeat copies. Event videographers, school staff, and community groups often prefer that method because it turns one long encode into a reusable master. Burn once mentally, copy many times physically.
And finally, there is the emotional side of DVDs, which modern tech sometimes forgets. A disc can be handed to someone, wrapped as a gift, stored in a keepsake box, or archived on a shelf for years. It feels tangible. It feels finished. That is why people still bother with them. Not because DVDs are the newest thing on Earth, but because sometimes “here is the file link” just does not have the same heart as “I made this for you.”
Conclusion
If you want to put a video on a DVD, the best method depends on what the disc needs to do. For simple storage, a data DVD made in Windows File Explorer, Windows Media Player, or Finder on a Mac is often enough. For true living-room playback, you will want DVD authoring software that creates a proper DVD-Video disc. And if you value testing, archiving, or making multiple copies, exporting a DVD folder or ISO first is often the smartest move.
The biggest secret is not technical wizardry. It is choosing the right workflow before you start. Do that, and your video has a much better chance of ending up on a useful DVD instead of becoming a shiny little reminder that technology enjoys practical jokes.