Table of Contents >> Show >> Hide
- What You’ll Need (Keep It Simple)
- How to Paint a Pumpkin So It Doesn’t Flake Off
- 46 Easy Pumpkin Painting Ideas for Fall Decorations
- Display Tips That Make Painted Pumpkins Look “Styled”
- Common Mistakes (So You Can Avoid Pumpkin Drama)
- Experience Notes: What Pumpkin Painting Is Really Like (and How to Make It Better)
- Conclusion
Pumpkin carving gets all the glory, but pumpkin painting is the low-mess MVP of fall decorating. No slippery pumpkin guts, no “who left the carving knife on the couch?!” conversations, and no sad jack-o’-lantern collapsing into a puddle two days later. Painted pumpkins can look spooky, sweet, modern, rustic, or “I definitely have my life together” chicand you can pull it off with basic craft paint and a little patience.
This guide is packed with 46 easy pumpkin painting ideas you can do in an afternoonplus the simple prep steps that make paint actually stick (because nothing says “autumn heartbreak” like watching your design peel off like a sticker in slow motion).
What You’ll Need (Keep It Simple)
You don’t need a professional art studiojust a small pile of supplies you can reuse every fall:
- Pumpkins: real pumpkins, gourds, or faux craft pumpkins (foam/plastic last for years)
- Paint: acrylic craft paint for most projects; spray paint for fast base coats; paint pens for crisp details
- Brushes: one medium flat brush + one small detail brush
- Painter’s tape: for stripes, sharp edges, and saving your sanity
- Sponges or pouncers: for polka dots, dabbing, and ombré effects
- Markers/paint pens: for faces, lettering, and outlines
- Extras (optional but fun): googly eyes, glitter, metallic paint, Mod Podge, faux leaves, ribbon
- Sealant: matte or satin clear spray to protect the finish (especially outdoors)
Acrylic paint is popular for pumpkins because it dries quickly and is easy to control; spray paint covers a whole pumpkin fast; washable paint pens can be a kid-friendly option for details.
How to Paint a Pumpkin So It Doesn’t Flake Off
1) Clean and dry first
Wipe your pumpkin with a damp cloth (a little mild soap helps if it’s dusty from the patch). Let it dry completelypaint and moisture have a toxic relationship. Cleaning helps paint adhere better.
2) Knock down the “waxy” surface
Many pumpkins have a natural sheen that can make paint bead up. A light coat of matte-finish sealant (or a grippy primer made for crafts) can help dull that surface so paint behaves.
3) Consider a base coat (especially for bright colors)
If you want vivid pink, bright white, or sunshine yellow, start with a white base coat (often easiest with spray paint). A pale base makes colors pop and reduces the number of coats you need.
4) Build color in thin layers
Two or three light coats usually look smoother than one thick coat. Let each layer dry before the nextrushing causes streaks, fingerprints, and regret.
5) Seal it (if you want it to last)
When the paint is fully dry, finish with a clear spray sealant. Matte looks modern; satin is a little richer; gloss looks bold (and shows every brushstroke, so… choose wisely).
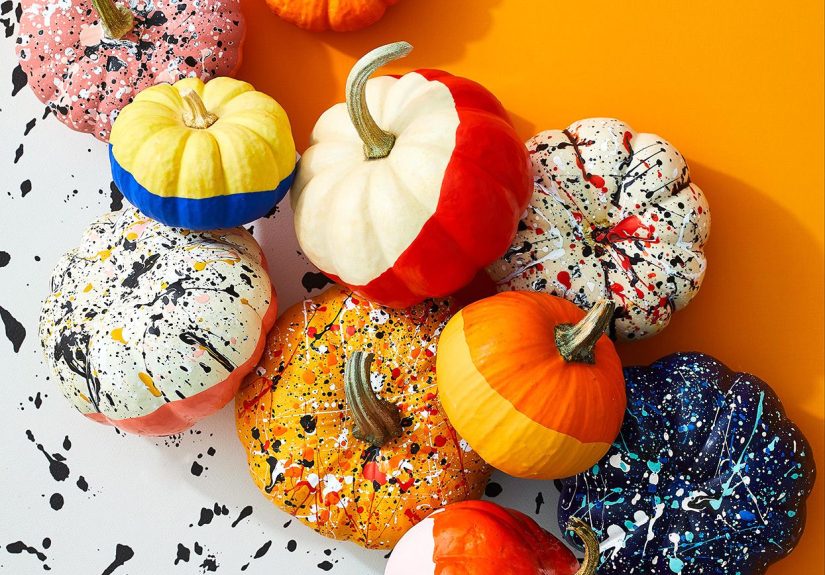
46 Easy Pumpkin Painting Ideas for Fall Decorations
Below are quick, beginner-friendly concepts. Mix and match techniques (you’re the pumpkin boss).
Classic Patterns That Always Work
- Polka Dot Party: Dip a sponge pouncer into paint and dot all over. Try two colors for a confetti look.
- Simple Stripes: Wrap painter’s tape around the pumpkin, paint over it, peel tape for crisp lines.
- Half-Dipped Pumpkin: Paint the bottom half one color, leave the top natural (or a second color). Clean and modern.
- Color-Blocked Trios: Tape off three vertical sections; paint each a different fall shade (rust, cream, sage).
- Ombre Fade: Sponge from dark at the bottom to light near the top. Add a metallic stem for extra flair.
- Speckled “Stone” Finish: Base coat a neutral color, then flick darker paint with a stiff brush for tiny specks.
- Buffalo Check: Paint a base color, then use tape to create a grid and fill alternating squares like a cozy flannel shirt.
- Metallic Splatter: Base coat matte black or white, then splatter gold paint lightly for glam drama.
- Rainbow Mini Pumpkins: Paint each mini pumpkin a solid color; arrange them in gradient order on a mantel.
- White-on-White Texture: Use white paint plus a slightly different finish (matte vs. satin) for subtle pattern-on-pattern.
- Drip Paint Top: Paint the top edge and let paint “drip” down. Use two colors for a layered effect.
- Chalkboard Pumpkin: Paint with chalkboard paint; write fall messages, names, or dinner menu items (very Pinterest, very useful).
Pattern-forward designs like stripes, polka dots, drips, and chalkboard styles are common go-to “no-carve” classics because they’re fast and forgiving.
Cute and Kid-Friendly (No Art Degree Required)
- Googly-Eye Monster: Paint a bright base color, add big googly eyes, then draw a goofy mouth with a paint pen.
- Emoji Faces: Yellow base coat, then paint simple expressions (heart eyes, laughing face, surprised “O”).
- Friendly Ghost: White pumpkin or white base coat; add two black oval eyes and a tiny smile. Adorable, not scary.
- Black Cat Pumpkin: Paint black, add triangle ears from craft foam, then draw whiskers and bright eyes.
- Owl Pumpkin: Add big circle eyes, simple wing shapes, and a tiny beakfelt or paint works.
- Donut Pumpkin: Use a small white pumpkin; paint “icing” on top and add sprinkle dots in fun colors.
- Ladybug Pumpkin: Red base coat, black spots, and a black “head” section near the stem.
- Bee Pumpkin: Yellow base coat with black stripes; add tiny white wings from paper or foam.
- Fox Face: Orange base, white muzzle area, little black nose, and pointy ears attached near the top.
- Unicorn Pumpkin: Pastel base, gold horn (paper cone), and closed “lash” eyes drawn with a marker.
- Glow-in-the-Dark Stars: Navy base coat with glow paint starsperfect for a kid’s room window display.
- Paint-Stamp Pumpkins: Use cookie cutters, leaves, or sponge shapes to stamp repeating patterns (super little-kid friendly).
Kids’ no-carve pumpkin projects often lean on simple shapes, paint + add-ons (like paper, foam, or googly eyes), and playful themes like animals and donuts.
Spooky (But Still Friendly Enough for the Front Porch)
- Spiderweb Tape Trick: Spray paint black, lay tape in web lines, paint over with white or silver, then peel tape.
- Bat Silhouettes: Paint a sunset gradient (orange to purple), then add black bat shapes with a stencil or paint pen.
- Mummy Wrap + Paint: Paint a pale base, wrap loosely with gauze, and add two eyes peeking out.
- Witch Hat Topper: Paint the pumpkin a bold color; add a mini paper witch hat on top for instant “Halloween.”
- Lace Overlay Pumpkin: Paint the pumpkin a dark base, wrap with lace or a patterned stocking, and securemoody and elegant.
- Skeleton Hands (Easy Version): Matte black base coat, then paint simple white “bone” shapesno anatomy textbook needed.
- Haunted House Scene: Paint a night sky, then a tiny haunted house silhouette. Add a yellow moon with a sponge.
- Eye-of-Newt (But Make It Cute): Paint a single big “eyeball” on the frontsimple circles, big impact.
- Glow Mouth Illusion: Paint a black face outline and add neon paint highlights so it looks like it’s glowing at dusk.
- Minimal “BOO” Lettering: Paint a solid base; stencil or freehand “BOO” in white or metallic for a clean look.
Spooky no-carve looks often rely on high contrast (black + white), silhouettes, tape tricks, and overlays like laceeasy techniques that read “Halloween” from across the street.
Chic, Modern, and “Yes, I Own Throw Pillows”
- Neutral Minimalist Pumpkins: Paint in cream, taupe, or soft gray; keep stems natural for a cozy-modern vibe.
- Terrazzo Speckles: White base coat; add chunky irregular specks in muted tones to mimic terrazzo.
- Monogram Pumpkin: Paint a solid base; add a big letter in the center with a stencil (great for place settings).
- Botanical Line Art: Use a paint pen to draw simple leaves and stemsone continuous-line design is extra sleek.
- Pressed-Flower Look (Painted): Paint flat floral shapes in warm fall colors; outline lightly for a “pressed” feel.
- Gold Leaf Accents: Add patches of faux gold leaf (or paint) around the top for subtle luxury.
- Toile-Inspired Pattern: Light base coat; paint tiny repeating scenes (or simple vines) in one color for a classic look.
- Marble Swirl: Blend two neutral paints while wet (or use a faux-marble technique with a feathered brush).
- Disco Pumpkin: Silver base coat, then add tiny mirror tiles (or paint a reflective pattern) for party porch energy.
- Galaxy Pumpkin: Black base, sponge on purple/blue, splatter white “stars,” and add a tiny constellation line.
- Abstract Brush Strokes: Choose 3–4 fall colors and paint loose strokesintentionally imperfect is the point.
- Modern Cactus Pumpkin: Paint green in a few shades and add small “needle” dots; display in a pot with gravel.
Modern painted pumpkin trends often include neutrals, abstract patterns, terrazzo speckles, disco shine, and botanical minimalismpopular across home décor and lifestyle outlets.
Display Tips That Make Painted Pumpkins Look “Styled”
- Group by color: Put similar tones together (all neutrals, all jewel tones) for a designer look.
- Mix sizes: One big statement pumpkin + several minis looks intentional, not accidental.
- Add height: Use stacked books, crates, or a small stool to create layers on a porch or mantel.
- Light it: Surround painted pumpkins with battery fairy lights for evening glowno carving required.
- Use faux pumpkins outdoors: If your porch gets lots of sun or rain, faux pumpkins keep the look consistent all season.
Common Mistakes (So You Can Avoid Pumpkin Drama)
- Painting on a wet pumpkin: Moisture underneath paint = peeling later.
- One thick coat: It looks streaky and takes forever to dry. Thin layers win.
- Skipping prep on shiny pumpkins: A quick dulling step helps paint behave.
- Sealing too early: Seal only when paint is fully dry, or you trap moisture and cloud the finish.
- Spray paint indoors: Ventilation mattersyour pumpkin should smell like fall, not like a hardware store aisle.
Experience Notes: What Pumpkin Painting Is Really Like (and How to Make It Better)
Pumpkin painting sounds calm in theory: soft music, a cozy drink, a gentle brushstroke, the scent of autumn in the air. In practice, it’s often more like a wholesome comedy sketchespecially if you’re crafting with friends, kids, roommates, or that one relative who insists they’re “not artistic” and then casually produces a museum-worthy pumpkin in 12 minutes.
One of the most common experiences people describe is the “table protection panic”. Someone always forgets the newspaper, someone else brings a fancy tablecloth, and suddenly everyone is negotiating like diplomats: “Okay, nobody moves their elbow more than three inches.” The easiest fix is boring but powerful: cover the surface with a disposable plastic tablecloth or a few trash bags, then tape the edges down. It sounds extra… until you watch a cup of rinse water tip over in slow motion and you realize you’ve prevented an incident that would’ve been retold at every Thanksgiving forever.
Another classic moment is the “why is this paint not sticking?” phase. People will start blaming the paint, the brush, the weather, and possibly the moon cycle. Usually the real culprit is that the pumpkin is still a little damp, dusty, or shiny. When crafters take two minutes to wipe the pumpkin and let it dry, everything gets easier. If you’re painting with kids, turning prep into a mini “pumpkin spa” (wipe, dry, inspect, repeat) makes it feel like part of the fun instead of a speed bump.
Group crafting brings out another experience: decision overload. With 46 ideas (and a whole internet of additional temptations), someone will freeze like they’re choosing a life path instead of painting a gourd. A simple trick is to pick a “theme lane” before you startcute, spooky, modern, or rusticand then choose just one or two techniques (tape stripes, polka dots, silhouettes). Boundaries make creativity faster. It’s not limiting; it’s like putting bumpers on a bowling lane so you actually hit pins instead of rolling straight into the snack table.
If you’ve ever hosted a pumpkin painting night, you’ve probably seen the “happy accidents become the best pumpkins” phenomenon. A crooked stripe can become a wavy retro pattern. A smudged dot can become a speckled stone finish. A drip that went too far turns into intentional “paint drip art.” The secret is to treat mistakes like design prompts: add more of the “mistake” in a controlled way, and suddenly it looks planned. People are usually impressed by confidence, not perfection.
Families often notice that pumpkin painting becomes a sneaky little tradition-builder. Kids love the low-stakes creativity (especially with googly eyes and paint pens), and adults love that it’s safer and less messy than carving. You’ll also see personality come out fast: one person makes elegant neutral pumpkins, another paints a neon galaxy, someone else produces a very serious buffalo-check masterpiece like their pumpkin has a Pinterest sponsorship.
Finally, the real “pro” experience tip: set expectations for drying time. Freshly painted pumpkins are basically wet paint sculptures. They will be touched. They will be moved. Someone will say, “Is it dry?” and then immediately test it with a finger. To avoid fingerprints, build in a drying zone: a corner of the table or a spare baking sheet where pumpkins can sit untouched. If you’re doing multiple coats, rotate pumpkins like you’re running a tiny seasonal assembly linepaint, dry, detail, dry, seal, done.
When it all comes together, pumpkin painting has that rare combination of being easy, genuinely fun, and surprisingly stylish. And if your pumpkin ends up looking a little goofy? Congratulationsyou’ve made something handmade, seasonal, and more memorable than anything you could buy in a store. That’s the point.
Conclusion
Painted pumpkins are the easiest way to upgrade your fall decorations without the mess of carving. With a little prep, the right paint, and one simple techniquetape stripes, sponge dots, silhouettes, or paint-pen line artyou can create pumpkins that feel custom, stylish, and totally “you.” Pick a few ideas from the list, make a mini collection, and let your porch (or mantel) do what it was born to do: look cozy and earn compliments.