Table of Contents >> Show >> Hide
- Why Painted Pumpkins Are the MVP of Fall Decor
- Supplies That Make Pumpkin Painting Easy (and Not a Sticky Regret)
- 46 Easy Pumpkin Painting Ideas for Fall Decorations
- How to Display Painted Pumpkins Like a Fall-Decor Pro
- Conclusion
- Extra: Real-Life Pumpkin Painting Experiences (So You Can Skip My Mistakes)
Carving pumpkins is a beloved fall tradition… right up until you’re elbow-deep in stringy pumpkin guts, wondering why you didn’t choose a hobby with less “squish.” Enter: pumpkin paintingthe no-carve, low-mess, high-cute way to turn a plain orange orb into porch-worthy fall decor.
Whether you’re decorating for Halloween, hosting a pumpkin-painting night, or just trying to make your entryway look like a cozy autumn catalog (without buying 37 throw pillows), these easy pumpkin painting ideas have you covered. We’ll start with quick prep and pro tips, then dive into 46 painted pumpkin designs that range from “my kid can do it” to “I might be an artsy genius now.”
Why Painted Pumpkins Are the MVP of Fall Decor
- No carving tools (translation: safer for kids and clumsy adults).
- Less mess (your kitchen counter stays a counter, not a crime scene).
- They can last longer than carved pumpkins, especially if you keep them dry and sealed.
- So many styles: spooky, modern, farmhouse, glam, minimalistpaint can do it all.
- Faux pumpkins turn these ideas into reusable fall decorations year after year.
Supplies That Make Pumpkin Painting Easy (and Not a Sticky Regret)
Basic pumpkin-painting toolkit
- Pumpkins: real or faux (foam/plastic). Faux is great for long-lasting fall pumpkin decor.
- Acrylic craft paint (most versatile) and/or paint pens (perfect for outlines and lettering).
- Brushes: one flat brush for base coats + one small detail brush.
- Painter’s tape (clean stripes, sharp geometric shapes).
- Stencils (letters, numbers, polka dots, spider websinstant “I planned this”).
- Optional fun extras: glitter, rhinestones, Mod Podge/decoupage glue, googly eyes, felt, ribbon.
- Sealer: clear acrylic spray or brush-on sealer for durability (especially outdoors).
Prep in 10 minutes: the “paint won’t peel” routine
- Clean the surface: wipe off dirt and dust; dry thoroughly.
- Stabilize it: set the pumpkin on a bowl or ring of paper towels so it doesn’t roll like it’s training for the Olympics.
- Prime if needed: faux pumpkins often paint better with a quick primer coat (matte primer or white spray base).
- Base coat: one or two thin layers beat one thick gloopy layer every time. Let it dry fully.
- Seal for longer life: once the design is dry, apply a clear sealer in light coats (especially if it’ll sit on a porch).
Pro tip: If you’re painting real pumpkins, keep them out of soggy weather and off wet soil. A pretty pumpkin is nice; a pumpkin that dissolves into porch soup is… less nice.
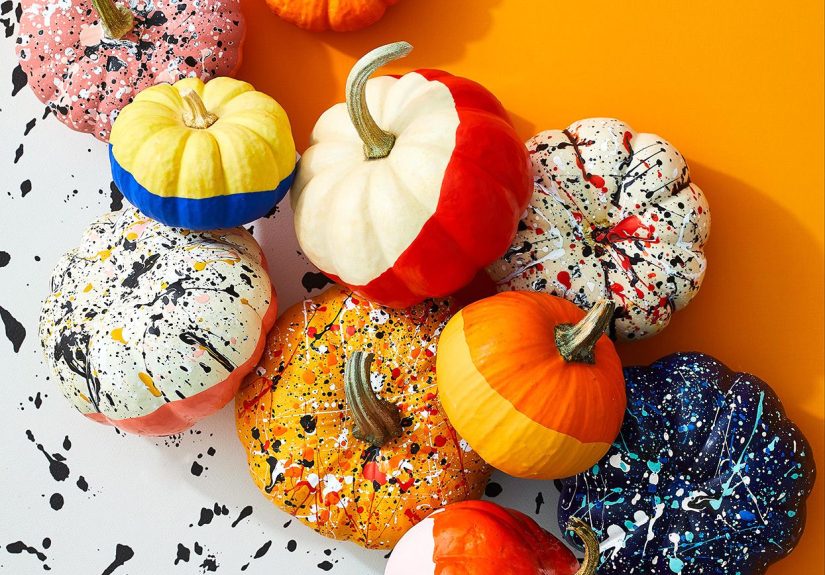
46 Easy Pumpkin Painting Ideas for Fall Decorations
These pumpkin paint ideas are designed to be beginner-friendly. Many require only a base color plus a paint penaka the magical marker wand of fall crafting.
Simple Patterns That Look Surprisingly Fancy (1–10)
- Classic Polka Dots Paint the pumpkin a solid color, then add dots with the end of a brush or a sponge dauber. Mix dot sizes for a playful “designer” look.
- Clean Stripes Wrap painter’s tape around the pumpkin in bands, paint over it, then peel for crisp stripes. Works in neutrals for modern fall decorations.
- Ombré Fade Start dark at the bottom and blend upward lighter using a dry brush. Even imperfect blending looks intentional (the best kind of intentional).
- Color-Blocked Pumpkin Tape off sections (triangles, halves, thirds), paint each area a different color, then remove tape for bold, graphic style.
- Speckled “Stoneware” Pumpkin Base coat in cream, then flick watered-down brown paint lightly for tiny speckles. Cozy, rustic, and very “I own matching mugs.”
- Gingham or Buffalo Plaid Light base coat, pencil a grid, then paint alternating squares. It’s easier than it soundsand harder than it looks. Still worth it.
- Brushstroke Abstract Big, confident strokes in 2–3 colors over a neutral base. The messier it is, the more it screams “gallery wall energy.”
- Minimalist Lines Paint the pumpkin matte white, then add thin black lines (wavy, vertical, or geometric) using a paint pen. Instant modern porch decor.
- Confetti Dots Scatter tiny dots in fall colors like you’re sprinkling joy. Great on mini pumpkins for table decor.
- Scallop Pattern Use a stencil or hand-draw half-circles in rows. Looks like fancy wallpaper, but on a pumpkin (which is objectively funnier).
Cute & Kid-Friendly Painted Pumpkins (11–20)
- Emoji Faces Yellow base coat + paint pen faces. Make a whole “mood lineup” and label them (e.g., “Monday,” “Pumpkin Spice,” “Group Text”).
- Googly-Eye Monsters Paint the pumpkin bright green, purple, or black, then glue on googly eyes. Add a jagged mouth with a paint pen.
- Friendly Ghost White base coat, simple black eyes, tiny smile. Cute enough for toddlers, charming enough for adults.
- Crayon Drip Pumpkin Glue crayons around the top and use a hair dryer to melt drips down the sides. It’s science class, but make it fall decor.
- Animal Faces Turn white pumpkins into a fox, cat, or owl with simple shapes and a paint pen outline. Add felt ears if you want bonus cuteness.
- Rainbow Pumpkin Paint thick rainbow bands or a gradient spiral. It’s cheerful fall decor for anyone who thinks “muted beige” is a personal attack.
- Thumbprint Pumpkin Dip fingers in paint and make tiny leaves, pumpkins, or dots. You’ll have memories… and possibly paint under your nails until Thanksgiving.
- Ice Cream Scoop Stack Paint mini pumpkins pastel “flavors,” add sprinkles, and stack like scoops. Display near your candy bowl for maximum chaos.
- Ladybug Pumpkin Red base coat + black dots and a little face near the stem. Cute and classic.
- Starry Night Pumpkin Deep navy base coat + tiny stars and dots in white and gold. Easy, magical, and very forgiving.
Spooky-But-Still-Easy (21–30)
- Spider Web Pumpkin Paint it black or white; draw a web with a paint pen. Add one little spider for dramatic effect.
- Matte Black + Metallic Details Matte black base coat, then add metallic lines, stars, or dots. Spooky chic without trying too hard.
- Skeleton Smile White base coat, then paint pen teeth and cheekbones. Keep it cartoonish for “friendly haunted house.”
- “Boo” Lettering Paint a neutral base and use a bold paint pen to write BOO. Add tiny bats (easy: three bumps and some wings).
- Mummy Wrap Illusion Paint off-white band “wraps” with thin gaps, then add two eyes peeking through. Zero gauze required.
- Haunted House Silhouette Blend a dusk gradient (purple to orange), then paint a simple black house silhouette. Your porch just became a tiny horror movie poster.
- Drip Paint “Slime” Paint the pumpkin a base color, then drip neon green from the top. Add black drips for extra “ew” (in a good way).
- Monster Teeth Paint a big mouth with pointy teeth. This pumpkin looks like it’s judging your candy choices.
- Bat Swarm Paint a moon (circle stencil), then add little bat silhouettes flying across. Easy, spooky, and surprisingly elegant.
- Jack-o’-Lantern Paint (No Carve Edition) Paint classic triangle eyes and a grin on an orange pumpkin. It’s carving, but without the emotional damage.
Chic, Modern, and “Guests Will Ask Where You Bought It” (31–40)
- House Number Pumpkin Paint it white, stencil your house number in black, and place it by the front door. Practical decor is the best kind of flex.
- Monochrome Neutrals Paint a set of pumpkins in cream, taupe, and warm gray. Arrange as a cluster for instant fall entryway styling.
- Chalkboard Pumpkin Paint with chalkboard paint, then write seasonal messages in chalk or chalk markers. Change the quote whenever your mood changes (hourly is valid).
- Minimal “Hello Fall” Script Neutral base coat + cursive lettering in a paint pen. Add tiny leaf doodles to frame it.
- Pressed-Flower Pumpkin Paint the pumpkin white, then attach pressed flowers with decoupage glue. Romantic fall decor that looks like it belongs in a magazine.
- Gold Foil Accents Add gold foil in messy patches or around the stem. “Imperfect” is the whole aestheticlean in.
- Marbleized Pumpkin Use a swirling paint technique (or faux marble lines with a paint pen) in white/gray/black. Fancy, fast, and very countertop-friendly.
- Velvet-Look Pumpkin Paint with a matte base, then dust with flocking powder while tacky. It looks expensive and feels like a tiny couch.
- Blue-and-White “Porcelain” Pumpkin White base coat + delicate blue florals drawn with a paint pen. Grandmillennial vibes, but make it autumn.
- Black Pumpkin + Lace Stencil Paint it black, wrap lace or a decorative stocking around it, lightly spray metallic paint, then remove the lace for a dramatic pattern.
Porch, Party, and Statement Pumpkins (41–46)
- Welcome Pumpkin Paint a large pumpkin a warm neutral and write “WELCOME” in bold letters. Add smaller pumpkins as a matching “welcome committee.”
- Checked Staircase Set Paint several pumpkins with different simple patterns (stripes, dots, solids) in one color palette. Line them up on steps for an easy fall front porch upgrade.
- Disco Pumpkin (Yes, Really) Paint it silver and add reflective “tiles” with metallic paper or sticker squares. Fall decor, but make it dance.
- PSL Pumpkin Paint it coffee-brown or creamy tan, add “PSL” lettering and a little whipped-cream swirl illustration. Your pumpkin is now a beverage. Congratulations.
- Farm Animal Set Paint a trio of pumpkins as a cow, pig, and chicken. Cartoony faces + simple patches = instant smiles.
- Constellation Pumpkin Deep black or navy base coat, then dot stars and connect them with thin lines. Label the constellation if you’re feeling extra academic.
Want to level up without adding stress? Make a “collection” instead of one masterpiece: a few mini pumpkins with simple patterns look intentional and stylish, even if each one took 12 minutes.
How to Display Painted Pumpkins Like a Fall-Decor Pro
Easy styling formulas
- The Trio Rule: group 3 pumpkins in different sizes (tall, medium, small) for a balanced look.
- Color Story: pick 3–4 colors and repeat them across different designs for a cohesive display.
- Texture Mix: combine matte paint, metallic accents, and one “extra” texture (lace, foil, or glitter).
- Porch Safety: keep pumpkins off wet grounduse a tray, crate, or doormat to reduce moisture.
Keeping painted pumpkins looking fresh
- Let paint dry fully between coats (patience is a craft supply).
- Seal finished designs in thin, even coatsespecially if outdoors.
- If you want decor that lasts all season (or all decade), choose faux pumpkins and store them after fall.
Conclusion
Painted pumpkins are proof that fall decorating doesn’t have to be complicated to look amazing. With a little paint, a steady-ish hand, and a willingness to laugh at minor imperfections, you can create everything from modern minimalist porch decor to kid-friendly monsters to chic metallic statement pieces. Pick one idea, or paint a whole pumpkin squad either way, your fall decorations will be bright, fun, and blissfully gut-free.
Extra: Real-Life Pumpkin Painting Experiences (So You Can Skip My Mistakes)
The first time I hosted a pumpkin painting night, I thought I was being wildly responsible. No knives! No mess! Just wholesome, Instagram-ready fall vibes. I laid out paint, brushes, cups of water, and a suspicious amount of snacks (because creativity runs on sugar). Ten minutes in, I learned my first big lesson: pumpkins are round, and round things roll. One enthusiastic painter turned their pumpkin into a runaway bowling ball that gently bumped into a cup of rinse water, creating a new art medium I like to call “accidental gray wash.”
Lesson two: thin coats win. Someone tried to do a single thick base coat, and it took so long to dry that the pumpkin became a sticky magnet for every floating hair and dust particle in the house. The finished look was less “smooth modern matte” and more “velvet lint collector.” Since then, my rule is simple: if you can see the pumpkin color through the first coat, congratulationsyou’re doing it right. Add another thin layer after it dries.
Lesson three: paint pens are basically cheat codes. If you want crisp lettering, clean lines, or tiny details, paint pens save the day. They’re also perfect for the person who shows up and says, “I’m not artistic,” while holding a pumpkin like it personally offended them. Give that person a paint pen, suggest a simple design (stars, dots, stripes, a cute ghost face), and they’ll leave feeling like a fall decorating wizard.
The outdoors taught me lesson four: seal anything that faces weather. One year, I placed my painted pumpkins right where a surprise drizzle could reach them. They didn’t fully melt, but the design got a little… “watercolor,” and not in an intentional, artsy way. Now, anything that goes on the porch gets a protective top coat, and I avoid putting real pumpkins directly on wet soil. If I’m doing a long-lasting porch display, I’ll use faux pumpkins for the painted ones and tuck real pumpkins nearby as unpainted “supporting actors.”
Another unexpected truth: mini pumpkins are the confidence builders. If you’re nervous, start small. A mini pumpkin can be finished quickly, and even a simple pattern looks adorable. During one painting night, we made an entire set of mini pumpkins in matching colorspolka dots, stripes, starsand arranged them down the center of a table like a cozy fall runway. It looked intentional, and no one had to paint a complicated scene.
Finally, my favorite lesson: painted pumpkins don’t need perfection to be charming. The slightly crooked smile on a ghost pumpkin becomes its personality. The uneven plaid turns into “handmade character.” If you’re decorating for fall, you’re already winningbecause you chose joy, creativity, and a seasonal craft that doesn’t require scooping pumpkin guts with a spoon like you’re excavating an ancient artifact.