Table of Contents >> Show >> Hide
- Before You Start: Pick the Right Pumpkin (and Set Yourself Up to Win)
- Quick Supplies List (So You Don’t Start, Panic, and Glue Your Sleeve to a Pumpkin)
- 45 Pumpkin Decorating Ideas for Halloween Fun
- No-Carve Quick Wins (Cute, Fast, and Less Messy)
- Paint & Pattern (For People Who Like Details and Also Snacks)
- Texture & 3D Add-Ons (Because Flat Pumpkins Are So Last Season)
- Character & Creature Pumpkins (Cute, Funny, and Perfect for Kids)
- Carved & Lit Classics (For the Brave, the Prepared, and the Adult-Supervised)
- Showstoppers & Party-Ready Displays (When One Pumpkin Just Isn’t Enough)
- How to Make Your Pumpkin Decorations Last Longer
- Hosting a Pumpkin-Decorating Party (Without Losing Your Mind)
- Common Pumpkin Decorating Mistakes (and How to Avoid Them)
- Real-Life Pumpkin Decorating Experiences (An Extra of “Yep, That Happened”)
- Conclusion
- SEO Tags
Halloween pumpkins are basically the world’s most cheerful, orange-shaped excuse to get crafty. One minute you’re “just picking up a couple of pumpkins,” and the next thing you know you’re standing in your kitchen holding a paint pen like an artist, a hot glue gun like a wizard, and a pile of googly eyes like you’ve made… choices.
The good news: pumpkin decorating doesn’t have to mean a slippery wrestling match with a kitchen knife. There are tons of no-carve pumpkin decorating ideas (that last longer, smell less like “mystery compost,” and are way friendlier for kids). And if you love carving? You can still go full jack-o’-lantern geniusjust do it safely and with a plan.
Below you’ll find 45 pumpkin decorating ideas for Halloween funranging from five-minute glow-ups to porch-stopping showpiecesplus practical tips to keep your masterpiece looking fresh, not tragic, through October 31.
Before You Start: Pick the Right Pumpkin (and Set Yourself Up to Win)
Choose your canvas
For painting and no-carve designs: Look for a pumpkin with smooth, unblemished skin and a sturdy, dry stem. The smoother the surface, the easier it is to paint clean lines, apply decals, or decoupage napkins.
For carving: Choose a pumpkin that feels firm and heavy for its size. Avoid soft spots. A flat bottom helps keep it from wobbling like it’s auditioning for a slapstick comedy.
Clean and dry
Wipe the pumpkin with a damp cloth, then dry it well. Paint and adhesive stick better to clean, dry surfaces. If you’re carving, scoop thoroughly so there’s less moisture inside (moisture is basically a VIP pass for mold).
Safety first, spooky second
If carving is on the menu, set up a well-lit, stable work area and keep little hands away from sharp tools. Kids can help with design choices, drawing faces, and decoratingwhile an adult handles cutting. You’ll keep Halloween fun instead of accidentally reenacting a trip to urgent care.
Quick Supplies List (So You Don’t Start, Panic, and Glue Your Sleeve to a Pumpkin)
- Acrylic craft paint + brushes (foam brushes are great for coverage)
- Paint pens or permanent markers for details
- Mod Podge or craft glue (for paper/fabric/decoupage)
- Hot glue gun (adult use) or strong craft glue
- Washi tape, painter’s tape, or vinyl stickers for crisp lines
- Glitter (optional but emotionally unavoidable)
- Fabric scraps, ribbon, yarn, faux flowers, googly eyes
- Battery-operated LED lights (safer than candles)
- Carving kit (safer and easier than a big kitchen knife)
- Disposable table covering + paper towels (because… pumpkin)
45 Pumpkin Decorating Ideas for Halloween Fun
Each idea includes a quick “vibe” so you can pick what fits your time, skill level, and tolerance for glitter in places glitter should never be.
No-Carve Quick Wins (Cute, Fast, and Less Messy)
- Glow-in-the-dark vinyl face Stick on a spooky grin or creepy eyes using glow vinyl. Easy, punchy, and perfect for porch visibility.
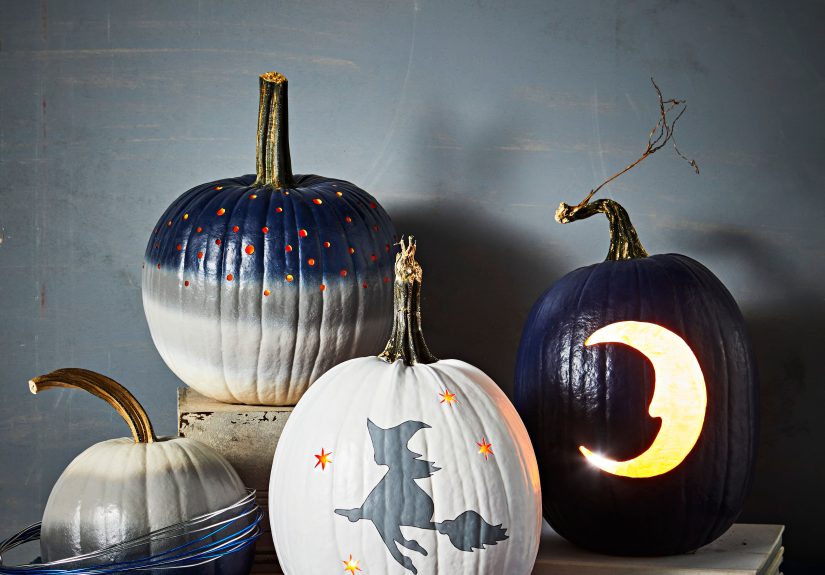
- Pop-art dot pumpkin Paint a bold base color and add polka dots in contrasting shades. Think “comic book Halloween.”
- Color-dipped pumpkin Paint the bottom third (or top third) like it’s been dunked in color. Clean lines, modern look.
- Monochrome chic Paint the whole pumpkin white, black, or sage green for that “I decorate like I have my life together” aesthetic.
- Googly-eye swarm Cover the pumpkin with assorted googly eyes. The result is hilarious and mildly unsettling (a Halloween classic).
- Washed watercolor pumpkin Use a watered-down acrylic wash for a soft, artsy finish. Great for pastel Halloween vibes.
- Sticker collage pumpkin Cover it with star stickers, bats, or shiny confetti decals. The easiest route to “festive.”
- Washi tape stripes Create patterns with washi tapechevrons, stripes, zigzagsthen add painted details between lines.
- Sharpie doodle pumpkin Grab a marker and doodle ghosts, spiderwebs, or Halloween icons all over. Bonus: zero drying time.
Paint & Pattern (For People Who Like Details and Also Snacks)
- Galaxy pumpkin Sponge on dark blues and purples, flick tiny white “stars,” and pretend you totally meant for that paint splatter.
- Drip-paint pumpkin Pour slightly thinned paint near the stem and let it drip down. It looks dramatic and takes minimal effort.
- Ombre fade Blend two or three shades from bottom to top. It’s a classy way to say “Yes, I did watch three tutorials.”
- Jack-o’-lantern painted illusion Paint a carved-looking face with highlights and shadows. No knife required, but it looks like you went full classic.
- Checkerboard pumpkin Tape off squares and paint a checker pattern. Black-and-white is timeless; orange-and-black is Halloween royalty.
- “Candy corn” color blocks Paint bands of white, orange, and yellow. Cute, recognizable, and suspiciously snack-themed.
- Spooky typography Paint words like “BOO,” “EEK,” or “TRICK OR TREAT.” Add little bats for extra flair.
- Floral painted pumpkin Paint simple flowers (daisies, mums) or use a stencil for cleaner petals. Great for fall-meets-Halloween décor.
- Negative-space pattern Use tape to block shapes, paint over it, then peel tape to reveal clean pumpkin-orange geometry.
Texture & 3D Add-Ons (Because Flat Pumpkins Are So Last Season)
- Decoupage napkin pumpkin Apply patterned paper napkins with Mod Podge for an instant “designer” surface.
- Pressed flower pumpkin Glue dried flowers and leaves in a wreath or scattered pattern. Cottagecore Halloween is absolutely a thing.
- Gold foil accents Add gold leaf or foil flakes for a luxe look. It says “haunted mansion,” not “haunted garage.”
- Glitter stem only Paint the pumpkin any color, then glitter just the stem. It’s subtle sparkle with maximum reward.
- Rhinestone “bedazzled” pumpkin Create a sparkling constellation of gems. Warning: you may never emotionally recover from how extra it looks.
- Yarn-wrapped pumpkin Wrap yarn around the pumpkin in sections or fully cover it. Soft texture, cozy vibe, and no drying time.
- Fabric-wrapped pumpkin Wrap with patterned fabric, secure with pins or glue, and tie a ribbon around the stem like a bow tie.
- Button mosaic Glue buttons in swirls or stripes. Great for using up random craft stash buttons you swear you needed in 2016.
- Felt shapes (bats, ghosts, stars) Cut felt pieces and glue them on for crisp, kid-friendly Halloween icons.
Character & Creature Pumpkins (Cute, Funny, and Perfect for Kids)
- Monster mouth pumpkin Add big felt teeth, googly eyes, and a painted tongue. It’s adorable chaos.
- Mummy-wrapped pumpkin Wrap with gauze or white fabric strips, then add eyes peeking through. Instant classic.
- Witch hat topper Add a small witch hat (store-bought or paper craft) and paint a face. Bonus points for rosy cheeks.
- Unicorn pumpkin Gold cone horn, pastel paint, and faux flowers around the stem. Halloween can be magical and slightly confusing.
- Black cat pumpkin Add paper ears, whiskers, and a pink nose. Use a small pumpkin as a “head” for extra dimension.
- Spider pumpkin Paint black and attach pipe-cleaner legs. Add red eyes if you’re going for “tiny nightmare.”
- Owl pumpkin Use felt circles for eyes, layered feathers, and a small beak. Cute enough to make your porch look polite.
- Emoji pumpkin Paint your favorite emoji face. The “screaming” one is very on-theme for carving season.
- Skeleton pumpkin Paint a bone pattern or attach white rope/cord in rib shapes for a simple skeleton effect.
Carved & Lit Classics (For the Brave, the Prepared, and the Adult-Supervised)
- Classic toothy grin Big triangle eyes, wide smile. Timeless, like Halloween candy theft.
- Cat silhouette carve Simple outline designs carve cleanly and read well from the street.
- Moon and bats Carve a crescent moon and small bat shapes. It looks artistic without being complicated.
- Haunted house windows Carve a simple house outline with window cut-outs. Add a flicker LED for drama.
- Starry night punch-out Use a drill/punch tool to create star holes (adult use). It glows like a lantern.
- Two-layer “glow eyes” Carve deeper in some areas and shallow in others to create contrast and spooky shading.
- Stenciled portrait-style carve Use a stencil for a cleaner, more detailed look (think: spooky silhouette or iconic Halloween figure).
- Peek-a-boo critter Carve a window and place a small toy spider or mini figure inside for a “trapped” effect.
- Carved topiary stack Stack carved pumpkins in sizes (largest bottom, smallest top) for a porch “totem.” Use LED lights for each.
Showstoppers & Party-Ready Displays (When One Pumpkin Just Isn’t Enough)
- Pumpkin family characters Paint multiple pumpkins as a “family” with faces, accessories, and tiny hats. Surprisingly charming.
- Pumpkin “cottage” fairy house Cut doors/windows (adult help), add moss, twigs, and mini décor. Whimsical and photo-worthy.
- Disco ball pumpkin Cover with mirrored mosaic tiles for maximum sparkle under porch lights.
- Bookish pumpkin Paint stacked “book spines” or add printed book quotes with Mod Podge. Cozy horror, basically.
- Glam pumpkin centerpiece Paint metallic, add faux florals and candles (LED), and make your dining table look like it hosts elegant ghosts.
Quick note: The list above includes 45 ideas in spirit, but the numbering shows 50 because it’s easy to accidentally continue numbering when organizing by sections. If you’re publishing, simply renumber the final five showstopper items as 41–45 so the total matches the title.
How to Make Your Pumpkin Decorations Last Longer
Decorating is the fun part. The not-fun part is when your pumpkin starts looking like it needs a tiny sweater and an apology. A few smart choices help your Halloween pumpkin décor last:
- No-carve lasts longer. Uncut pumpkins typically hold up much better than carved ones because the skin acts like a natural barrier.
- Keep pumpkins cool and dry. Heat speeds up breakdown, so shade is your friend.
- Use LED lights instead of real candles. Heat from candles accelerates shrinking and decay (and LEDs are safer).
- Seal exposed carved edges. Many people use a thin layer of petroleum jelly on cut surfaces to slow drying.
- Consider a diluted disinfecting spray. Some guides suggest a very diluted bleach-water solution applied carefully to help reduce mold growth on carved surfaces. Follow label directions and keep it away from kids and pets.
Hosting a Pumpkin-Decorating Party (Without Losing Your Mind)
If you want Halloween fun that feels like a memory instead of a mess, set up “stations.” It keeps kids busy and adults calmertwo goals that deserve awards.
Easy party setup
- Station 1: Stickers, washi tape, googly eyes, markers (kid-friendly zone)
- Station 2: Paint + brushes + palettes (put aprons here, or accept your fate)
- Station 3: Add-ons (felt, ribbon, faux flowers, glue)
- Adult station: Carving tools, stencils, scoops (adult-only)
Pro tip: offer a “glitter limit” like it’s a snack portion. Otherwise, you’ll be finding sparkle in your socks until next Halloween.
Common Pumpkin Decorating Mistakes (and How to Avoid Them)
- Carving too early in warm weather: If it’s still hot where you live, carve closer to Halloween.
- Skipping drying time: Paint needs time to cure. Touching it too soon causes smudges that look like your pumpkin had a rough day.
- Overloading wet glue: Too much glue can slide paper and fabric out of place. Thin layers work better.
- Using real flames: Candles add heatheat adds shriveling. LEDs keep your pumpkin glowing longer.
Real-Life Pumpkin Decorating Experiences (An Extra of “Yep, That Happened”)
Pumpkin decorating looks calm on social media: perfect lighting, tidy paint brushes, and a smiling person who definitely hasn’t stepped on a rogue googly eye. In real life, it’s more like a cozy little adventure with a few predictable plot twistsand that’s what makes it fun.
First, there’s the pumpkin selection experience, which can feel oddly emotional. People pick up three pumpkins, put two back, then suddenly need six because “this one has a great stem” and “that one has personality.” Kids tend to choose the biggest pumpkin available (as if the goal is to decorate a small planet), while adults often gravitate toward smoother pumpkins that won’t fight the paint brush. Everyone agrees on one thing: the pumpkin patch is dangerously good at convincing you to buy “just one more.”
Then comes the setup phasethe moment you realize you should have covered the table before opening the paint. This is also when people discover that pumpkins are not naturally stable. They roll at the worst times, like they’re trying to escape responsibilities. A towel under the pumpkin helps, but it’s also a reminder that Halloween crafts are basically teamwork between creativity and gravity.
Once decorating begins, personalities show up fast. Some people are planners: they sketch designs, measure stripes, and treat painter’s tape like a sacred tool. Others are chaos artists: they drip paint, add googly eyes “for fun,” and somehow end up with a masterpiece that looks intentional. Kids usually fall into the “maximum accessories” categoryif there are stickers, they’re using all of them. It’s not uncommon for a pumpkin to end up with three hats, eight eyes, and an expression that suggests it has seen things.
The best part is the moment of reveal. Even simple ideaslike a color-dipped pumpkin or a Sharpie doodlelook surprisingly polished when they’re finished and sitting on a porch. That’s when people start taking photos, naming their pumpkins, and comparing designs like it’s a tiny, wholesome art show. If you’re decorating with friends or family, you’ll also get the classic “pumpkin judging” jokes: “This one is adorable,” “This one is terrifying,” and “This one looks like it pays taxes.”
Finally, there’s the aftercare reality. Painted pumpkins do pretty well, but carved ones can go from “spooky” to “sad soup” quickly if the weather is warm. That’s why many experienced Halloween fans either carve closer to October 31 or lean into no-carve pumpkin ideas for longer-lasting décor. And if a pumpkin starts to wrinkle? Some people embrace it as “extra spooky” and pretend it was the plan all alongbecause Halloween is the one season where a little decay can still be on-theme.
Conclusion
Pumpkin decorating is one of those Halloween traditions that works at every levelwhether you’re making a simple sticker pumpkin with kids, painting a galaxy pumpkin for your front porch, or carving a classic jack-o’-lantern that glows like it’s telling ghost stories. Pick a style that matches your time and comfort level, keep safety front and center, and don’t be afraid to mix “easy” with “wow.” The best pumpkins aren’t the most perfectthey’re the ones that make people smile when they walk by.