Table of Contents >> Show >> Hide
- Before You Paint: The 10-Minute Prep That Saves 10 Hours of Regret
- Paint Choices: What Works on Curtains (and What Doesn’t)
- Technique Tips for Curtains That Look “Custom,” Not “Craft Day”
- 45 DIY Painted Curtain Styles
- How to Choose the Right Painted Curtain Style for Your Room
- Common Mistakes (and How to Fix Them Without Crying)
- Wrapping It Up
- Experience Notes: What DIYers Learn the Hard Way (So You Don’t Have To)
- SEO Tags
Curtains are basically the eyebrows of a room: ignore them and everything looks a little surprised (in a bad way).
The good news is you don’t need custom drapesor a second mortgageto get window treatments with personality.
With a little paint and a tiny bit of patience, plain panels can turn into “Where did you buy those?!” curtains.
And yes, you can absolutely do this even if your art credentials currently include “once owned a highlighter.”
This guide walks you through smart prep, paint choices, and the techniques that make painted curtains look
crisp instead of “craft store accident.” Then you’ll get 45 specific DIY painted curtain styles you can copy,
remix, or use as a launching pad for your own window masterpiece.
Before You Paint: The 10-Minute Prep That Saves 10 Hours of Regret
1) Pick a fabric that actually wants to be painted
Natural fibers (cotton, linen, canvas, drop cloths) are the easiest to paint because they absorb pigment evenly.
Slick synthetics can be trickier and may need specialty fabric paint. If you’re not sure what your panels are,
do a small test on the hem area first.
2) Wash, dry, and iron
Pre-wash removes sizing and finishes that can block paint from bonding. Dry completely, then iron the fabric
flat so your pattern doesn’t “wiggle” over wrinkles. Your future self will thank you.
3) Set up a paint-friendly workspace
- Lay a plastic tablecloth or painter’s plastic down first, then kraft paper or cardboard on top.
- Tape the curtain edges so the fabric stays put.
- Slide cardboard inside the panel if you’re painting through only one layer (stops bleed-through).
- Keep paper towels nearby for quick “oops” moments.
Paint Choices: What Works on Curtains (and What Doesn’t)
Option A: Fabric paint (the easiest path)
Fabric paint is made to flex with fibers and survive washing. It’s the most beginner-friendly choice for
stencils, stamps, and hand-painted designsespecially if you want softer curtains that don’t feel stiff.
Option B: Acrylic paint + textile medium (the versatile path)
Acrylic paint can work beautifully on fabric when mixed with a textile medium. The medium helps the paint
stay flexible and washable. Follow the brand’s ratio (it varies), and always test on a scrap or an inside hem
first.
Option C: Spray paint (the fast-but-fussy path)
Fabric spray paint can be great for gradients and big, soft shapes. Regular spray paint can make fabric stiff
and is better reserved for small accents or decorative panels that won’t be washed often. Ventilate well and
mask areas carefully.
Heat-setting: the step that makes it last
Many fabric paints and paint/medium mixes need heat-setting so the design holds up to handling and laundering.
Usually that means letting paint dry fully, then ironing (often on the reverse side) or using a dryer cycle,
depending on the product instructions.
Technique Tips for Curtains That Look “Custom,” Not “Craft Day”
Stencil like a pro (aka: less paint, more patience)
- Offload paint onto a paper towel so your roller/brush feels almost dry.
- Use a light touch and build coverage in thin layers to prevent bleeding under stencil edges.
- Secure the stencil with painter’s tape or a repositionable spray adhesive.
- Lift carefully before paint fully dries if your stencil directions recommend itthis keeps edges crisp.
Stamping and printing: charming, imperfect, and intentional
Stamps and blocks give you that artisan “printed textile” vibe. You can carve foam, cut potatoes (yes, really),
or use household objects (like a foam brush edge) to create repeating patterns. The secret is consistent spacing
and a steady amount of painttoo much paint blurs the edges.
Painter’s tape for clean geometry
Tape creates bold stripes and modern shapes with sharp lines. Burnish the tape edge (press it down firmly),
and paint in light coats. Peel tape back slowly at an angle for the most satisfying reveal of your life.
45 DIY Painted Curtain Styles
Below are 45 ideas, each with a quick “how” and a style note. Mix and match techniquesswap colors, change scale,
or combine two ideas (like an ombré base plus a stencil border) for a one-of-a-kind look.
- Irregular “X” Stamp Rows – Use the edge of a foam brush to stamp loose X’s in neat rows. Great for casual modern rooms.
- Classic Block-Print Dots – Stamp evenly spaced dots (large or tiny) for a clean, graphic feel. Works in nurseries and kitchens.
- Oversized Polka Fade – Start with bold dots at the bottom and fade upward by spacing dots farther apart.
- Minimalist Pinstripe Bands – Tape thin vertical stripes near the edges only, leaving the center plain. Tailored and calm.
- Wide Cabana Stripes – Tape thick stripes for instant beach-house energyespecially on drop cloth curtains.
- Two-Tone Color Block – Paint the bottom third a contrasting color (like a “dipped” look). Sharp, modern, and easy.
- Ombre Dip-Dye (Painted) – Blend from darker at the bottom to lighter at the top with a damp foam brush.
- Sunrise Gradient – Horizontal bands that blend from warm to cool tones. Perfect for a kid’s room or creative studio.
- Soft Watercolor Wash – Thin paint with water (or use fabric dye) for a dreamy, airy veil effect.
- Hand-Painted Abstract Brushstrokes – Big, confident strokes that look “gallery wall,” not “oops.” Great with neutral walls.
- Modern Terrazzo Dashes – Paint small scattered dashes in 3–5 colors, like terrazzo chips. Fun in bathrooms and offices.
- Scalloped Border Hem – Stencil or freehand scallops along the bottom edge for cottage charm.
- Greek Key Band – Stencil a Greek key near the top or bottom for a classic, upscale look.
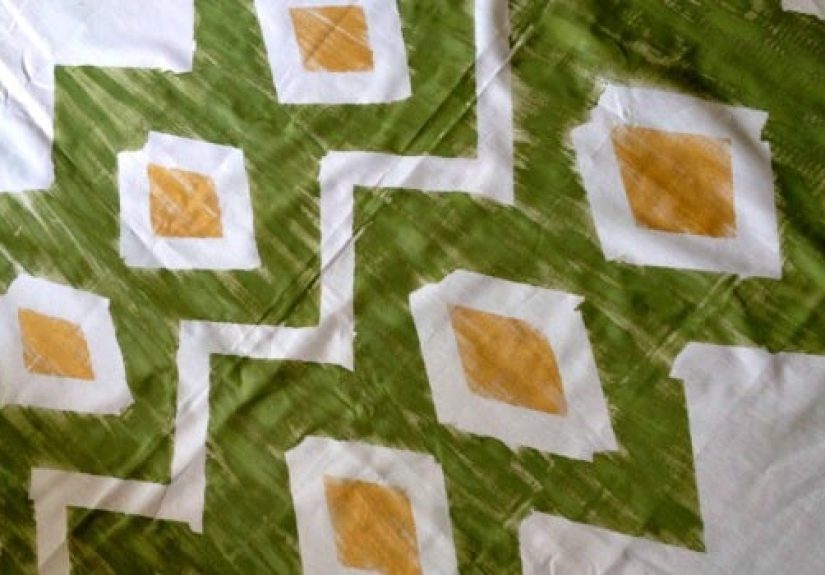
- Moroccan Tile Repeat – Use a repeating stencil pattern for a wallpaper vibe without wallpaper commitment.
- Diamond Trellis Allover – A trellis stencil reads “designer drapes” even on budget panels.
- Botanical Vine Trail – Paint a leafy vine climbing one side panel. Asymmetry makes it feel intentional.
- Fern Fronds – Sponge or stencil fern shapes in tonal greens for spa-like calm.
- Wildflower Meadow Hem – Tiny painted flowers concentrated near the bottom, fading upward.
- Monstera Statement Leaves – Large leaf silhouettes in a single color for bold, modern tropical energy.
- Cactus Line Art – Minimal cactus outlines in black or charcoal. Cute for kitchens and dorms.
- Coastal Coral Silhouettes – Stencil coral shapes along the bottom for an airy, beachy feel.
- Mountain Range Horizon – Paint layered mountain silhouettes in muted tones across the lower third.
- City Skyline Border – Tape + paint simple skyline rectangles for a modern, urban nod.
- Constellation Night Sky – Deep navy wash with tiny white “stars” flicked using a toothbrush.
- Moon Phases Panel – Paint moon phase icons down one edge. Subtle, trendy, and surprisingly elegant.
- Sunburst Corner – Paint rays from an upper corner like morning light. Great for cheerful spaces.
- Checkerboard Sections – A modern checker pattern in a soft neutral palette feels fresh, not diner-ish.
- Windowpane Grid – Tape a thin grid pattern for a tailored “linen suit” vibe.
- Broken Stripe (Wabi-Sabi) – Paint stripes that intentionally break and shiftperfect for relaxed, artsy rooms.
- Herringbone Stencil – Herringbone reads expensive. Keep it tone-on-tone for grown-up style.
- Speckle “Stone” Texture – Lightly spatter paint for a natural, stonewashed finish.
- Painted Fringe Illusion – Use thin vertical strokes at the hem to mimic fringe without sewing.
- Ribbons & Bows Motif – Stencil small ribbon shapes for a sweet, classic look (especially in nurseries).
- Mid-Century Arches – Paint repeating arches in warm neutrals. Looks great with wood furniture.
- Half-Moon Border – A chain of half-moons along the leading edge adds graphic interest without overwhelming.
- Painted Tassel Dots – Dot clusters that mimic tasselsfun and boho, especially in clay and terracotta shades.
- Bandana-Inspired Print – Stencil a bandana-style pattern in one color for a cozy, Americana vibe.
- Ikät-ish Blur Stripes – Soft-edged stripes created with a slightly damp brush for a hand-dyed look.
- Shibori-Style Painted Resist – Use painter’s tape or binding to create resist lines, then paint around them.
- Stencil Border Only – Keep the center plain and add an ornate border at the bottom. Elegant and low effort.
- Top Header Band – Paint a band near the rod pocket for a “trim” effectespecially good for short curtains.
- Corner Motif Repeats – Paint/stencil the same motif in each lower corner, like a monogrammed napkin for your window.
- Diagonal Color Dip – Paint the bottom corner diagonally (like a “folded envelope”). Modern and unexpected.
- Painted Tie-Dye Swirls – Use fabric paint in loose swirls for a retro vibekeep colors limited for sophistication.
- Abstract “Confetti” Sprinkle – Tiny random dots and dashes in two colors. Looks playful but still tidy.
How to Choose the Right Painted Curtain Style for Your Room
Match the pattern scale to your window size
Large windows can handle bold shapes and big repeats. Smaller windows usually look better with tighter patterns,
border designs, or subtle texture (think: speckles, pinstripes, or tone-on-tone stencils).
Pick a palette that behaves
If your room already has loud wallpaper, busy rugs, or statement furniture, choose a simpler curtain design:
stripes, a border, or a single large motif. If your room is neutral and calm, that’s your green light for
a bolder stencil or colorful abstract strokes.
Decide how “washable” you need this to be
Kitchen curtains and kid-zone panels should use fabric paint or acrylic + textile medium with proper heat-setting.
Decorative panels in a low-traffic room can be more experimental (but still test first).
Common Mistakes (and How to Fix Them Without Crying)
Paint bleed under the stencil
Usually caused by too much paint or a stencil that shifted. Fix by letting it dry, then touching up the edge with
a tiny artist brush and a little matching paint. Next time: offload paint and tape the stencil more securely.
Stiff fabric
Heavy coats of paint can stiffen curtains. Use thinner layers and consider mixing acrylic with textile medium per
product instructions. For future projects, do multiple light coats and avoid flooding the fabric.
Uneven pattern spacing
Measure lightly with a ruler or make a simple cardboard spacer you can reuse. If spacing is slightly off, lean in:
add a few extra accents so the “handmade” look feels intentional.
Wrapping It Up
Painted curtains are one of the rare DIY projects that check every box: inexpensive, customizable, and genuinely
high-impact. Whether you love crisp tape lines, soft watercolor washes, or a bold stencil that screams “designer,”
the key is simple: prep the fabric, use the right paint strategy, and build color slowly. Your windows deserve it.
Experience Notes: What DIYers Learn the Hard Way (So You Don’t Have To)
When people try painted curtains for the first time, the biggest surprise is how much the “not glamorous” steps
matter. The pattern is the fun part, surebut the best-looking results usually come from treating the fabric like
a serious surface, not an afterthought. Pre-washing is the classic example: plenty of DIYers skip it because the
panels look clean, then wonder why the paint cracks later or feels like it’s sitting on top of the weave. Washing
and ironing first makes the fabric flatter, more predictable, and way easier to stencil without bumps and bubbles.
Another common experience is underestimating how far a little paint goesespecially with stencils. People tend to
load up the roller like they’re painting drywall, and fabric immediately punishes that optimism with bleed and
smudges. The “aha” moment is realizing that stenciling on fabric works best when your brush or roller is almost
dry. Thin coats feel slow, but they build cleaner edges and a more professional finish. If you’ve ever watched
someone peel off painter’s tape and do that happy little gasp, it’s usually because they applied less paint than
they thought they needed.
DIYers also notice that curtains behave differently once they’re hanging. A design that looks perfectly centered
on the floor can shift visually when the fabric gathers on a rod. That’s why border patterns and edge details are
so forgiving: they still look intentional even with folds. If you love allover prints, it helps to plan for the
“accordion effect” of gathered fabric by making your motif slightly larger or spacing repeats a bit wider than you
would on a flat table.
Then there’s the emotional rollercoaster of color choice. Bright paint on white fabric looks very loud very fast.
People often fall in love with a bold color chip, paint a test patch, and suddenly their living room feels like
it’s wearing a neon jacket. The steady solution is to test colors in daylight and at night, and to consider a
toned-down version of your first pickeither by using a softer shade or by doing a tone-on-tone look (like warm
gray on oatmeal linen). The goal isn’t to make curtains shout; it’s to make them sing backup for the room.
Finally, most first-timers learn to respect drying time and heat-setting. It’s tempting to rushbecause once you
see the pattern, you want it up immediately. But paint that isn’t fully cured can transfer, scuff, or pick up lint
like a magnet. Letting it dry thoroughly and then setting it according to the product directions is what turns a
“cute weekend craft” into curtains that survive real life. In other words: the boring steps are the reason your
fun steps last.