Table of Contents >> Show >> Hide
- Why Calla Lilies Do Well Indoors
- 1. Give Your Calla Lily the Brightest Spot in the House
- 2. Start with the Right Pot, Soil, and Planting Depth
- 3. Water Consistently, but Never Let the Pot Turn Into a Mini Marsh
- 4. Feed During Growth and Respect the Plant’s Dormant Phase
- Common Indoor Calla Lily Problems and Easy Fixes
- Best Places to Keep a Calla Lily Indoors
- Conclusion
- Indoor Growing Experiences: What People Learn After Living With a Calla Lily
- SEO Tags
Calla lilies are the kind of plant that make people stop mid-sentence and say, “Wait, is that real?” With their sleek trumpet-shaped blooms, glossy leaves, and just a hint of drama-queen energy, they look like they belong in a designer loft with a very expensive candle nearby. The good news is that growing a calla lily indoors is not nearly as intimidating as the plant’s elegant reputation suggests.
If you have been eyeing one at a garden center, rescuing one after a holiday gift, or wondering why yours currently looks offended by life, you are in the right place. Indoor calla lily care comes down to a few basics: bright light, the right potting setup, steady moisture without swamp conditions, and a little respect for the plant’s natural rest period. Get those things right, and your calla lily can reward you with lush foliage and striking blooms that look almost too polished to be real.
Below are four simple, practical ways to grow a calla lily indoors, plus common mistakes to avoid, troubleshooting tips, and real-world indoor growing experiences that make the process much easier.
Why Calla Lilies Do Well Indoors
Before we get into the how-to, it helps to know what a calla lily actually wants. Despite the name, calla lilies are not true lilies. They grow from rhizomes, not classic bulbs, and they like warmth, bright light, and evenly moist soil during active growth. They are often sold as flowering gift plants, but they can also be grown long-term indoors when their needs are met.
That said, this is not a “water it whenever you remember and hope for the best” houseplant. A calla lily indoors needs a little more intention. Think of it as a stylish houseguest: gorgeous, charming, and slightly particular about the room conditions.
1. Give Your Calla Lily the Brightest Spot in the House
If your calla lily had a dating profile, “loves bright light” would be at the top. Indoors, one of the biggest reasons calla lilies struggle is weak lighting. These plants usually perform best when they receive very bright indoor light, ideally near a sunny window. Morning sun is especially helpful, and bright filtered light works beautifully in many homes.
Best indoor light for calla lilies
Place your plant near an east-facing window for gentle morning sun or a south-facing window with a sheer curtain if the afternoon sun is intense. A west-facing window can also work if the light is not scorching the leaves. In darker homes or apartments, a grow light can make a major difference, especially in winter.
Signs your calla lily needs more light
- Leaves stretching or leaning hard toward the window
- Weak stems that flop instead of standing upright
- Few or no blooms during the growing season
- Overall slow growth that seems stuck in neutral
Temperature matters too. Calla lilies generally like average household temperatures, which is excellent news because none of us wants to recreate a tropical greenhouse in the living room. Keep the plant away from icy drafts, blasting heater vents, and air-conditioning vents that dry it out.
Simple takeaway: If your calla lily is indoors, do not tuck it in a dim corner “for decoration.” That is not décor. That is a slow-motion protest.
2. Start with the Right Pot, Soil, and Planting Depth
A calla lily can be surprisingly forgiving, but only if its roots are not sitting in a soggy mess. One of the smartest things you can do is set it up correctly from day one with a container that drains well and a loose potting mix that holds moisture without turning into mud.
Choose the right pot
Always use a container with at least one drainage hole. This is non-negotiable. A decorative cachepot is fine, but the inner growing pot needs proper drainage. If water collects around the rhizome, rot can move in fast, and calla lilies are not fans of wet feet for long stretches.
The best soil for indoor calla lilies
Use a quality, well-drained potting mix with organic matter. Many growers do well with standard indoor potting soil improved with a little perlite or bark for extra air flow. You want a mix that stays evenly moist but still drains freely after watering.
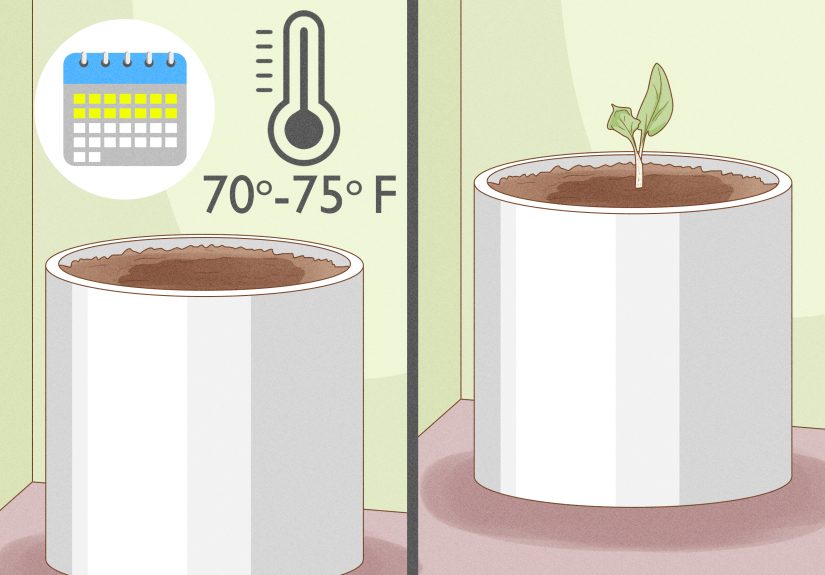
How deep to plant calla lily rhizomes
If you are planting rhizomes yourself, place them about 1 to 2 inches deep in the potting mix with the growing points facing upward. A pot that is too large can hold excess moisture for too long, so start with a container that gives the roots room without creating a swampy soil reservoir.
Warmth helps at planting time. Newly potted calla lily rhizomes tend to establish well in a warm indoor spot, and once growth begins, you can move the pot to its brightest location.
A good indoor setup looks like this
- A pot with drainage holes
- Moist but airy potting mix
- Rhizome planted shallowly, not buried too deep
- A warm room with bright light nearby
If you bought a blooming plant instead of a bare rhizome, resist the urge to repot it immediately unless the soil is clearly poor or the plant is badly rootbound. Let it settle in first. A mid-bloom transplant is sometimes like changing seats during a roller coaster: technically possible, but not always appreciated.
3. Water Consistently, but Never Let the Pot Turn Into a Mini Marsh
This is the balancing act that separates a thriving indoor calla lily from a sad one. Calla lilies like evenly moist soil during active growth and blooming, but they do not want to sit in standing water. In plain English: keep the soil lightly and consistently moist, not soaked, waterlogged, or neglected until it turns into dust.
How often to water a calla lily indoors
There is no perfect universal schedule because watering depends on pot size, light levels, room temperature, and season. Instead of watering on autopilot every Tuesday because a calendar said so, check the top layer of soil with your finger. If the surface is just starting to dry, it is usually time to water again.
When you water, do it thoroughly until excess water drains out the bottom. Then empty the saucer or outer pot so the roots are not left soaking. Room-temperature water is best. If your tap water is heavily chlorinated or hard, and your plant seems finicky, filtered or distilled water may help.
Signs of overwatering
- Yellowing leaves with soft stems
- Mushy crown or rhizome
- Musty-smelling soil
- Little to no new growth
Signs of underwatering
- Drooping leaves
- Crispy edges
- Buds failing to open properly
- Soil pulling away from the sides of the pot
Humidity can also help, especially in dry homes during winter. You do not need to turn your home into a cloud forest, but avoiding desert-dry air can keep foliage looking fresher. Grouping plants together or using a pebble tray nearby may help, though light and watering are still the main event.
Rule of thumb: a happy indoor calla lily wants moisture with boundaries.
4. Feed During Growth and Respect the Plant’s Dormant Phase
Many people assume their calla lily is dead when it starts yellowing after bloom. In reality, it may just be ready for a rest. This is one of the most misunderstood parts of indoor calla lily care.
Fertilizing for better blooms
During active growth, feed your plant with a balanced fertilizer about once a month, or use a diluted liquid fertilizer every couple of weeks. This supports strong leaves and better flowering. Do not overdo it, because too much fertilizer can create lush foliage at the expense of blooms, and nobody invited a leaf-only performance.
What dormancy looks like
After blooming, the foliage may begin to yellow, wither, and brown. This can feel alarming, especially if you have been doing everything right. But calla lilies often need a rest period. As the plant winds down, reduce watering and let it rest. After a dormant period of around two months, repot if needed, resume watering, and place it back in bright light to encourage fresh growth.
How to handle dormancy indoors
- Let the foliage naturally decline after bloom.
- Reduce watering as the plant stops active growth.
- Allow the rhizome to rest for roughly 60 days.
- Repot or refresh the soil if needed.
- Resume watering and bright light to restart growth.
This rest period is often the difference between a one-season novelty plant and a repeat performer. If you skip dormancy entirely, the plant may limp along, but it often will not bloom as well the next time.
Common Indoor Calla Lily Problems and Easy Fixes
No flowers
The most common causes are not enough light, inconsistent feeding, or lack of a proper dormant period. Move the plant to brighter conditions, fertilize during active growth, and let it rest after blooming.
Yellow leaves
This could mean overwatering, poor drainage, or natural dormancy. Check the timing. If the plant just finished blooming, yellowing may be normal. If it is mid-season and the soil is soggy, that is a red flag.
Drooping plant
Low light, thirsty soil, or root trouble are the usual suspects. Check soil moisture first, then evaluate the light situation.
Brown leaf tips
Dry air, inconsistent watering, or water quality may be contributing. Adjust watering habits and consider using filtered water if the problem persists.
Pet safety
Calla lilies are toxic to cats and dogs if chewed or eaten, so keep them out of reach of curious pets. This is especially important in households where “houseplant” is apparently interpreted as “salad bar.”
Best Places to Keep a Calla Lily Indoors
If you are wondering where this plant actually belongs inside a home, here are some of the best spots:
- A bright kitchen window with morning sun
- A sunny breakfast nook
- A home office with strong natural light
- A living room near a south- or east-facing window
- A shelf under a good-quality grow light
Avoid dark hallways, windowless bathrooms, and spots right next to heating vents. A calla lily wants to be indoors, yes, but it still wants to feel like the sun remembers its name.
Conclusion
Growing a calla lily indoors is much simpler than it looks. Give it bright light, a well-drained potting mix, consistent moisture, and regular feeding during the growing season. Then, when it begins to fade, do not panic. Let it rest. That natural rhythm is part of what makes the plant work.
In other words, the secret is not doing something wildly advanced or mystical. It is doing the simple things well. Bright spot. Good pot. Smart watering. Proper rest. That is the recipe.
Once you understand those four basics, a calla lily can become one of the most rewarding flowering plants in your indoor collection. It is elegant without being impossible, dramatic without being unreasonable, and impressive enough to make guests think you absolutely know what you are doing. No need to correct them.
Indoor Growing Experiences: What People Learn After Living With a Calla Lily
One of the most common experiences indoor growers share is that their first calla lily taught them how much “bright light” really matters. Many people start by placing the plant where it looks beautiful rather than where it will actually thrive. A dining table centerpiece may look magazine-worthy for a few days, but if that table sits ten feet from a window, the plant usually starts leaning, stretching, or refusing to bloom again. Once growers move the pot closer to a bright window, the difference is often obvious within a couple of weeks. The leaves stand more upright, the growth looks stronger, and the plant stops acting like it is emotionally exhausted.
Another frequent lesson is about watering. At first, many people assume a calla lily wants constant wet soil because the plant is associated with moisture-loving conditions. Then they discover the fine print: evenly moist is not the same as drenched. Growers often describe the turning point as the moment they stop guessing and start checking the soil before watering. That one habit alone can prevent yellow leaves, mushy roots, and the classic indoor plant mystery known as “I watered it lovingly and it still looks terrible.”
There is also the dormancy surprise. Plenty of indoor gardeners think they have failed when the leaves start yellowing after bloom. In reality, this phase often becomes the moment they finally understand the plant. Once they learn that resting is normal, the whole process feels less stressful. Instead of tossing the pot or overwatering in a panic, they let the rhizome rest, restart the cycle later, and are rewarded with new growth. It is one of those gardening experiences that feels deeply unfair the first time and deeply satisfying the second time.
People growing calla lilies indoors in apartments often mention that the plant fits beautifully into smaller spaces because it offers a high-end look without needing a giant footprint. A single healthy plant by a bright window can give a room a clean, sculptural focal point. It is also a favorite among people who want flowers indoors but do not want to fuss with a plant that drops petals everywhere or needs constant pruning.
Another real-life observation is that calla lilies teach patience. They are not usually the best plant for someone who wants instant nonstop blooms all year long. But for growers who enjoy rhythm in plant care, active growth followed by rest feels manageable and even satisfying. The plant has a season, a pause, and a comeback. That cycle can make success feel more earned.
In the end, most indoor growers who succeed with calla lilies say the same thing: the plant is easier once you stop treating it like a mystery. It is not fragile. It is not impossible. It just responds clearly to good care. Put it in strong light, water it with common sense, avoid soggy soil, and do not freak out when it takes a nap. That is usually when the relationship starts working.