Table of Contents >> Show >> Hide
- Why Organza Makes Such Good Fabric Flowers
- Supplies You’ll Use for All 3 Methods
- Way #1: Heat-Sealed Layered Petal Bloom (Candle or Heat Tool)
- Way #2: Sewn Gathered Organza Rosette (Soft, Chic, and Secure)
- Way #3: Rolled Organza Ribbon Rose (No-Sew or Minimal-Sew)
- Finishing Touches That Make Your Flower Look Expensive
- Where Organza Flowers Really Shine
- FAQ: Organza Flower Making
- Craft Table Notes: 500+ Words of Experience You’ll Be Glad You Read
- Conclusion
Organza flowers are the craft world’s version of a “small effort, big wow.” They’re airy, light-catching,
and somehow make a plain headband, gift box, or centerpiece look like it has a personal stylist.
The best part? You can make them with beginner-level toolsand you’ll end up with flowers that don’t wilt,
don’t complain, and don’t require sunlight.
In this guide, you’ll learn three reliable ways to make organza flowers:
(1) a heat-sealed layered bloom with ruffled petals, (2) a sewn gathered rosette that looks boutique,
and (3) a rolled organza ribbon rose that’s basically “origami, but softer.”
I’ll also share practical finishing tricks and a longer “what you learn after making a bunch” experience section
at the endbecause the real tutorial is always the mistakes we make along the way.
Why Organza Makes Such Good Fabric Flowers
Organza is sheer, crisp, and holds shape better than many lightweight fabrics. That crispness is the secret:
when you fold, gather, or heat-shape it, organza keeps the petal structure instead of collapsing into a sad fabric pancake.
Quick reality check: not all organza behaves the same
- Polyester organza is the “craft-friendly” option because it can be heat-shaped and heat-sealed.
- Silk organza is gorgeous and crisp, but it won’t melt the same way; it can scorch instead of sealing.
- Organza ribbon often has a woven edge that already resists fraying (bless it).
If you’re not sure what you bought, do the tiniest test on a scrap: a quick pass near heat tells you whether it curls neatly
or just gets cranky. (Spoiler: your flower will thank you for testing before you commit.)
Supplies You’ll Use for All 3 Methods
- Organza fabric or organza ribbon
- Sharp scissors (dull scissors turn organza into emotional damage)
- Needle + matching thread (hand sewing is totally fine)
- Hot glue gun + glue sticks (optional, but convenient)
- Small felt circles (for clean backs and easy attaching)
- Hair clip / headband / brooch pin / gift topper base
- Center embellishment: button, pearl, bead cluster, rhinestone, or a tiny fabric knot
Method-specific add-ons
- Heat-shaping: tea light/candle OR heat tool, plus tweezers/metal tongs and a heat-safe surface.
- Sewn rosette: straight pins or fabric clips; a ruler helps for neat strips.
- Ribbon rose: T-pin or straight pin (to hold the starting coil), optional pipe cleaner/floral wire for stems.
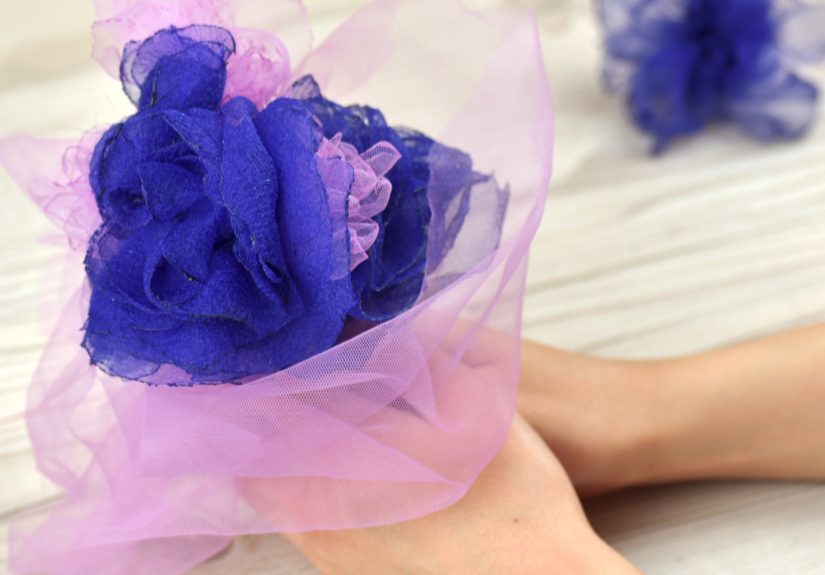
Way #1: Heat-Sealed Layered Petal Bloom (Candle or Heat Tool)
This method makes the classic “ruffly” organza flowerthink peony vibes, dance-recital hair accessory vibes,
and “I totally bought this at a boutique” vibes. Heat gently curls the edges and also helps prevent fraying
(with synthetic organza).
Best for
- Big, soft, layered flowers
- Hair clips, corsages, gift toppers
- People who enjoy instant gratification (no judgment; same)
Safety first (quick but real)
- Work in a clear area, tie back hair, and keep a cup of water nearby.
- Use tweezers or tongsorganza is lightweight and heat is… heat.
- Ventilation helps. Melted polyester has a “hot plastic” personality.
Step-by-step
-
Make petal templates.
Cut 3–5 template sizes from cardstock: circles or rounded petals (about 1.5″, 2″, 2.5″, 3″, 3.5″ is a solid range).
Circles make a fuller bloom; petals make a more defined flower shape. -
Trace and cut.
Trace 2–3 pieces per size onto organza. Cut them out neatly. You’ll usually want 8–12 layers total.
(More layers = fluffier. Also more layers = you getting asked to make these for everyone you know.) -
Heat-shape the edges.
Hold one layer at a time near a flame (not in it). Rotate slowly and let the edge curl as it warms.
You’ll see the edge tighten and wave slightly. Repeat for each layer.
Alternative: Use a heat tool/heat gun for curling and sealing if you don’t want an open flamejust keep the motion quick. -
Stack from largest to smallest.
Layer the pieces so petals/circles are slightly offset. This keeps it from looking like a perfectly aligned bullseye.
Nature is messy. Be like nature. -
Secure the center.
Stitch through the middle several times, then sew on a button/bead clusteror add hot glue and press the center embellishment in place. -
Finish the back.
Glue or sew the flower to a felt circle. Then attach the felt to a clip, headband, pin back, or gift topper.
Troubleshooting (so you don’t invent new swear words)
- Edges are turning black: you’re too close to the flame or lingering too long. Back up and move faster.
- It melted into holes: too much heat. Treat it like toast: you can always brown it more, but you can’t un-burn it.
- Petals look flat: mix in more sizes and offset layers. Also try pinching the center tighter before stitching.
Pro variation: scale it up
The same idea works for giant décor flowers: cut larger petals, shape them, and build around a sturdy center with wire support.
For weddings or photo backdrops, big organza flowers look dramatic while staying lightweight.
Way #2: Sewn Gathered Organza Rosette (Soft, Chic, and Secure)
If the heat-sealed bloom is your fun weekend craft, the sewn rosette is your “I take my accessories seriously” craft.
It’s especially good when you want durabilityflowers that can handle being worn, tossed in a bag, and worn again.
Best for
- Brooches, handbags, clothing accents, headbands
- Silk organza (no melting required)
- Anyone who prefers stitches over glue strings
Option A: The classic gathered strip rosette
-
Cut a strip.
Start with something like 2″–3″ wide by 18″–30″ long (longer = bigger rosette).
If you want a fuller look, cut two strips and layer them. -
Fold lengthwise.
Fold the strip in half (wrong sides together) so the folded edge becomes the “pretty” outer edge of petals.
This also hides one raw edge. -
Run a gathering stitch.
Sew a long running stitch near the raw edge (about 1/8″–1/4″ from the edge).
Use strong thread; organza gathers can fight back.
Helpful trick: If your thread snaps often, try stitching a zigzag over a stronger “core” thread (like dental floss),
then pull the core to gather. -
Gather and coil.
Pull the thread gently to bunch the strip. Start coiling the strip into a spiral, building a rose-like rosette. -
Stitch the base as you go.
Tack the coil to itself at the base every few turns. Keep the base flat so it sits nicely on a felt circle. -
Finish clean.
When you reach the end, tuck the tail under and stitch it down. Add a center bead/button if you want extra polish.
Option B: The “fold & sew” rosette (quick and neat)
Some rosettes are made by folding and stitching the organza in steps (instead of gathering one long edge).
If you like structured petals, this approach gives a slightly more geometric, modern rosette.
The key is the same: fold, stitch to hold, and build in a spiral until it looks like a flower.
Troubleshooting
- Rosette looks lumpy: gather evenly and tack the base more often (small stitches prevent “accordion chaos”).
- Edges fray too much: fold to hide edges, use a narrow hem, or lightly seal synthetic organza edges with heat.
- Flower won’t lie flat: keep the base stitched down as you coil, and don’t over-tighten the gather.
Way #3: Rolled Organza Ribbon Rose (No-Sew or Minimal-Sew)
This is the method for when you want a rose look without needing a degree in “tiny petals engineering.”
Rolled roses are fast, customizable, and perfect for decorating everything from wreaths to napkin rings.
And yes, you can absolutely make a whole bouquet this wayjust know you’ll become “the flower person” forever.
Best for
- Roses, rosettes, vintage-style décor
- Wreaths, bouquets, gift wrap, lampshade trims, statement accessories
- People who like a clean “finished” look with minimal fuss
Step-by-step (hot glue version)
-
Cut ribbon.
Start with 12″–18″ of organza ribbon (1″–1.5″ wide is easy to handle).
Longer ribbon makes a bigger rose. -
Start the center coil.
Roll the end tightly into a small bud. Pin it in place with a T-pin or hold it firmly. -
Build petals with folds.
As you wrap the ribbon around the center, fold the ribbon over every turn or two.
Those folds create the “petal edges.” -
Secure as you go.
Add a tiny dab of hot glue on the underside every few wraps to lock the shape.
(Tiny. You’re not frosting a cupcake.) -
Finish the tail.
When the rose is the size you want, glue the last bit to the underside and trim any excess. -
Mount and embellish.
Attach to felt, add leaves, and turn it into a clip, pin, or décor piece.
Step-by-step (needle & thread version)
If you don’t want glue at all, you can stitch the base after every fold and wrap.
The result is sturdier and often looks more “professional” up closegreat for wearable pieces.
Finishing Touches That Make Your Flower Look Expensive
Choose a center that matches the vibe
- Classic: pearl or button center
- Glam: rhinestone button
- Natural: bead cluster in a soft gradient
- Modern: knotted organza center with no sparkle
Hide your mechanics
- Use a felt circle to cover stitching and glue.
- Match thread color closelyorganza is sheer and loves to expose your secrets.
- Use smaller dots of glue instead of long lines (less shine, less mess).
Attachment ideas
- Hair: alligator clips, barrettes, elastics, combs
- Clothing: brooch pins or detachable backing for easy removal
- Decor: floral wire, pipe cleaners, wreath frames, gift wrap, napkin rings
Where Organza Flowers Really Shine
Organza has that special talent of looking “event-ready.” Use your finished blooms for:
- Wedding décor (chair accents, bouquets, corsages)
- Gift wrapping toppers that make people suspicious you bought the gift at a fancy store
- Hair accessories for everyday outfits or special occasions
- Holiday décor (wreaths, garlands, tree accents)
- Costumes and dance outfits (lightweight, dramatic, and photo-friendly)
FAQ: Organza Flower Making
Can I use silk organza for the heat-sealed method?
Usually, no. Silk organza doesn’t melt like polyester; it’s more likely to scorch or simply refuse to “seal.”
If you want silk organza flowers, pick the sewn rosette method or use very careful finishing (tiny hems, edge treatments).
How do I stop organza from fraying?
For synthetic organza, heat-sealing edges works great. For silk, use folding techniques, narrow hems, or seam finishes.
If the piece is decorative and won’t be washed often, a tiny amount of fray-check style solution can helptest first.
Why does my flower look “flat” even with lots of layers?
Usually it’s one of three things: the sizes are too similar, the layers are too aligned, or the center isn’t tight enough.
Mix your petal sizes more dramatically, offset each layer, and secure the center firmly before fluffing.
What’s the easiest method for beginners?
The rolled ribbon rose is the most beginner-friendly because it’s forgiving. If it looks weird halfway through,
you can just keep wrapping until it looks intentional. That’s not cheating; that’s “design.”
Craft Table Notes: 500+ Words of Experience You’ll Be Glad You Read
Here’s what usually happens when someone makes their first organza flower: they cut the pieces, they get excited,
they approach a candle like they’re performing a tiny, dramatic ritual… and then they either (A) hold the fabric too close
and create an instant “crispy edge situation,” or (B) hold it too far away and wonder why nothing is happening.
The sweet spot is closer than you think, but not close enough to make friends with the flame. With polyester organza,
you’re looking for a gentle curl and a slight tightening at the edge. It’s less “burn it” and more “toast it.”
Once you feel that moment, your hands learn it fast. After a few petals, you’ll be moving around the edge like you’re
tracing a tiny invisible circle in the air. It’s oddly satisfyinglike bubble wrap, but prettier.
Another real-world lesson: organza loves to cling. Static shows up uninvited, especially in dry weather.
If your cut petals keep sticking to your fingers or stacking into a weird clump, don’t assume you’ve lost your crafting talent.
Lightly misting the air (not the fabric) or running a dryer sheet over your work surface can calm things down.
Also, cut your pieces in batches and stack them with intentionotherwise your “organized” petals become
a mysterious pile where the smallest petals vanish like socks in a laundry cycle.
If you’re doing the sewn rosette, the biggest “why didn’t anyone tell me this” trick is to keep the base flat early.
People often gather a strip, start spiraling, and only tack it down at the endthen wonder why it looks like a cinnamon roll
that refuses to sit straight. Tack as you go. Pretend your rosette is a toddler in a shopping cart: you don’t wait until the end
to buckle it in.
For the ribbon rose, perfection isn’t the goalvariation is. Real petals don’t fold at identical angles every time.
So if your folds aren’t perfectly spaced, congratulations: you accidentally made it look more natural. The only real rule is
to keep the center tighter and let the outer petals loosen slightly. If you want that “garden rose” look, use a wider ribbon
and make your folds softer. If you want a neat, vintage rosette, tighten the folds and secure more often.
And let’s talk about glue, because glue is both a helper and a chaos agent. Hot glue strings are basically craft confetti:
they appear everywhere, including places they shouldn’t, like the front of your flower. The fix is simple:
use smaller dots, let them cool a second, and clean strings as you go. If you’re making flowers for wearable accessories,
consider doing the main structure with stitching and using glue only for the very final attachment. That way your flower stays
flexible and you won’t have that stiff “this might be armor” feeling against clothing.
Finally: attach your flower like you expect it to be used. Hair clips get tugged. Brooches get bumped.
Gift toppers get handled and admired and sometimes… reused (because your flower was better than the gift, honestly).
A felt backing is the unsung hero here: it hides the mess, reinforces the base, and makes attachments cleaner.
If you do nothing else, do the felt circle. It’s the difference between “DIY” and “DIY but make it polished.”
Conclusion
Organza flowers are one of the best “high impact, low drama” crafts out thereonce you know the method that matches your tools
and your patience level. If you want fast and fluffy, go heat-sealed layered petals. If you want sturdy and refined,
go sewn gathered rosette. If you want a rose look with minimal fuss, go rolled organza ribbon.
Pick one method, make one flower, and then make a second one immediatelybecause the second flower is always the one
where your hands finally say, “Ohhh, I get it.”