Table of Contents >> Show >> Hide
- What Are Photoshop Filters, Exactly?
- Why Learning the Right Filter Workflow Matters
- Way 1: Add a Filter Directly From the Filter Menu
- Way 2: Use the Filter Gallery to Stack and Preview Effects
- Way 3: Add Smart Filters for Non-Destructive Editing
- Which Method Should You Choose?
- Common Mistakes to Avoid When Adding Photoshop Filters
- Final Thoughts
- Real-World Experiences With Photoshop Filters
Photoshop filters are a little like seasoning on fries: a tiny amount can make everything better, and too much can turn your masterpiece into a digital cry for help. The good news is that adding filters in Photoshop is not complicated once you know where to look and when to use each method. The better news? You do not need to poke random menu items and hope for artistic destiny.
If you want sharper portraits, moodier landscapes, smoother backgrounds, or a stylized effect that makes your image look intentional instead of accidental, Photoshop gives you several ways to apply filters. The trick is choosing the right one for your workflow. Some methods are fast and direct. Others give you more flexibility and far fewer regrets. In this guide, you will learn three practical ways to add Photoshop filters, when to use each one, and how to avoid the classic mistakes that make beginners mutter at their screens.
What Are Photoshop Filters, Exactly?
In plain English, Photoshop filters are tools that change the appearance of an image or selected area. Some filters are corrective, such as blur, sharpen, noise reduction, or lens correction. Others are creative, such as artistic textures, stylized edges, lighting effects, or AI-powered enhancements. You can use them to clean up a photo, add mood, create depth, or build an entirely new look.
That sounds simple enough, but here is where many people get tripped up: not every filter should be applied the same way. Sometimes you want a quick one-and-done edit. Sometimes you want to stack effects. And sometimes you definitely want the freedom to change your mind later, because your “brilliant cinematic glow” may look suspiciously like someone smeared butter on the lens.
Why Learning the Right Filter Workflow Matters
Before jumping into the three methods, it helps to understand one golden rule: destructive edits are permanent, but non-destructive edits are flexible. A destructive filter changes the pixels on the layer immediately. A non-destructive filter lets you edit, hide, reorder, or remove the effect later.
If you are working on a casual social image, a direct filter may be fine. But if you are editing client work, building a product image, retouching portraits, or creating a layered design, you will usually want a smarter method. That is why the third option in this article is the one professionals love most.
Way 1: Add a Filter Directly From the Filter Menu
The first and most straightforward method is to apply a filter directly from Photoshop’s Filter menu. This is the fast lane. No extra setup. No complicated prep. Just choose your layer, open the menu, and go to work.
How to Do It
- Open your image in Photoshop.
- Select the layer you want to affect.
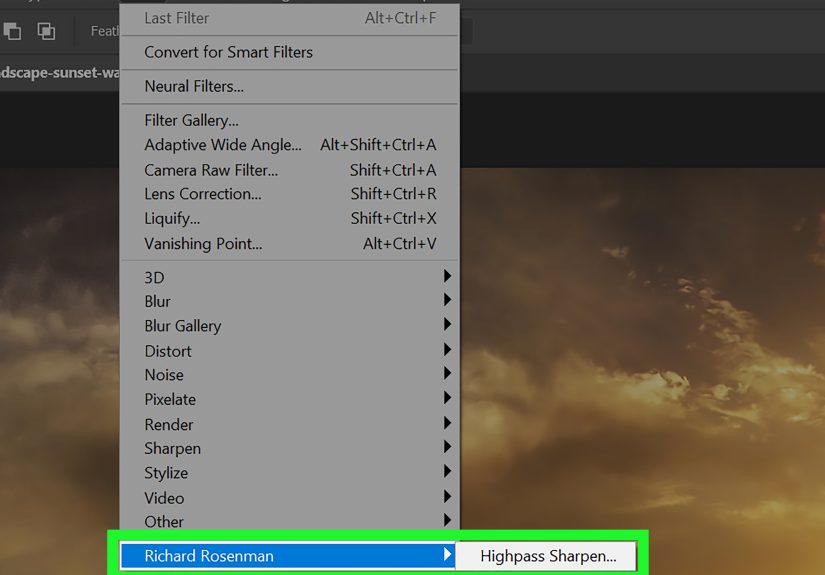
- Go to Filter in the top menu.
- Choose a category such as Blur, Sharpen, Noise, Stylize, Distort, or Render.
- Pick a specific filter and adjust the settings in the dialog box.
- Click OK to apply it.
When This Method Works Best
This approach is ideal when you want speed. Maybe you just need a light Gaussian Blur on a background, a quick Sharpen pass on a product image, or a Dust & Scratches filter to tame some mess in an old scan. If you know exactly what you want and you are not planning to revisit the effect later, this method is perfectly fine.
It is also useful when you are experimenting. Sometimes the fastest way to understand a filter is to use it, undo it, use it again, and slowly build confidence while pretending that was your plan all along.
Example
Let’s say you are editing a simple portrait and the background feels distracting. You can select the background layer, go to Filter > Blur > Gaussian Blur, and increase the radius until the subject stands out more clearly. The result is fast, clean, and easy to understand.
The Catch
The downside is flexibility. Once the filter is applied directly, the change becomes part of the layer. Yes, you can undo it immediately. But once you save, close, and move on with life, that filter is baked in. No magic rewind button appears next Tuesday.
So, use this method when speed matters more than editability. If that sentence makes you nervous, keep reading.
Way 2: Use the Filter Gallery to Stack and Preview Effects
The second method is the Filter Gallery, which is a great choice when you want to browse creative effects, preview them live, and combine more than one filter in a single workflow. Think of it as Photoshop’s tasting menu for stylized looks.
How to Open the Filter Gallery
- Select the layer you want to edit.
- Go to Filter > Filter Gallery.
- Browse the categories on the right.
- Click a filter to preview it.
- Adjust the sliders until the effect looks right.
- Add another filter if you want to build a layered effect.
- Change the stacking order if needed, then click OK.
Why the Filter Gallery Is So Useful
The Filter Gallery is handy because it lets you see the effect before committing. That alone saves a lot of time. It is especially useful for creative edits like cutout looks, poster edges, dry brush textures, or stylized photo effects that need a little tinkering before they look good.
Even better, you can stack multiple filters in the gallery. That means you can combine a texture effect with edge detail, or soften one part of a stylized look while exaggerating another. It gives you more control than simply applying one filter and hoping the result is photogenic.
Best Use Cases
Use the Filter Gallery when you want to create a more designed or artistic appearance, especially for social graphics, posters, experimental portraits, or editorial visuals. It is excellent for “I want this to look cooler, but I also want to know what I am doing” projects.
Example
Imagine you are creating an album-cover-style image. The original photo feels too normal, which is a problem if your goal is “mysterious indie genius.” In the Filter Gallery, you can test effects like Cutout, Poster Edges, or Film Grain, then tweak them until the image feels polished rather than chaotic. You can add more than one filter and reorder them for a stronger result.
One Important Limitation
Not every Photoshop filter appears in the Filter Gallery. So if you go in expecting every effect under the sun, moon, and design brief, you may be disappointed. The Filter Gallery is best for specific creative filter groups, not every single correction tool in the program.
Way 3: Add Smart Filters for Non-Destructive Editing
If the first method is fast and the second is fun, the third is the grown-up choice. Smart Filters let you add filters in a non-destructive way, which means you can edit them later, turn them off, change their order, or remove them without damaging the original image.
This is the method that deserves a tiny standing ovation.
How to Apply a Smart Filter
- Open your image and select the layer.
- Convert the layer to a Smart Object. You can do this by right-clicking the layer and choosing Convert to Smart Object, or by using Filter > Convert for Smart Filters.
- Go back to the Filter menu and choose the filter you want.
- Adjust the settings and click OK.
- Look in the Layers panel to find the filter listed below the layer as a Smart Filter.
Why Smart Filters Are Better
Smart Filters give you freedom. You can double-click the filter name to reopen its settings. You can toggle visibility on and off. You can drag filters into a different order. You can even use the attached filter mask to hide the effect in certain areas.
That means if your blur is too strong, your sharpen is too crunchy, or your artistic effect suddenly looks like a melted comic book, you can fix it. No starting over. No copy-paste panic. No dramatic sighing.
Smart Filters in Real Projects
This method is excellent for professional editing and layered design work. For example:
- Portrait retouching: Apply blur or noise reduction gently and mask it away from eyes, hair, and texture-rich areas.
- Product photos: Sharpen details without committing permanently.
- Composite images: Match depth and texture across different elements while keeping every decision editable.
- Client revisions: Change filter intensity later without rebuilding the file from scratch.
Bonus: Use Camera Raw Filter as a Smart Filter
One of the most powerful options inside Photoshop is the Camera Raw Filter. Even if you are not editing a RAW file, you can still open it from Filter > Camera Raw Filter and use tools for light, color, detail, texture, clarity, masking, and more.
This is incredibly useful when you want broad image improvements with easy sliders instead of building everything manually with separate layers. Camera Raw Filter is great for:
- Boosting contrast and clarity
- Adjusting highlights, shadows, and color balance
- Adding or softening texture
- Applying quick vignette effects
- Making final polish adjustments before export
And yes, if you apply it to a Smart Object, you can reopen and edit the settings later. That is the kind of flexibility that keeps your workflow calm and your future self grateful.
Bonus: Neural Filters for Fast AI-Based Effects
Photoshop also includes Neural Filters, which use AI to perform edits like skin smoothing, colorizing black-and-white images, improving portraits, reducing JPEG artifacts, and applying artistic changes. These are useful when you want quick results, but they should be used with taste and restraint.
Why restraint? Because just because software can make someone look 22 years younger, happier, more dramatic, and vaguely cinematic does not mean it should. Sometimes a subtle result is the best result.
Which Method Should You Choose?
Here is the practical answer:
- Use the Filter menu when you want a quick direct edit.
- Use Filter Gallery when you want to browse, preview, and stack stylized effects.
- Use Smart Filters when you want professional flexibility and a non-destructive workflow.
If you are unsure, start with Smart Filters. They are usually the safest choice, especially if the image matters. Photoshop veterans often work this way by default because it keeps options open and reduces headaches later.
Common Mistakes to Avoid When Adding Photoshop Filters
1. Using Too Many Filters at Once
Yes, Photoshop has many shiny buttons. No, your image does not need all of them. Too many filters can make a photo look muddy, fake, or overprocessed. Choose one goal per edit: sharpen, soften, stylize, or correct.
2. Ignoring the Subject
A strong filter can crush skin texture, flatten detail, or distract from the focal point. Always ask whether the filter supports the subject or steals attention from it.
3. Skipping Non-Destructive Setup
Beginners often rush straight to the Filter menu and edit the original layer. That works until they need a revision. Convert to a Smart Object when the file matters.
4. Forgetting About Masks
Many filters look better when applied selectively. Blur the background, not the eyes. Reduce noise in the shadows, not every pore on a face. Masking is where “pretty good” turns into “that actually looks professional.”
Final Thoughts
Learning 3 ways to add Photoshop filters is really about learning control. Photoshop gives you speed, creativity, and flexibility; you just need to choose the right path for the image in front of you. A direct filter is fast. The Filter Gallery is playful and visual. Smart Filters are the best long-term choice for polished, editable work.
The smartest approach is not to use more filters. It is to use the right filter, in the right place, with the right workflow. Once you understand that, Photoshop becomes much less intimidating and much more fun. Also, your layers panel will stop looking like a haunted filing cabinet.
Real-World Experiences With Photoshop Filters
Anyone who spends time in Photoshop eventually has a filter story. Usually, it starts with confidence and ends with a zoomed-in face that looks either suspiciously plastic or weirdly crunchy. That is part of the learning process. The first real experience many beginners have with Photoshop filters is discovering that a cool effect at 25% zoom can look absolutely unhinged at 100% zoom. A blur that felt cinematic from far away suddenly looks like someone fogged the screen with soup. A sharpen pass that seemed “professional” becomes a glorious celebration of pores, dust, and regret.
Another common experience is realizing that filters are not just for dramatic special effects. A lot of people start Photoshop assuming filters are gimmicks, like things you use to make an image look painted, sketched, or aggressively vintage. Then they discover that some of the most useful filters are subtle. A mild blur can separate subject from background. A small Camera Raw adjustment can rescue contrast and color. A little noise reduction can clean up a low-light image without making it look fake. In real editing, the best filter work often goes unnoticed, which is oddly the highest compliment.
Designers and photographers also talk about the moment they discover Smart Filters. It usually feels like graduating from chaos to competence. Before that moment, editing can feel risky. Every filter is a commitment. Every click carries a whisper of danger. But once a user converts a layer into a Smart Object and sees the filter appear neatly underneath it in the Layers panel, something clicks. Suddenly, editing feels safer. You can test ideas without marrying them. You can change your mind without starting over. That single workflow shift often makes Photoshop feel less like a minefield and more like a creative workspace.
There is also the experience of overusing filters because they are fun. This is universal. Almost everyone has made at least one image that looked amazing for six minutes and embarrassing forever after. Maybe it was too much Poster Edges. Maybe it was too much Sharpen. Maybe it was an AI portrait tweak that made a human being look like a very confident wax figure. The lesson usually arrives the same way: subtlety wins. Good editing supports the image. Great editing makes the viewer feel something without noticing every trick behind the curtain.
Over time, experienced Photoshop users start treating filters less like novelty effects and more like precision tools. They stop asking, “What filter can I add?” and start asking, “What problem am I solving?” That shift changes everything. Filters become part of a larger creative process, not random decoration. And once that happens, the software feels much easier to control. You are no longer throwing effects at a photo like spaghetti at a wall. You are making deliberate choices. That is when Photoshop gets really satisfying, and frankly, a lot more fun.