Table of Contents >> Show >> Hide
- What “Universal Design” Means (and What It Doesn’t)
- Before You Pick Tile: The 3 Decisions That Make Everything Easier
- 19 Universal Bathroom Design Ideas for a Remodel That Ages Like Fine Wine
- 1) Widen the doorway (or at least make it feel wider)
- 2) Choose a curbless or low-threshold shower
- 3) Include a built-in bench or a fold-down seat
- 4) Add a handheld showerhead on a slide bar
- 5) Place shower controls where you can reach them from the entry
- 6) Use a thermostatic or pressure-balance valve for anti-scald protection
- 7) Plan grab bars that look like design features
- 8) Pick slip-resistant flooring (and keep transitions smooth)
- 9) Upgrade lighting: layers, not glare
- 10) Add rocker switches and place them logically
- 11) Install a comfort-height toilet (and consider bidet features)
- 12) Choose a vanity with knee clearance or flexible storage
- 13) Pick lever-handle faucets (or touchless where it makes sense)
- 14) Make mirrors usable for different heights
- 15) Use contrast to improve visibility (subtle, not circus)
- 16) Build smarter storage: reachable, labeled, and not overhead-only
- 17) Add ventilation that actually keeps up with real life
- 18) Don’t forget electrical safety and convenience
- 19) Design for cleaning: fewer grout headaches, better drainage
- How to Prioritize These Ideas (Without Blowing the Budget)
- Real-World Remodel Experiences: 7 Lessons People Wish They’d Known Sooner
- Lesson 1: The shower is the main eventtreat it like one
- Lesson 2: “We’ll add grab bars later” is how people end up sad
- Lesson 3: Lighting fixes more problems than you expect
- Lesson 4: Storage should be designed around real routines
- Lesson 5: Materials matter, but finishes matter more than you think
- Lesson 6: Small layout tweaks can beat “fancy upgrades”
- Lesson 7: The best universal design looks like good design
- Final Takeaway
Bathrooms are tiny, slippery, and full of hard cornersbasically the Olympic finals of “How Did I End Up on the Floor?”
Universal bathroom design is the antidote: a remodel approach that makes the space safer, easier, and more comfortable for
everyone (kids, guests, aging parents, your future self after knee surgery, and you at 2:00 a.m. half-asleep searching for the light switch).
The best part? Universal design doesn’t have to look “clinical.” Done well, it reads as modern, thoughtful, and quietly luxurious
like your bathroom just got a graduate degree in being helpful.
What “Universal Design” Means (and What It Doesn’t)
Universal design is about building a bathroom that works well for a wide range of ages, sizes, abilities, and mobility levelswithout
needing special add-ons later. It overlaps with accessibility standards and “aging in place,” but it isn’t limited to wheelchair use or
one life stage. Think of it as future-proofing that also makes daily life smoother right now.
It also doesn’t mean your bathroom must look like a public restroom. You can hide reinforcement behind tile, choose stylish grab bars,
and pick materials that feel spa-like while still being slip-resistant and easy to maintain.
Before You Pick Tile: The 3 Decisions That Make Everything Easier
1) Decide your “must-move” walls (if any)
The biggest universal design wins come from layoutespecially if you can steal a few inches from a closet or adjacent room.
More clear floor space improves safety, makes cleaning easier, and gives you options for the future.
2) Choose a shower strategy
If your budget allows, prioritize the shower. A curbless or low-threshold shower with a bench and handheld sprayer is one of the
most universal features you can addusable for quick rinses, bathing kids, shaving legs, and reducing trip risk.
3) Build in “invisible” reinforcement
Blocking inside walls for future grab bars (and even a future fold-down seat) is one of the smartest low-cost upgrades because it
changes what’s possible later without changing how the bathroom looks today.
19 Universal Bathroom Design Ideas for a Remodel That Ages Like Fine Wine
1) Widen the doorway (or at least make it feel wider)
A wider door opening is a universal design classic: it helps with walkers, wheelchairs, strollers, laundry baskets, and the occasional
“I bought the jumbo pack of paper towels” moment. If widening isn’t possible, consider a door that doesn’t eat into the room (like a pocket
door or an out-swing where allowed).
Example: In a tight hall bath, swapping a standard swing door for a pocket door can make the room feel instantly less cramped.
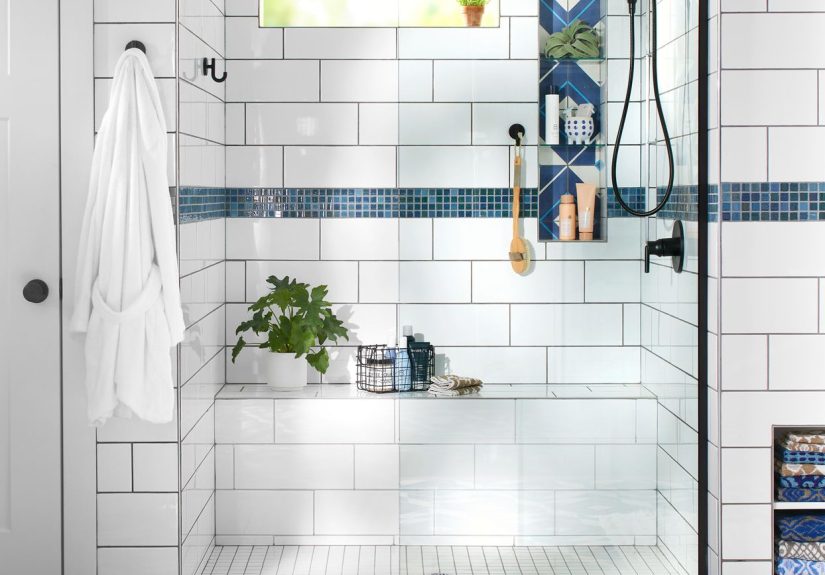
2) Choose a curbless or low-threshold shower
A no-step entry (or minimal threshold) reduces tripping and creates a clean, modern look. It’s also easier to roll in a shower chair if ever
needed. Curbless showers require careful waterproofing and slope planning, so this is a “hire someone who knows what they’re doing” feature.
Design tip: A linear drain can simplify the slope and looks sleeklike your shower got a tailored suit.
3) Include a built-in bench or a fold-down seat
A shower bench is one of those features you don’t think you needuntil you have it. It’s helpful for shaving, resting, washing kids, and
supporting anyone with balance issues. A fold-down seat saves space in smaller showers.
4) Add a handheld showerhead on a slide bar
A handheld sprayer increases flexibility for different heights and mobility needsand it makes cleaning the shower dramatically easier.
Mount it on an adjustable slide bar so it works for everyone from toddlers to tall adults.
Bonus: Pair it with a second fixed showerhead if you love the “rainfall spa” vibe.
5) Place shower controls where you can reach them from the entry
Nobody loves the “cold water dash” where you step into the shower, turn it on, and hope you’re fast enough to avoid an involuntary squeal.
Place controls so you can turn water on from outside the spray path.
6) Use a thermostatic or pressure-balance valve for anti-scald protection
Consistent temperature is safer for kids and older adults, and it’s also nicer for everyone. Anti-scald protection helps prevent sudden hot
spikes when someone flushes a toilet or runs a dishwasher (because your shower shouldn’t be a surprise science experiment).
7) Plan grab bars that look like design features
Install grab bars in the shower and near the toiletor at least add blocking so they can be installed later. Today’s grab bars come in finishes
that match faucets and towel bars, so they can blend in rather than shout “medical equipment.”
Practical note: Many guidelines place grab bars around 33–36 inches from the floor, but the right placement depends on the users.
A pro can tailor height and location to your household.
8) Pick slip-resistant flooring (and keep transitions smooth)
Wet bathroom floors are a hazard, full stop. Choose flooring with slip resistance in mindespecially in the shower zone. Also avoid thick
thresholds between rooms. Smooth transitions help prevent trips and make it easier for mobility aids.
Material ideas: Textured porcelain tile, certain vinyl products, and other slip-resistant surfaces can combine durability and traction.
9) Upgrade lighting: layers, not glare
Universal bathroom lighting means fewer shadows and better visibility. Use layered lighting: ambient ceiling light, task lighting at the mirror,
and a soft night light or toe-kick light for late-night trips.
Example: Sconces at eye level reduce shadows on faces far better than a single overhead “interrogation bulb.”
10) Add rocker switches and place them logically
Rocker switches are easier to use than small toggles, especially if someone has limited hand strength or is carrying something.
Place switches where you naturally reach when entering the room. Motion-sensor night lighting is also a strong universal design move.
11) Install a comfort-height toilet (and consider bidet features)
Comfort-height toilets can be easier to sit down on and stand up from. Add space for easy approach, and consider a bidet seat for hygiene and
independence (and because heated seats are one of modern civilization’s best ideas).
12) Choose a vanity with knee clearance or flexible storage
A floating vanity can make the room feel larger and allow knee clearance if someone needs to sit while using the sink. If you prefer a furniture-style
vanity, aim for drawers that glide easily and storage that doesn’t require deep bending.
Example: A shallow top drawer for daily items and deeper drawers below keeps things reachable without countertop clutter.
13) Pick lever-handle faucets (or touchless where it makes sense)
Lever handles are easier than knobs for many people and more convenient when your hands are soapy. Touchless faucets can add convenience, but
choose models with reliable sensors and easy manual override.
14) Make mirrors usable for different heights
A tall mirror is the simplest universal option. For more flexibility, consider a tilt mirror or placing the bottom edge low enough to work for
seated userswithout making standing users feel like they’re in a funhouse.
15) Use contrast to improve visibility (subtle, not circus)
Contrast helps people with reduced vision distinguish edges and controls. You don’t need high-contrast stripes everywhere; even subtle changes
like a slightly darker floor than the wall, or a distinct countertop colorcan improve clarity.
Example: Matte finishes reduce glare, which can be as important as contrast.
16) Build smarter storage: reachable, labeled, and not overhead-only
Universal design loves storage that doesn’t demand acrobatics. Use pull-out shelves, drawers, and compartments that keep essentials between shoulder
and knee height. If you do use upper cabinets, add lower open shelving for daily items.
17) Add ventilation that actually keeps up with real life
Good ventilation helps manage humidity, reduce mold risk, and keep the room comfortable. Look for quiet, efficient exhaust fans (bonus points for
humidity sensors or timers) so the fan runs long enough to do its jobwithout sounding like a small airplane.
18) Don’t forget electrical safety and convenience
Plan outlets where they’re easy to access for grooming tools, electric toothbrushes, or a night lightwhile following local electrical codes for
bathroom safety (like GFCI protection). Consider a dedicated outlet inside a drawer if you want clutter-free charging.
19) Design for cleaning: fewer grout headaches, better drainage
Universal design isn’t only about mobilityit’s also about reducing effort. Choose finishes and layouts that are easier to clean: larger-format tile,
minimal ledges, and shower niches placed where water doesn’t pool. If you’ve ever scrubbed mildewy corners with a toothbrush, you already understand
the mission.
How to Prioritize These Ideas (Without Blowing the Budget)
If you’re trying to get the most universal design impact per dollar, focus on upgrades that improve safety and layout first:
a safer shower entry, better lighting, slip-resistant flooring, and reinforcement for grab bars. Then layer in comfort upgrades like a bench,
handheld sprayer, comfort-height toilet, and smarter storage.
A simple “tier” approach
- High impact, moderate cost: Low-threshold shower, bench, handheld sprayer, layered lighting, ventilation upgrade.
- High impact, low cost: Blocking for grab bars, lever handles, rocker switches, non-slip strips or textured surfaces.
- Luxury-meets-universal: Heated floors, bidet seat, curbless shower with linear drain, custom drawer organization.
And always remember: universal design is not “all or nothing.” Even a handful of upgrades can dramatically improve comfort, safety, and resale appeal.
Real-World Remodel Experiences: 7 Lessons People Wish They’d Known Sooner
Universal design sounds wonderfully straightforward in theoryuntil you’re standing in a half-demolished bathroom, holding a tile sample in one hand
and a budget spreadsheet in the other, wondering if “spa-inspired” is still a vibe when your shower niche is exactly two inches too low.
Based on common remodel patterns homeowners and designers talk about, here are practical lessons that keep coming up.
Lesson 1: The shower is the main eventtreat it like one
Many people start by picking vanity lights or tile (understandable; tile is pretty), then realize later that the shower layout drives everything:
drain location, waterproofing method, slope, curb height, and where controls and grab bars can go. The homeowners who feel happiest long-term often
invested early planning time in the shower: where you enter, where water lands, and where you can sit or steady yourself. Even if you can’t go fully
curbless, lowering the threshold and improving traction can feel like a big upgrade every single day.
Lesson 2: “We’ll add grab bars later” is how people end up sad
The best universal design move is invisible: wall reinforcement. People frequently say they wish they had added blocking everywhere it might be useful
(shower, toilet area, even a long wall that could someday use a rail). It’s cheap when the walls are open, and expensive when tile is already in.
The funniest part is that you don’t have to install the bars nowjust make sure you can without a demolition sequel.
Lesson 3: Lighting fixes more problems than you expect
Remodelers often underestimate how much lighting affects safety and comfort. A bright ceiling fixture alone can create glare and shadows, especially
at the mirror. The “why didn’t we do this sooner?” moment usually happens after adding mirror task lights and a soft night light. People report fewer
stumbles, easier grooming, and a bathroom that feels more relaxing instead of harsh. It’s one of those upgrades that feels boring on a spec sheet and
life-changing in real life.
Lesson 4: Storage should be designed around real routines
It’s easy to build storage that looks good and still annoys you dailylike a deep cabinet where everything disappears into the back like it’s entering
a different dimension. The most successful universal design storage tends to be drawers, pull-outs, and “zones” for what you actually do: skincare,
shaving, hair styling, medications, first aid, cleaning supplies. People often say that once they stop stacking items on the counter, the whole room
feels larger and calmer.
Lesson 5: Materials matter, but finishes matter more than you think
Homeowners frequently focus on tile type but overlook finish and maintenance. Matte and lightly textured finishes can reduce slips and glare, and they
often hide water spots better than glossy finishes. People also learn (sometimes the hard way) that fewer grout lines generally means easier cleaning.
Larger-format tile, high-quality grout, and good ventilation combine into a bathroom that stays fresher with less effort.
Lesson 6: Small layout tweaks can beat “fancy upgrades”
Plenty of remodel stories include a moment of regret about spending on something flashy while living with a tight, awkward layout. Shifting a vanity a few
inches, re-centering a toilet, or choosing a door that doesn’t swing into the room can create a surprising amount of functional space. Universal design is
often about removing frictionliteral and metaphoricalso the room just works.
Lesson 7: The best universal design looks like good design
People are sometimes hesitant because they picture a bathroom that feels “medical.” But the most admired universal bathrooms usually look modern and intentional:
clean lines, thoughtful lighting, a shower you can glide into, and hardware that feels substantial. When bars match faucet finishes, when benches are built-in, and
when storage is organized, visitors often don’t even realize it’s universal designthey just think it’s a really nice bathroom. Which is the whole point.
If you’re remodeling now, you don’t need to predict every future need. You only need to build flexibility: safer floors, smarter lighting, better access, and the
ability to add support features later without tearing everything apart. Future You will be gratefuland Present You will enjoy a bathroom that’s easier to live in
starting on day one.