Table of Contents >> Show >> Hide
- Before You Plant: The 10-Minute Setup That Saves You Months of Regret
- 1) Build One “Hero” Foundation Bed (Small, Neat, and Impossible to Mess Up)
- 2) Add Crisp Edging (Because “Intentional” Often Looks Like a Straight Line)
- 3) Mulch Smart (Not Too Much, Not Too Close, Not a “Mulch Volcano”)
- 4) Plant in “Drifts” (Stop the Polka-Dot Planting)
- 5) Pick a Simple Color Palette (Your Future Self Will Thank You)
- 6) Create a Pollinator Pocket (Small Bed, Big Energy)
- 7) Use Shrubs for Structure, Then “Accessorize” with Flowers
- 8) Try a Mini Xeriscape Strip (Drought-Smart, Not “Rock Desert”)
- 9) Install a Simple Path (Even a Small One Changes Everything)
- 10) Use Matching Entry Containers (Instant Curb Appeal in One Afternoon)
- 11) Create a Dry Creek Bed (Pretty Drainage That Looks Like You Planned It)
- 12) Build a Small Rain Garden Near a Downspout
- 13) Replace High-Maintenance Bare Soil with Groundcovers
- 14) Add Drip Irrigation (Your Garden’s “Set It and Mostly Forget It” Upgrade)
- A Simple Maintenance Rhythm (So Your Front Yard Stays Cute)
- Conclusion: Start Small, Stay Consistent, Get the Compliments
- Real-World Newbie Experiences (So You Don’t Learn the Hard Way)
Your front yard is your home’s handshake. It meets the neighbors, waves at delivery drivers, and silently judges you when you drag the trash cans out in pajamas.
The good news: you don’t need a landscape architecture degree (or a small fortune) to make it look pulled together. You just need a plan that’s beginner-friendly,
forgiving, andmost importantlydoesn’t collapse into a weedy mess the moment life gets busy.
Below are 14 front yard garden ideas that prioritize curb appeal and sanity. Each one is designed for newbies: simple moves, clear payoff, and choices that scale
from “tiny weekend project” to “I guess I’m a garden person now.”
Before You Plant: The 10-Minute Setup That Saves You Months of Regret
A little prep keeps you from buying plants that “look cute” and then promptly melt, flop, or sulk. Do these quick checks first:
- Track sun: Note where you get full sun (6+ hours), part sun, or shade. Front yards often have tricky “morning sun, afternoon shade” patterns.
- Know your hardiness zone: Your zone helps you pick perennials and shrubs that can survive winter where you live.
- Get a basic soil test: It’s the fastest way to learn your pH and nutrients so you don’t “fix” the wrong problem with the wrong product.
- Call 811 before digging: If you’re trenching, edging, or planting trees/shrubs, do the safe thing and locate utilities first.
- Think in layers: Taller plants toward the house or center of beds, medium in the middle, low at the edges. It reads clean and intentional.
1) Build One “Hero” Foundation Bed (Small, Neat, and Impossible to Mess Up)
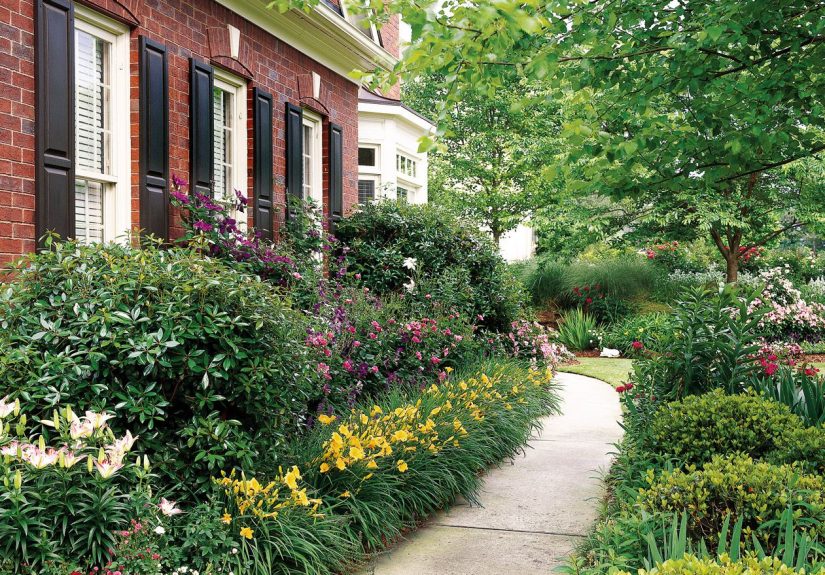
The easiest curb appeal win is a simple foundation bedone defined area near the front of the house that looks designed on purpose. Keep it beginner-sized:
a single bed that’s wide enough for plants to breathe (not a sad 8-inch strip hugging the foundation like it’s hiding from the HOA).
Beginner formula
- Backbone: 2–3 evergreen shrubs for year-round structure (choose a size that fits your space).
- Season: 3–5 flowering perennials for color (repeat varieties for a tidy look).
- Edge: Groundcover or low mounding plants to soften the border and block weeds.
Example combos (adjust to your climate): boxwood or inkberry holly + coneflower and catmint + creeping thyme; or hydrangea (if it suits your zone) +
hosta/heuchera in shade + sweet woodruff or pachysandra as a groundcover.
2) Add Crisp Edging (Because “Intentional” Often Looks Like a Straight Line)
Newbie gardens can look amazing and still feel messy if the border is fuzzy. Edging gives your beds a clean outline, keeps mulch where it belongs,
and makes the whole yard look cared forlike you own a matching set of socks.
Easy edging options
- Brick/pavers: Classic, tidy, and durablegreat for traditional homes.
- Metal edging: Sleek and modern; bends into gentle curves without drama.
- Stone edging: Natural look, especially good with cottage-style planting.
3) Mulch Smart (Not Too Much, Not Too Close, Not a “Mulch Volcano”)
Mulch is the beginner gardener’s best friend: it helps conserve moisture, reduces weeds, and makes beds look finished. The trick is applying it correctly.
Most garden beds do well with a moderate layer of organic mulchenough to cover soil, not enough to bury your plants like they owe you money.
Mulch rules that protect plants
- Keep mulch pulled back from stems and tree trunks so moisture doesn’t cause rot or invite pests.
- Refresh with a light top-up instead of piling on thick layers every year.
- Choose a consistent mulch type and color to make the front yard look cohesive.
4) Plant in “Drifts” (Stop the Polka-Dot Planting)
A common newbie move: one of everything. It’s charming… in a plant nursery cart. In the ground, it can look scattered. Instead, plant in drifts:
group the same plant in clusters (think 3, 5, or 7) to create bold, readable shapes from the street.
Drifts also simplify care. When the same plant is repeated, watering and trimming become consistent, and the garden looks designed even when it’s still young.
5) Pick a Simple Color Palette (Your Future Self Will Thank You)
If you’re new, limit your palette: choose two main bloom colors plus one “neutral” (white flowers or silvery foliage) and repeat them.
You can always add more laterlike seasoning. Start with salt and pepper before you go full hot sauce.
Beginner palettes that rarely fail
- Cool + calm: white + purple + silver foliage (salvia, catmint, dusty miller).
- Sunny: yellow + blue + lots of green (coreopsis, blue fescue, shrubs).
- Bold: pink + burgundy + chartreuse (echinacea, heuchera, bright foliage accents).
6) Create a Pollinator Pocket (Small Bed, Big Energy)
You don’t need acres to support pollinators. A small front-yard bed can provide nectar and habitat, and it looks livelymore movement, more color,
more “wow, your yard is thriving” vibes.
Make it beginner-proof
- Choose a handful of locally adapted native plants and stagger bloom times (spring through fall).
- Group the same plants so pollinators can find them easily.
- Skip pesticides when possible; your “help” can be their kryptonite.
- Add a shallow water dish with a few stones for perches.
7) Use Shrubs for Structure, Then “Accessorize” with Flowers
Flowers are fun, but shrubs do the heavy lifting. A couple of well-chosen shrubs give your front yard year-round shape, which means the garden looks good
even when perennials are sleeping. Then you can add seasonal color like you’re changing throw pillowsjust outside.
Try one flowering shrub as a focal point (like a hydrangea where it fits climate and exposure) and pair it with lower perennials and groundcovers for a layered look.
8) Try a Mini Xeriscape Strip (Drought-Smart, Not “Rock Desert”)
Xeriscaping is about water-wise design, not giving up on plants. A small drought-tolerant bed near a hot driveway or sunny sidewalk can look modern and intentional.
Use plants that handle heat, add gravel or mulch, and you’ll water less without sacrificing curb appeal.
Great “tough” plant types to consider
- Ornamental grasses for movement
- Low-water perennials (many salvias, sedums, yarrow-type silhouettes)
- Compact shrubs that don’t require constant trimming
9) Install a Simple Path (Even a Small One Changes Everything)
A path is both practical and pretty. It keeps feet off plants, creates a sense of arrival, and gives the eye a clean line to follow.
For beginners, pick a straightforward material: stepping stones set in mulch, a gravel path with edging, or simple pavers.
Beginner tip
Make the path wide enough to walk comfortably (and wide enough for a future wheelbarrow if you level up your gardening ambitions).
10) Use Matching Entry Containers (Instant Curb Appeal in One Afternoon)
If you want results today, containers are your cheat code. Two matching pots flanking the entry read “designed” immediately.
Use the classic container formula: a tall “thriller,” a mounding “filler,” and a trailing “spiller.”
Easy container combo ideas
- Ornamental grass (thriller) + petunias (filler) + sweet potato vine (spiller)
- Dwarf evergreen (thriller) + seasonal annuals (filler) + creeping Jenny (spiller)
11) Create a Dry Creek Bed (Pretty Drainage That Looks Like You Planned It)
If your front yard gets soggy during storms, turn the problem into a feature. A shallow “dry creek” of river rock can guide runoff away from sensitive areas.
It adds texture and looks intentionallike your yard has a tiny, stylish infrastructure department.
Pair it with moisture-tolerant plants along the edges and keep the rock line crisp with edging for a clean finish.
12) Build a Small Rain Garden Near a Downspout
A rain garden is a planted basin that captures runoff and helps it soak into the ground. If you have a downspout that dumps water in one spot,
this can reduce puddling and create a lush mini-garden at the same time.
Beginner-friendly placement
- Pick a spot where water naturally flows, but not right against your foundation.
- Choose plants that tolerate both wet and dry cycles (many native perennials excel here).
- Start small: even a modest rain garden can make a difference.
13) Replace High-Maintenance Bare Soil with Groundcovers
Bare soil is basically an invitation to weeds. Groundcovers fill space, reduce erosion, and make beds look lush.
They’re especially helpful for newbies because they reduce the amount of hand-weeding required.
Groundcover “roles”
- Sunny edges: creeping thyme, sedum-type groundcovers, hardy ice plant in suitable climates
- Shade: sweet woodruff, some ajuga varieties, and other region-appropriate shade groundcovers
- Between stepping stones: low growers that tolerate light foot traffic (again: creeping thyme is famous for this)
14) Add Drip Irrigation (Your Garden’s “Set It and Mostly Forget It” Upgrade)
New gardens fail more often from inconsistent watering than from “bad plant choices.” Drip irrigation delivers water slowly at the root zone,
helping plants establish with less waste. For beginners, a simple drip line with a battery timer can be a game changer.
Why newbies love drip
- Less time standing outside with a hose, negotiating with mosquitoes
- More consistent moisture for stronger roots
- Water goes where plants are, not where the wind sends it
A Simple Maintenance Rhythm (So Your Front Yard Stays Cute)
Curb appeal isn’t about perfectionit’s about looking intentionally cared for. Here’s a low-effort routine that keeps a front yard garden looking sharp:
- Weekly (10–15 minutes): pull obvious weeds, deadhead a few spent blooms, check moisture, tidy edges.
- Monthly: top up thin mulch spots, prune lightly if needed, watch for pests before they become a soap opera.
- Seasonally: refresh containers, divide overly enthusiastic perennials, and consider leaving some stems/leaves in less-visible areas to support beneficial insects.
Conclusion: Start Small, Stay Consistent, Get the Compliments
The best front yard garden is the one you can actually maintain. Pick one or two ideas from this list, execute them neatly, and let the garden grow into itself.
Clean edges, thoughtful repetition, and the right plants in the right place will do more for curb appeal than any complicated, high-maintenance design.
Real-World Newbie Experiences (So You Don’t Learn the Hard Way)
Let’s talk about the part no one puts in the glossy photos: the early days when you’re excited, slightly overconfident, and your garden tools are still shiny.
New gardeners tend to run into the same “oops” moments, and they’re completely normal. Here are the experiences that come up again and againand how to handle
them without spiraling into “I guess I’m a houseplant person now.”
Experience #1: The Nursery Blackout. You walk into a garden center for “a few shrubs,” and suddenly you’re loading your trunk with six
flowering perennials, two ornamental grasses, and a plant tag that says “full sun” even though your front yard is mostly shade. It happens because plants in
pots look like instant success. The fix: treat the first trip like a scouting mission. Take photos of your yard, note sun patterns, and choose plants that match
your conditions. If you do impulse-buy, make it something flexiblelike containers that can move while you learn your sun.
Experience #2: The Too-Close Planting Problem. Newbies often plant based on how things look today, not how they’ll look next year.
Shrubs and perennials grow. Some grow a lot. The garden looks amazing for three months, then turns into a crowded middle-school hallway by late summer.
You’ll know it’s happening when airflow disappears and everything flops onto the sidewalk. The fix is boring but magical: follow spacing recommendations,
or at least give plants room to expand. If you already planted too tightly, don’t panicmove or divide in the right season, and use mulch or a small annual
to fill gaps temporarily.
Experience #3: The Mulch “Fix.” When weeds appear, the instinct is to dump more mulch until the bed resembles a freshly frosted cake.
But too much mulch can cause problems, especially around trunks and stems. The better move is a moderate layer applied correctly, with weeds removed first.
If weeds pop through later, it doesn’t mean you failed; it means seeds exist on planet Earth. Pull the small ones early and top up thin spots lightly.
Experience #4: The Watering Guessing Game. Many first-time gardeners water on a schedule (“every day!”) or not at all (“it rained once”).
Plants prefer consistent moisture while establishing, then deeper, less frequent watering. You’ll get better results by checking soil moisture a few inches down
rather than judging by surface dryness. If you want the easiest version of this experience, drip irrigation plus a timer is basically gardening on friendly mode.
Experience #5: The “Why Does My Garden Look Messy?” Mystery. Even good plants can look chaotic if the edges are fuzzy and the shapes are random.
This is why beginners get such a dramatic upgrade from simple edging, repeated plant groupings, and a limited palette. The fix is often not “buy more plants.”
It’s “make the existing ones look intentional.” Crisp borders, repeated clusters, and a defined path can make a young garden look finished before it fills in.
Experience #6: The First Compliment (and the Sudden Urge to Do More). Once someone says, “Your front yard looks great,” you’ll want to expand
everything immediately. That’s how a manageable garden becomes a sprawling weekend job. The best move is to add in phases: one bed, one path, one container upgrade.
Let each section teach you something about your yard before you scale up. Gardening is a long game, and curb appeal gets better when you build a simple structure
first and then decorate with color.
If you take nothing else from these real-world moments, take this: start neat, start small, and give yourself room to learn. A front yard garden doesn’t need to
be complicatedit just needs to look loved.